
Make a mason jar snowman using simple craft store supplies! This is a perfect Christmas project for a beginner; great for gifts or decor.
Skills Required: Beginner. It helps to have a bit of experience with Mod Podge since you’re going to be using tissue paper and it can wrinkle. Having said that, newbies can do this project if they follow the instructions closely.

This year I’m embracing a trend fully that has been around for ages . . . mason jar Christmas crafts.
There’s just something about mason jars that makes them conducive to Christmas crafting. I recently did a Santa mason jar, and I love the way it turned out!
It might be the smooth surface or the compact size, but they are perfect for beginning crafters who want to make Christmas decor.
They’re great for giving as handmade gifts . . . especially when you add candy or other edible goods. They also look great on a Christmas mantel.
But what I really love about mason jars is their innate ability to be transformed into practically anything, including a snowman!
And that’s exactly what I did with a mason jar. I turned a simple glass vessel into Frosty the mason jar snowman. Didn’t he turn out so cute?
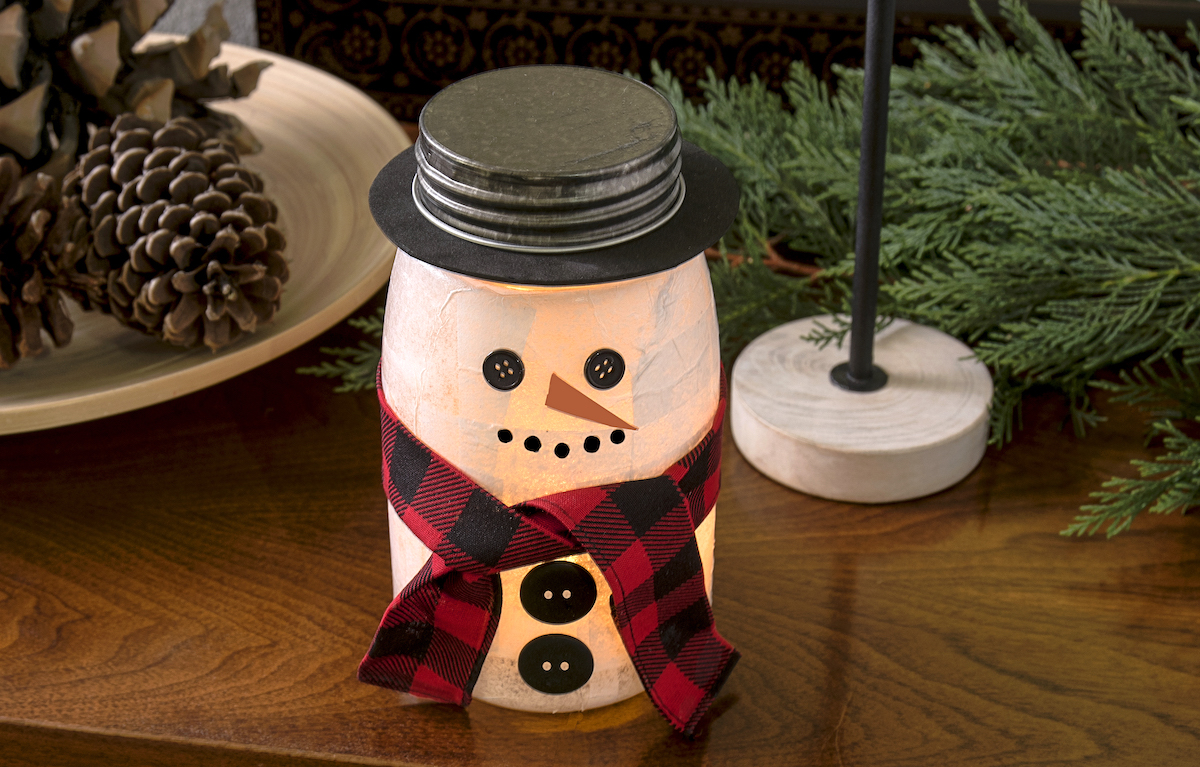
You’re going to complete this project in five simple steps: cut the tissue paper, apply it to the jar with Mod Podge, make and add the scarf, add the buttons and face, then finish with the hat.
Before you jump into the craft, I want to mention something you should know about Mod Podge and tissue paper.
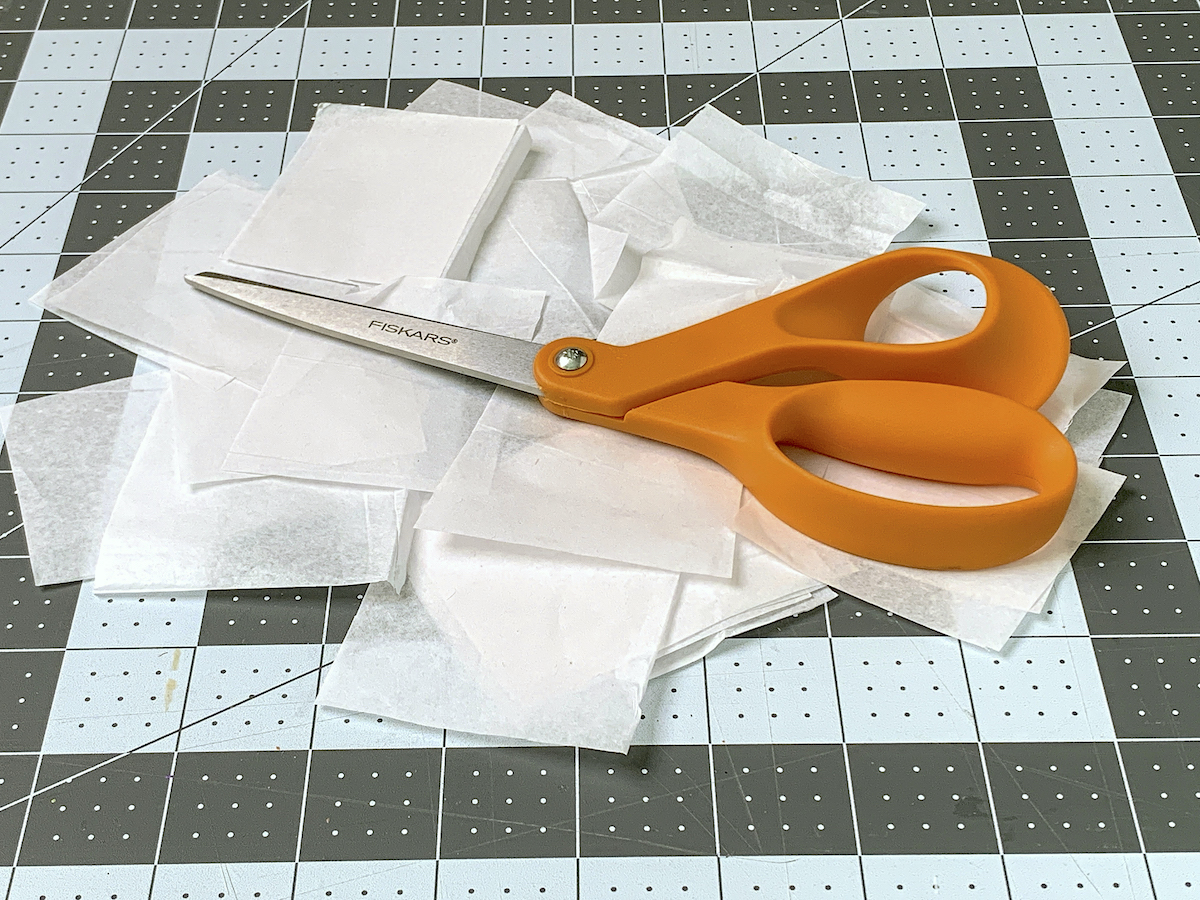
It’s kind of difficult to use decoupage medium and tissue paper without wrinkles, which is why you’ll cut the tissue into squares.
While this doesn’t completely eliminate wrinkles, it helps diminish them. And if you do get wrinkles in your project? Embrace them. It doesn’t take away from the finished project – trust me.
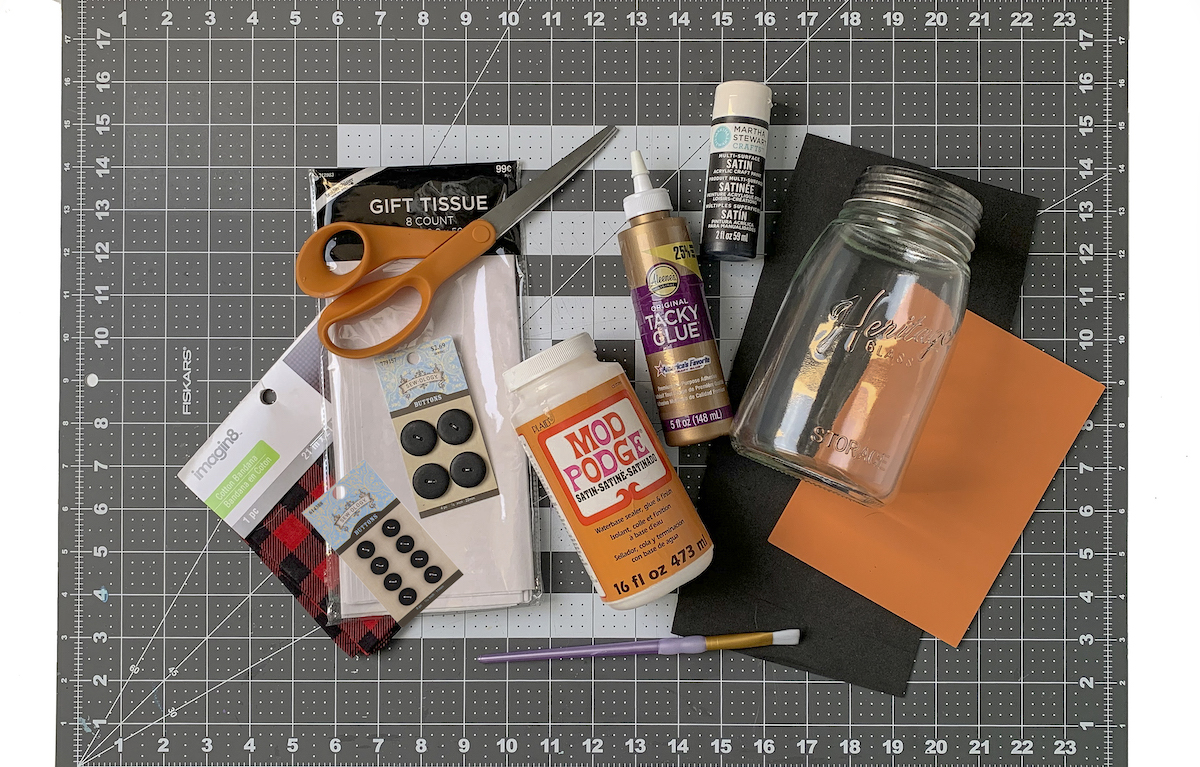
Gather These Supplies
- Mason jar
- White tissue paper
- Mod Podge Satin (or Gloss, Matte)
- Acrylic paint – black
- Black felt or craft foam
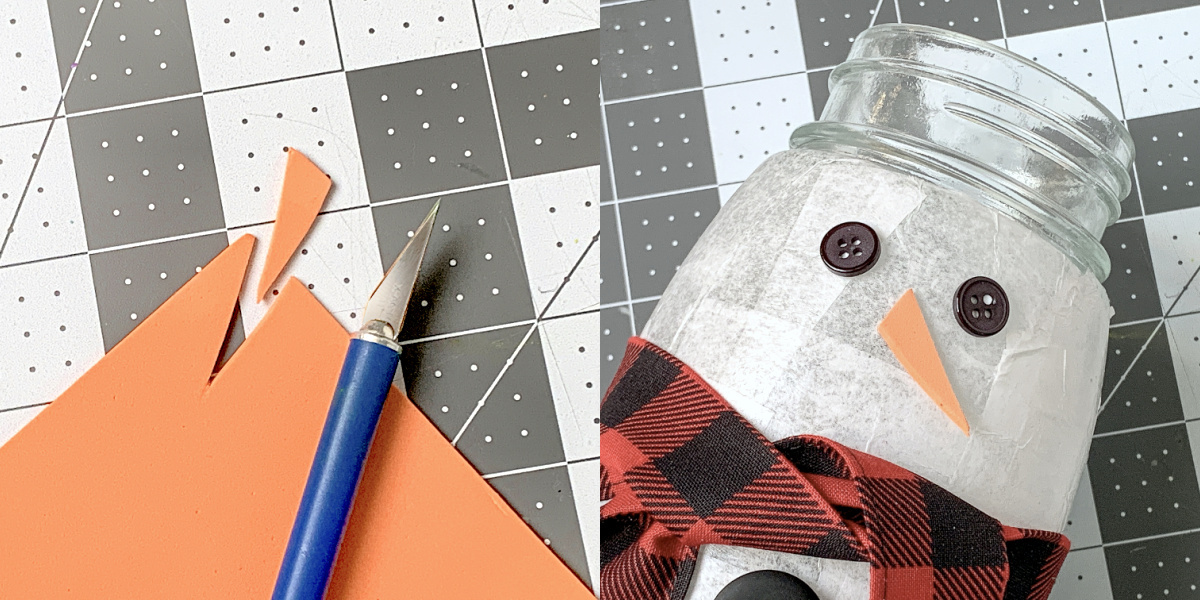
- Orange felt or craft foam
- Bandana or fabric for scarf – pattern of your choice
- Black buttons – two small, two large
- Craft glue
- Scissors
- Craft knife
Tips and Thoughts for This Project
Before you begin, you’re going to want to clean the mason jar. You are removing oils from fingers – oils that repel Mod Podge. Read my guide for Mod Podging on glass. I also have a guide on sticker removal.
I used orange and black craft foam because that’s what I had on hand, but you can use felt. Or even cardstock.
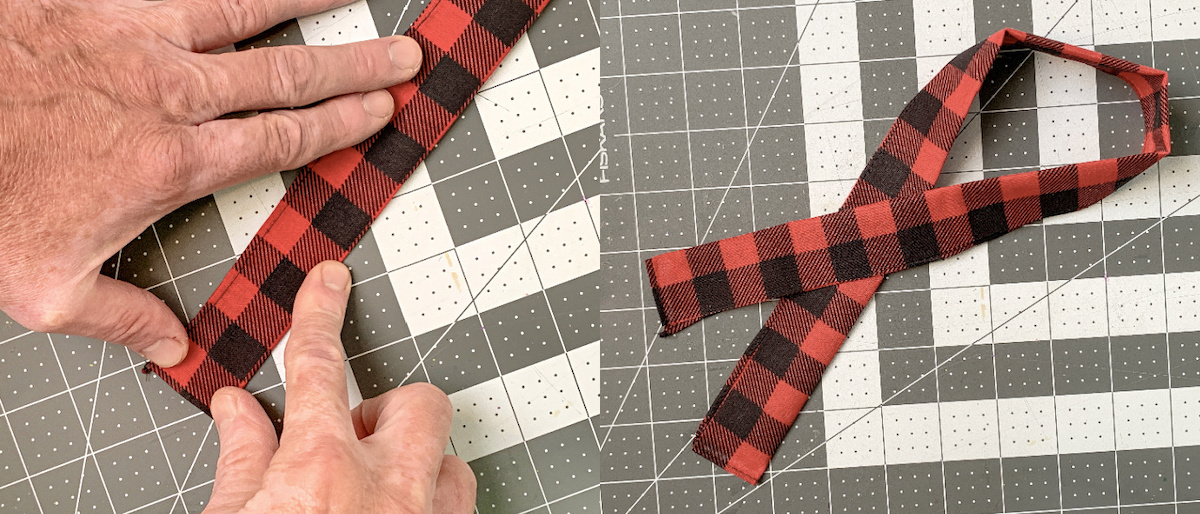
I made Frosty’s scarf out of a 21″ square buffalo plaid bandana I had in my stash. You could use felt, fabric (think scraps or a sock without a pair), or even knit a small scarf if you are so inclined. Use what’s in your stash!
If you find you have a gold or silver ringed mason jar, you can paint it with black acrylic paint. Luckily, mine was kind of dark silver-y so the black craft foam went well.
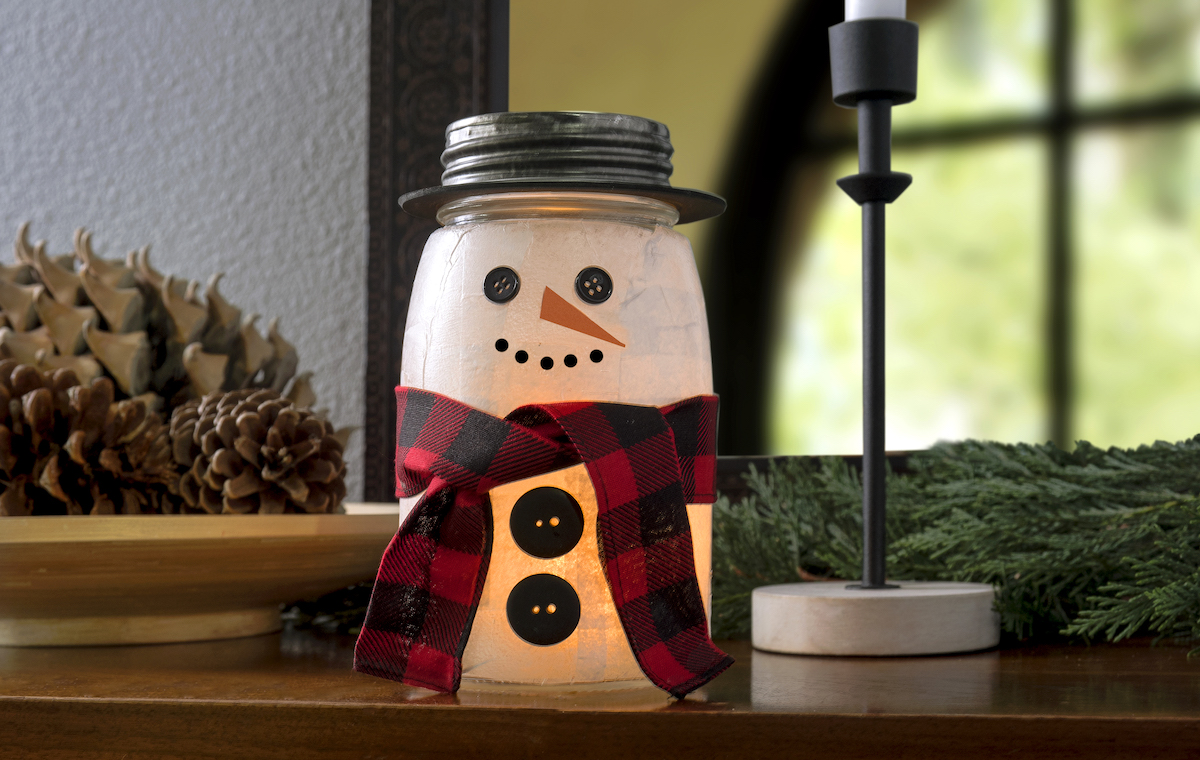
When the snowman mason jar is done, you can use an LED candle to light it up! Or obviously, add candy. If you use a real tealight, don’t put the circle in the middle of the ring when you screw it on.
Yes, you can use a real tealight. Mod Podge is non-flammable, and also it is on the outside of the jar.
Note: please never leave real candles unattended due to fire danger. Safety first!
Of course, you can also use this for gifting of candy/edible goods, for a new homeowner, or as a teacher gift. There are so many possibilities, and this mason jar snowman will definitely put a smile on anyone’s face.
Winter might be dark and cold, but Frosty is always happy and bringing good wishes. You gotta love that.

Mason Jar Snowman
Equipment
Materials
- Mason jar(s)
- White tissue paper
- Mod Podge Satin
- Acrylic paint black
- Black felt or craft foam
- Orange felt or craft foam
- Bandana or fabric for scarf
- 4 Black buttons two small, two large
- Craft glue
Video
Instructions
- Cut a piece of white tissue paper into squares using the scissors. You're going to apply this to the mason jar so make sure the pieces aren't too big.
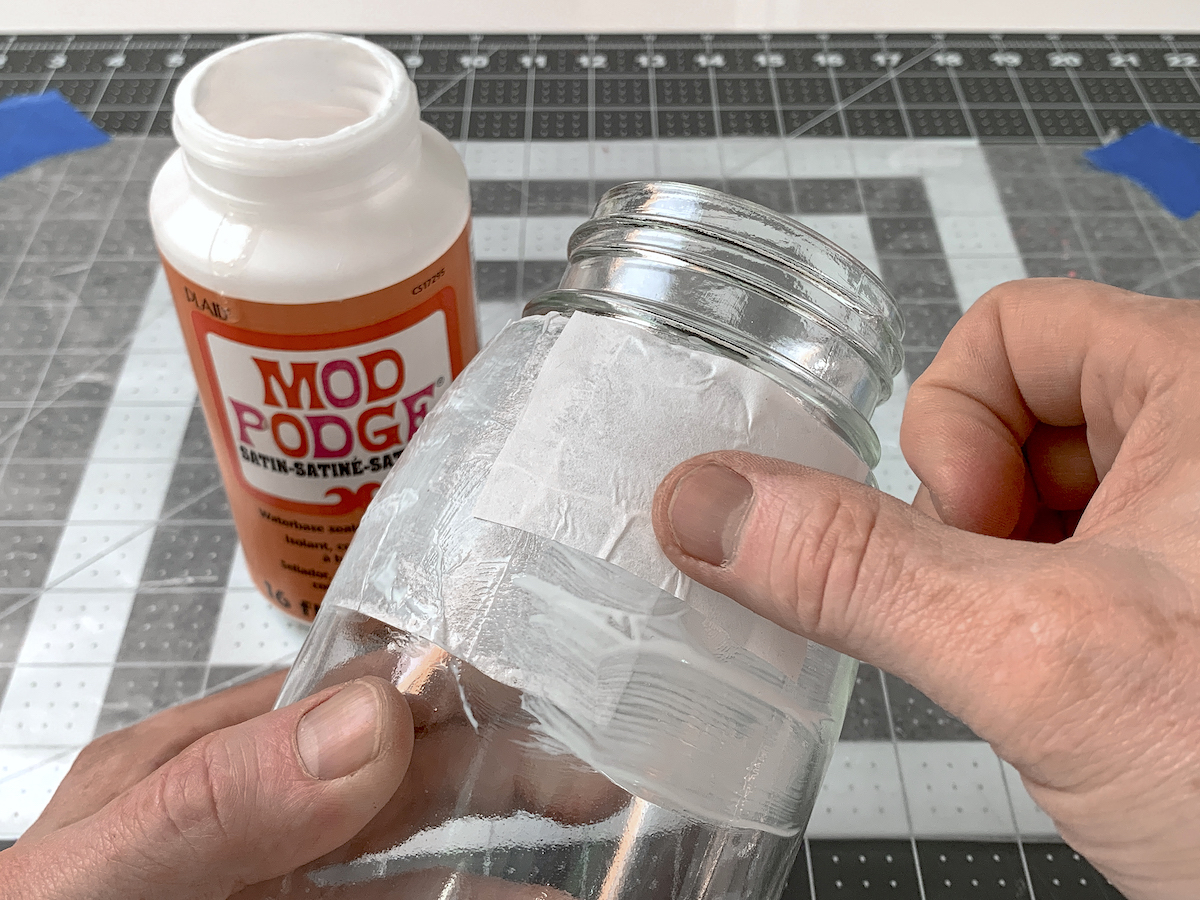
- Working one section at a time, apply a layer of Mod Podge to the mason jar. Place the white tissue paper down and brush over the top to secure.
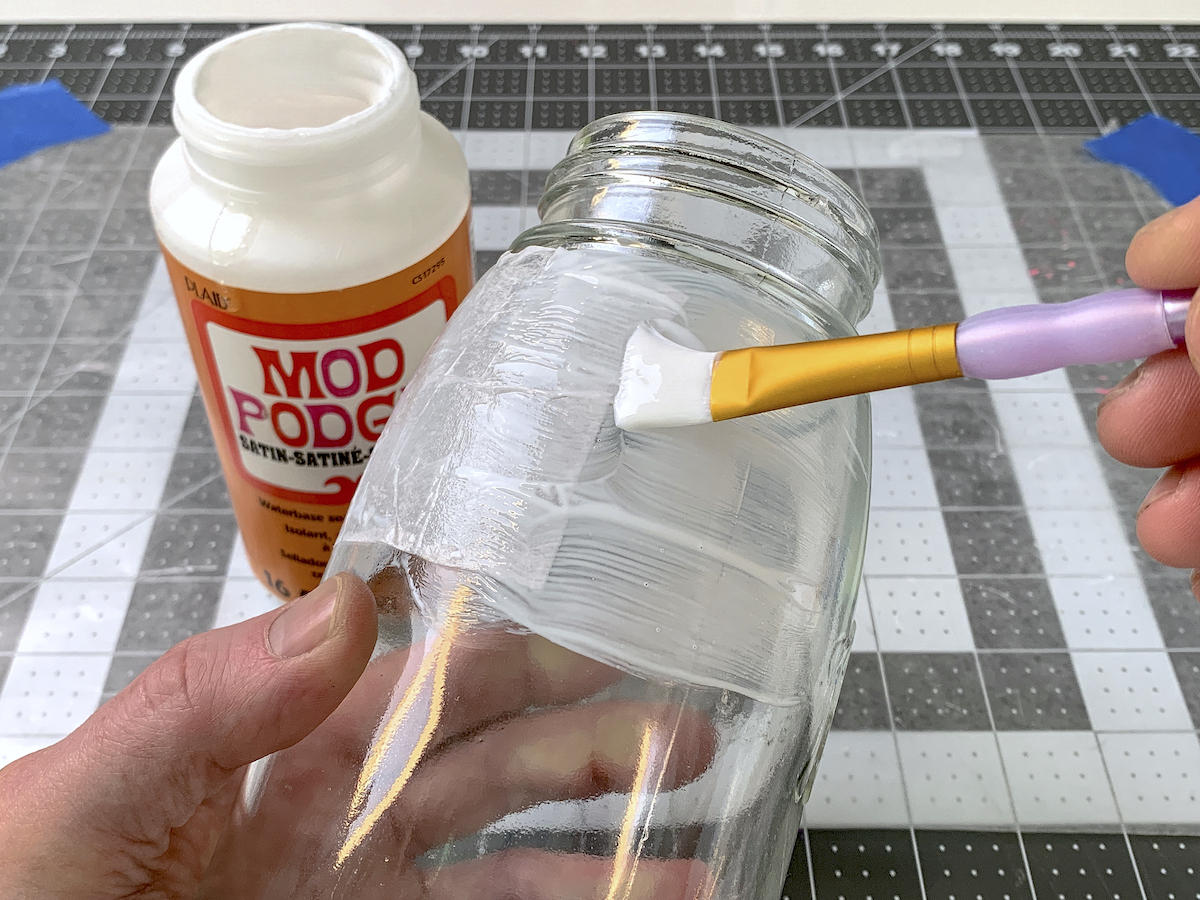
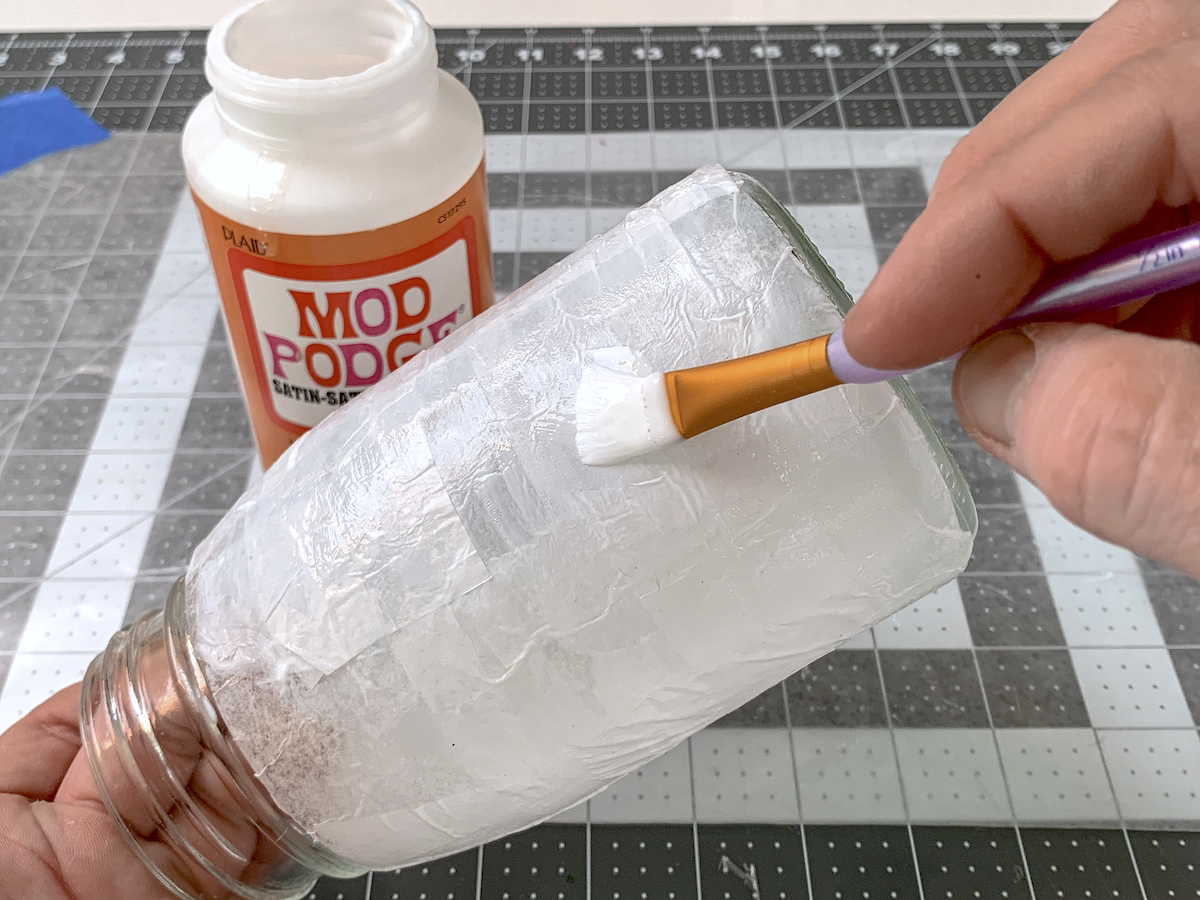
- Repeat this step until the entire jar is covered. Lightly smooth the tissue with your fingers and let dry.
- Apply a top coat of Mod Podge over the entire jar and let dry.
- Cut a 2" x 21" (approximate) piece of fabric or bandana.
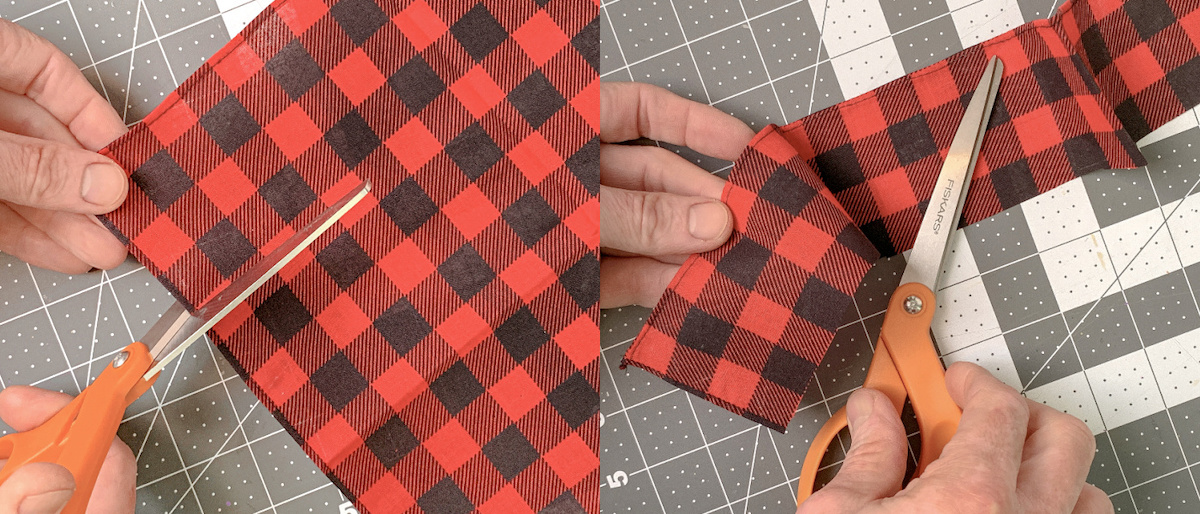
- Fold this 2" piece in half and smooth with your fingers. If it's not cooperating, you can also iron to make it flat. Tack the scarf to itself to keep it folded with some craft glue. Let dry.
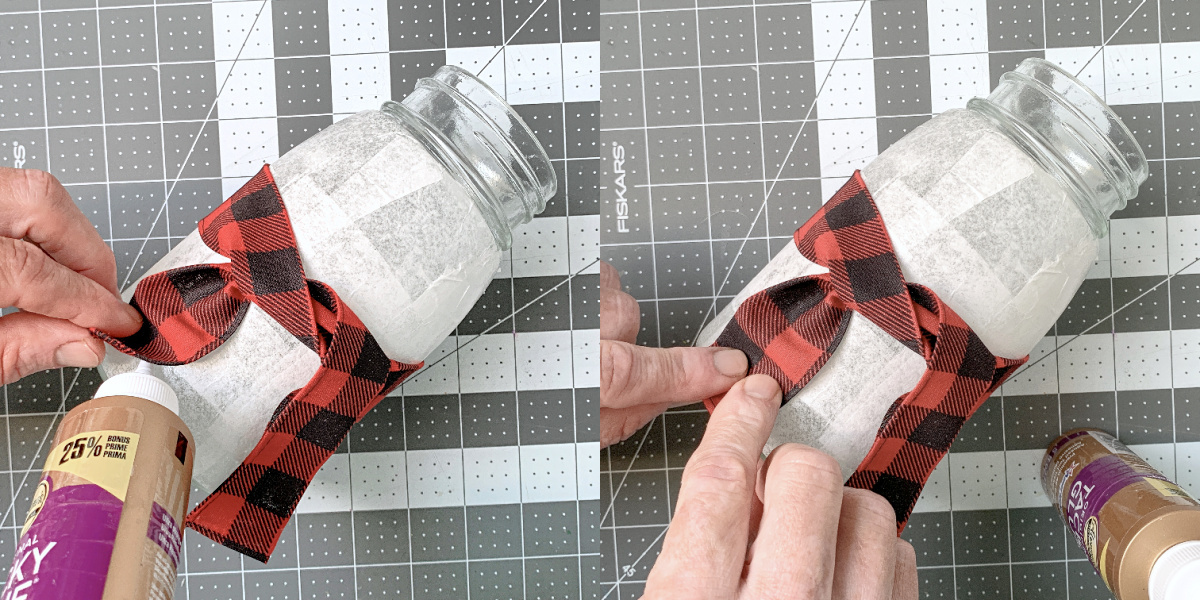
- Wrap the scarf around you snowman as shown. Use the craft glue to tack the bottom pieces of the scarf to the jar. You might need to hold for several seconds until it stays. Let dry.
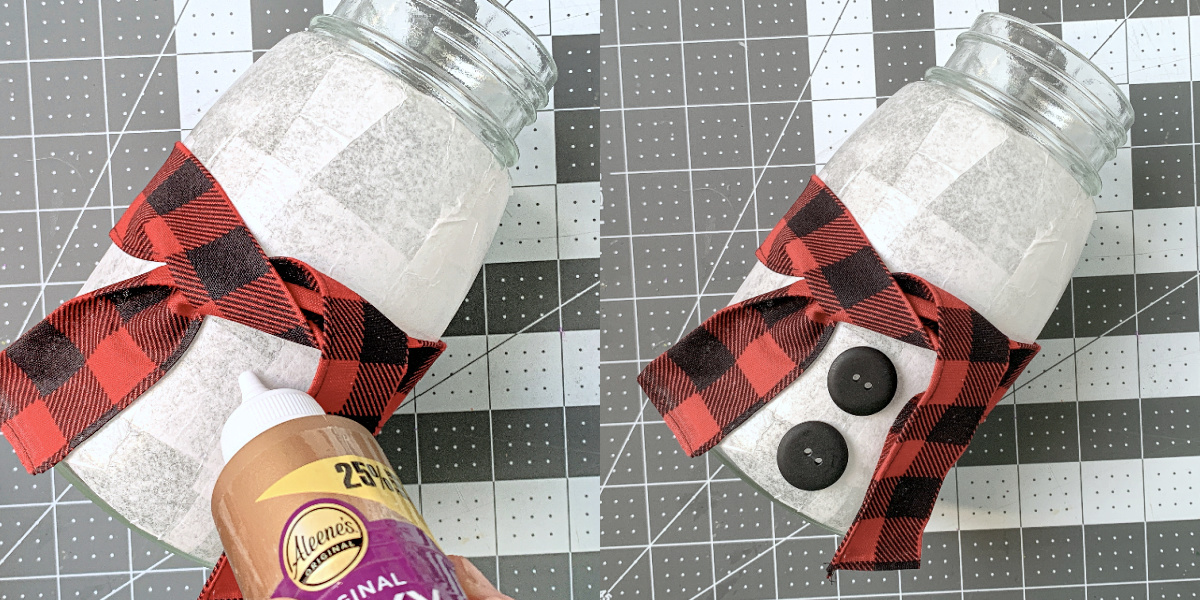
- Glue two large black buttons to the front under the scarf. Let dry.
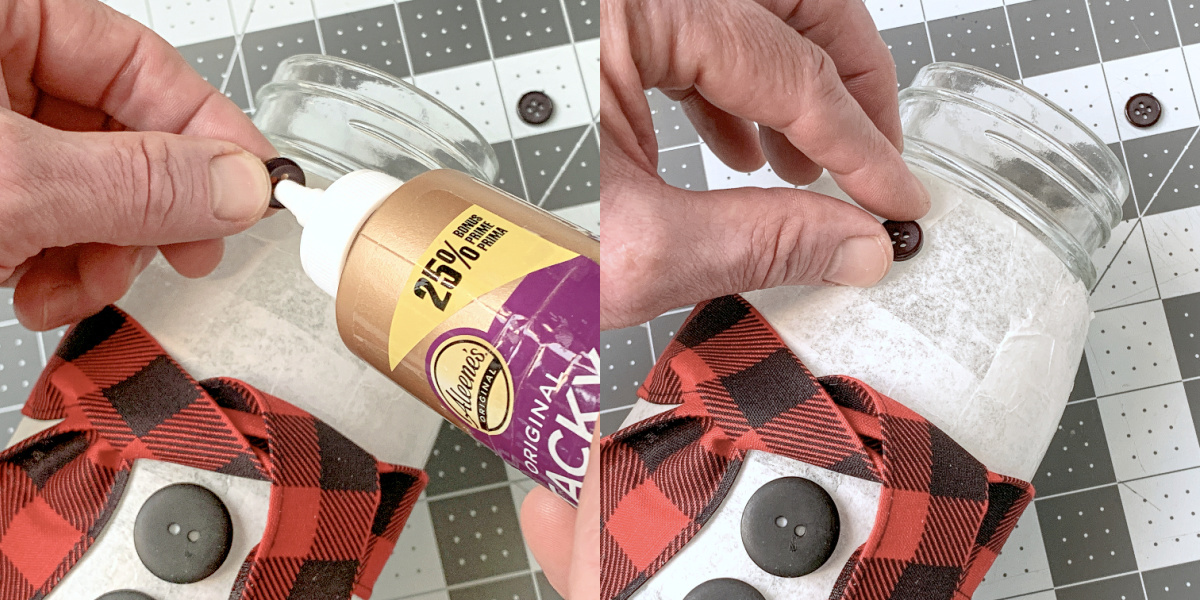
- Glue two small black buttons to the front above the scarf to act as eyes. Let dry.
- Cut a nose from orange craft foam or felt and attach to the front with glue. Let dry.
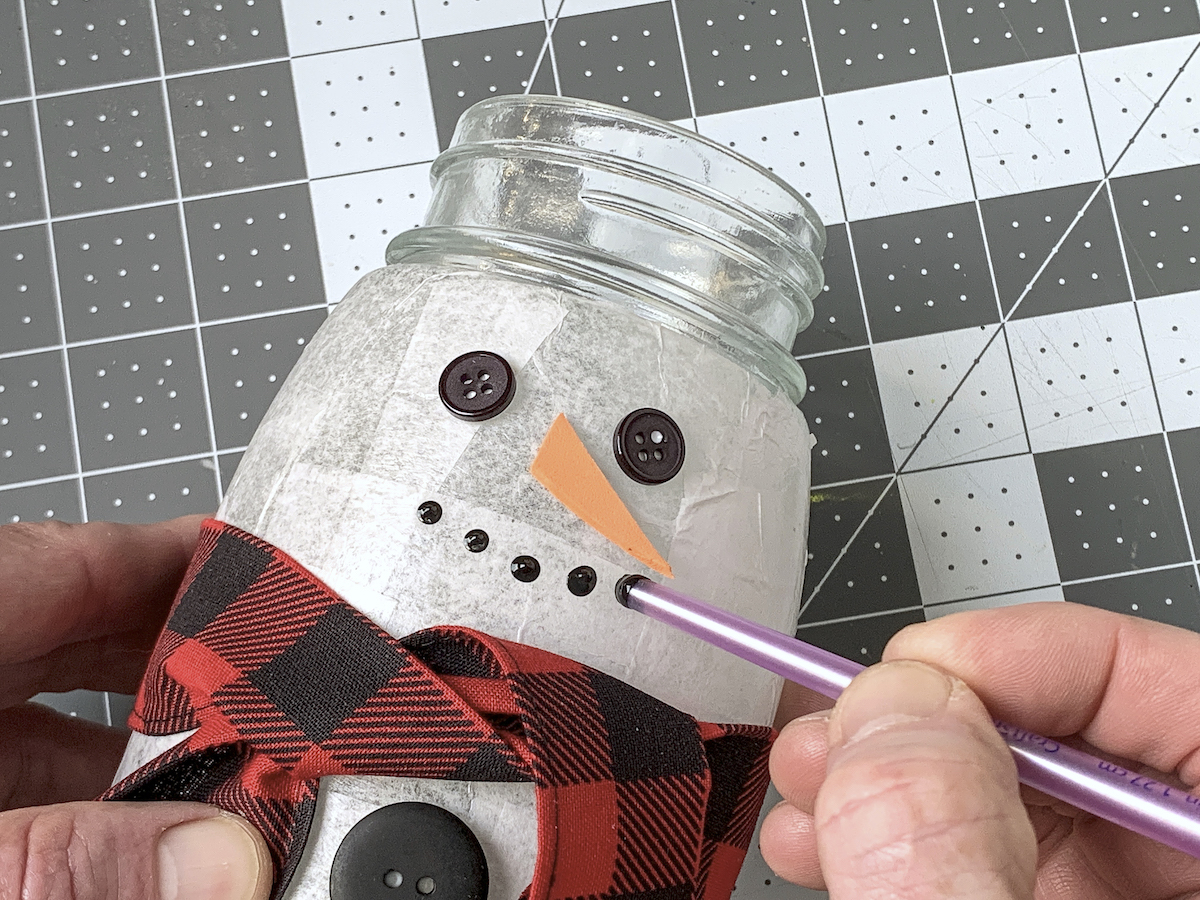
- Use your paintbrush end and black acrylic paint to make dots for the mouth on the face. It helps to start in the middle and work outwards so everything is properly placed.
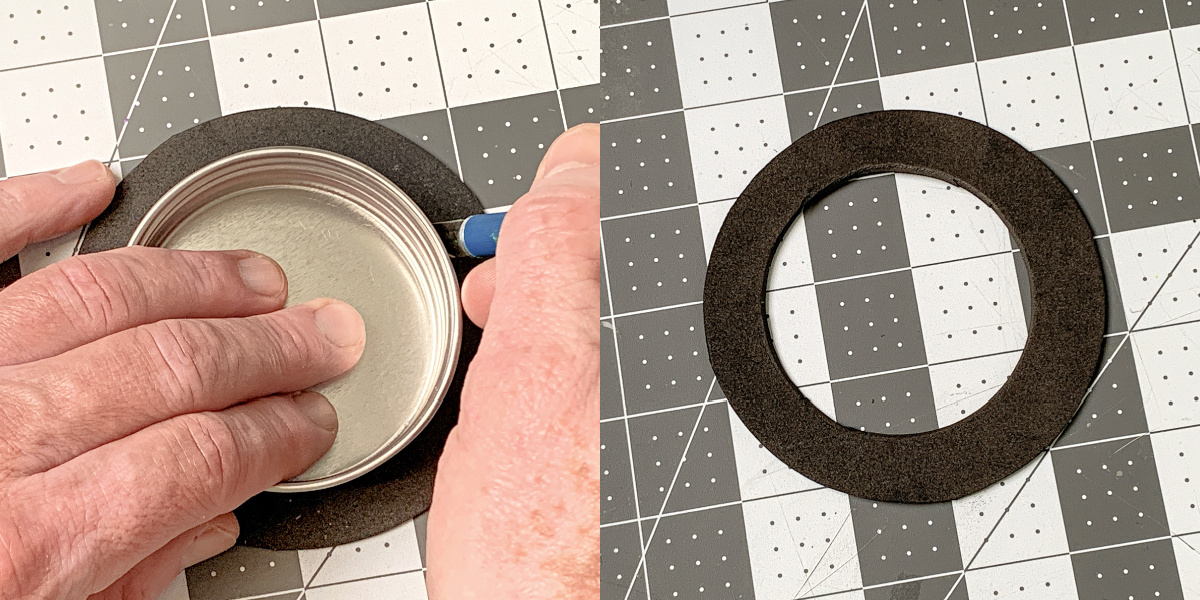
- Trace a circular object larger than the lid onto the craft foam or felt and cut out.

- Trace the jar lid onto the center of your new circle and cut out.
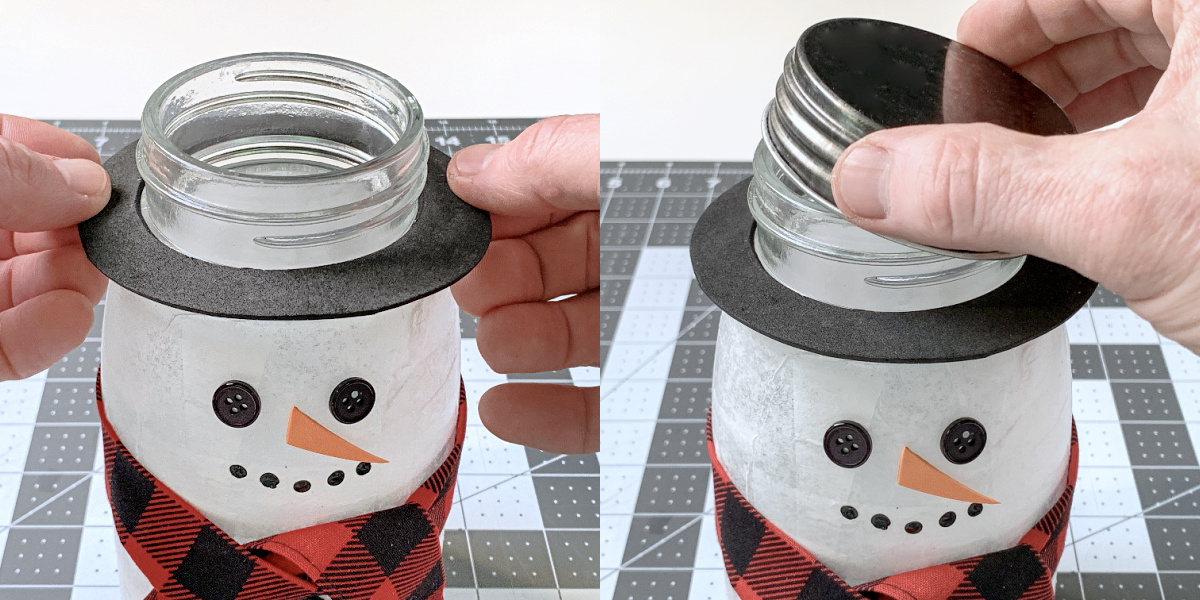
- Place the brim you just created onto the mason jar and screw the lid on top to finish.
Notes
Did you enjoy my Frosty mason jar? If you make him, let me know in the comments! I’d also love for you to check out these other holiday project ideas:


What about using Epsom Salt instead of White tissue paper
This was a super fun project for my daughter and I to make! It’s going to be a Christmas present for her brother!
Yay! Glad you liked it.
Can you please tell me how many ounces your mason jar is for the snowman?
Yes it is a 16 oz jar!
Thank you for a wonderful craft. I love snowmen and intend to make a few of these.
Clear instructions.
beautiful and easy!!
I appreciate it Sandy!
OMG, that is so cute!
Thank you so much Terry!
REALLY cute! Great job – very classy snowman!
Thank you so much Janet!
I love your snowman. It is so simple to do. Thank you for your idea.
Thank you so much Carole! I hope you enjoy it!