
Are you curious what the Mod Podge finishes look like when they are dry? Scroll down for a handy dandy guide! Very informative. Also get a video about the formulas at the end of the post.
I get A LOT of questions about using Mod Podge as a finish (learn to Mod Podge here!). After all, you can decoupage with it, but after you are done, you can use it as a finish!
But how are the Mod Podge finishes going to look at the end of your project? Will they be shiny or what? That is one of the most common questions I get!
This visual guide is going to show you how each Mod Podge formula looks after you paint it onto your project and let it dry. I used a regular, soft bristle paint brush on paper.
In addition to viewing my samples, you should also:
Visit my Mod Podge formula guide to get learn more about these and additional Mod Podge formulas. If you click on the names of the formulas below you’ll get more details (including projects) as well.
To reduce brushstrokes from any of these formulas, use a soft bristled brush and then sand between coats. To do this, apply the Mod Podge and let it dry an hour.
Then use #0000 steel wood and lightly sand the entire surface. Do this between every coat. After the final coat, sand and then spray a clear acrylic sealer to finish.
Mod Podge Finishes
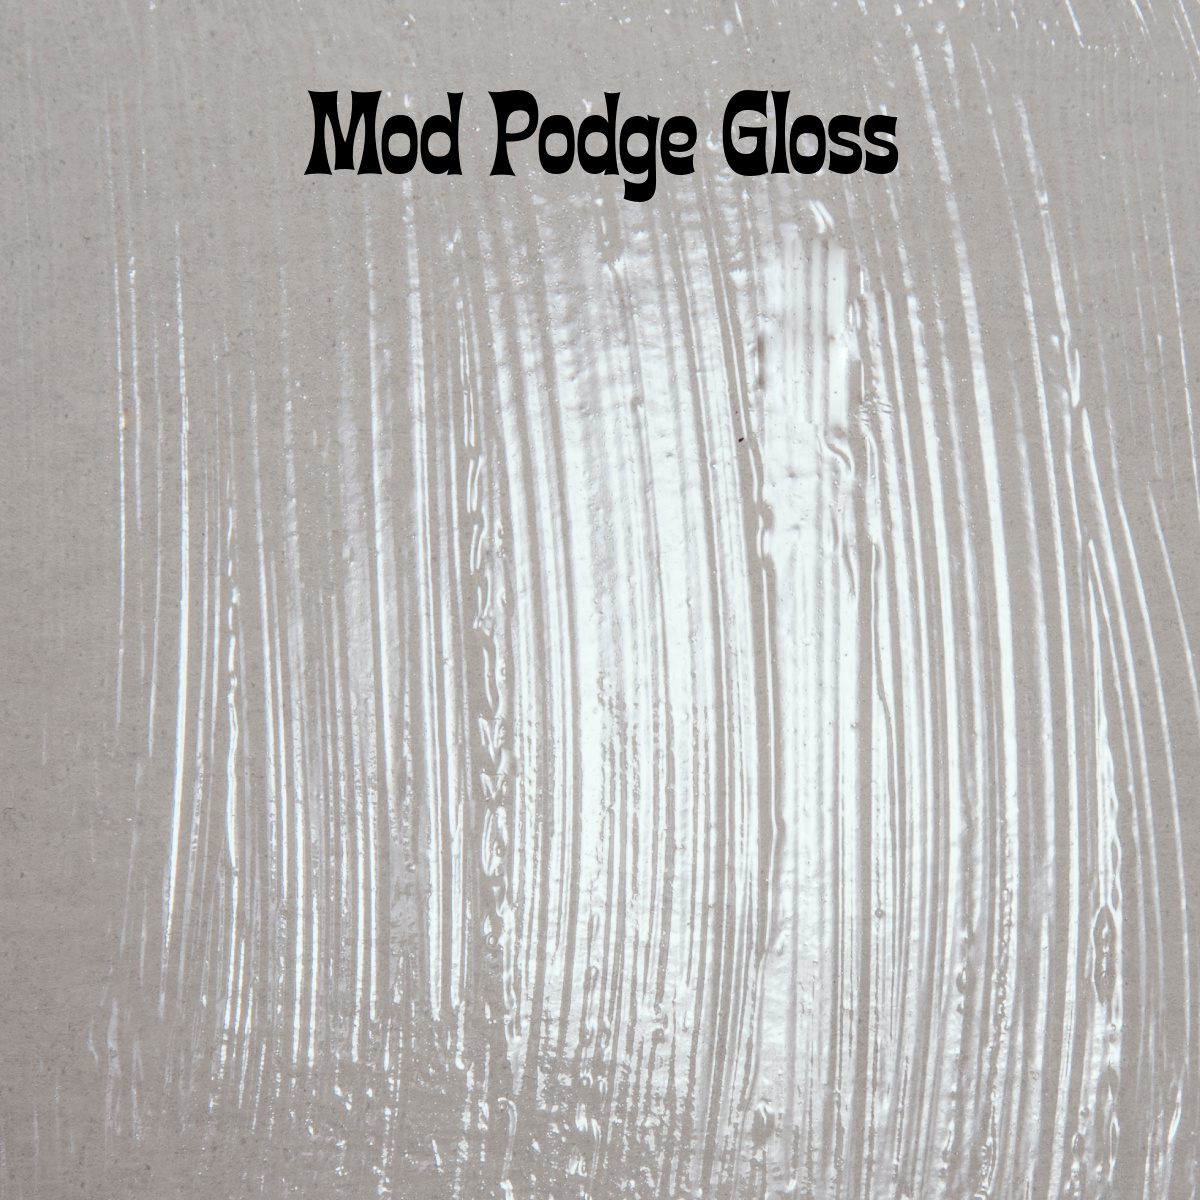
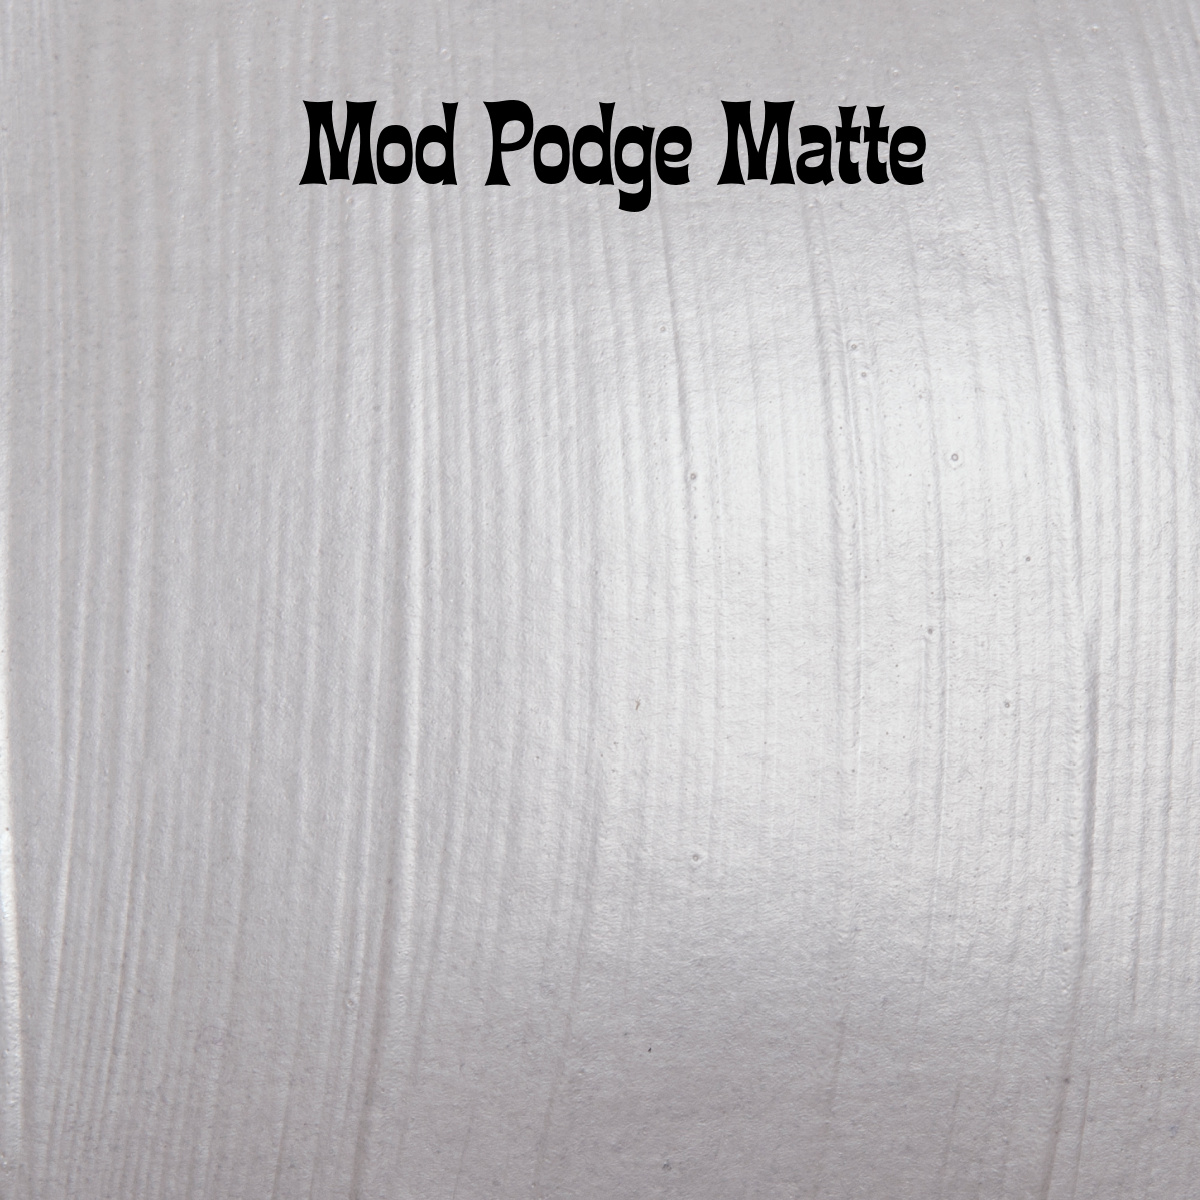
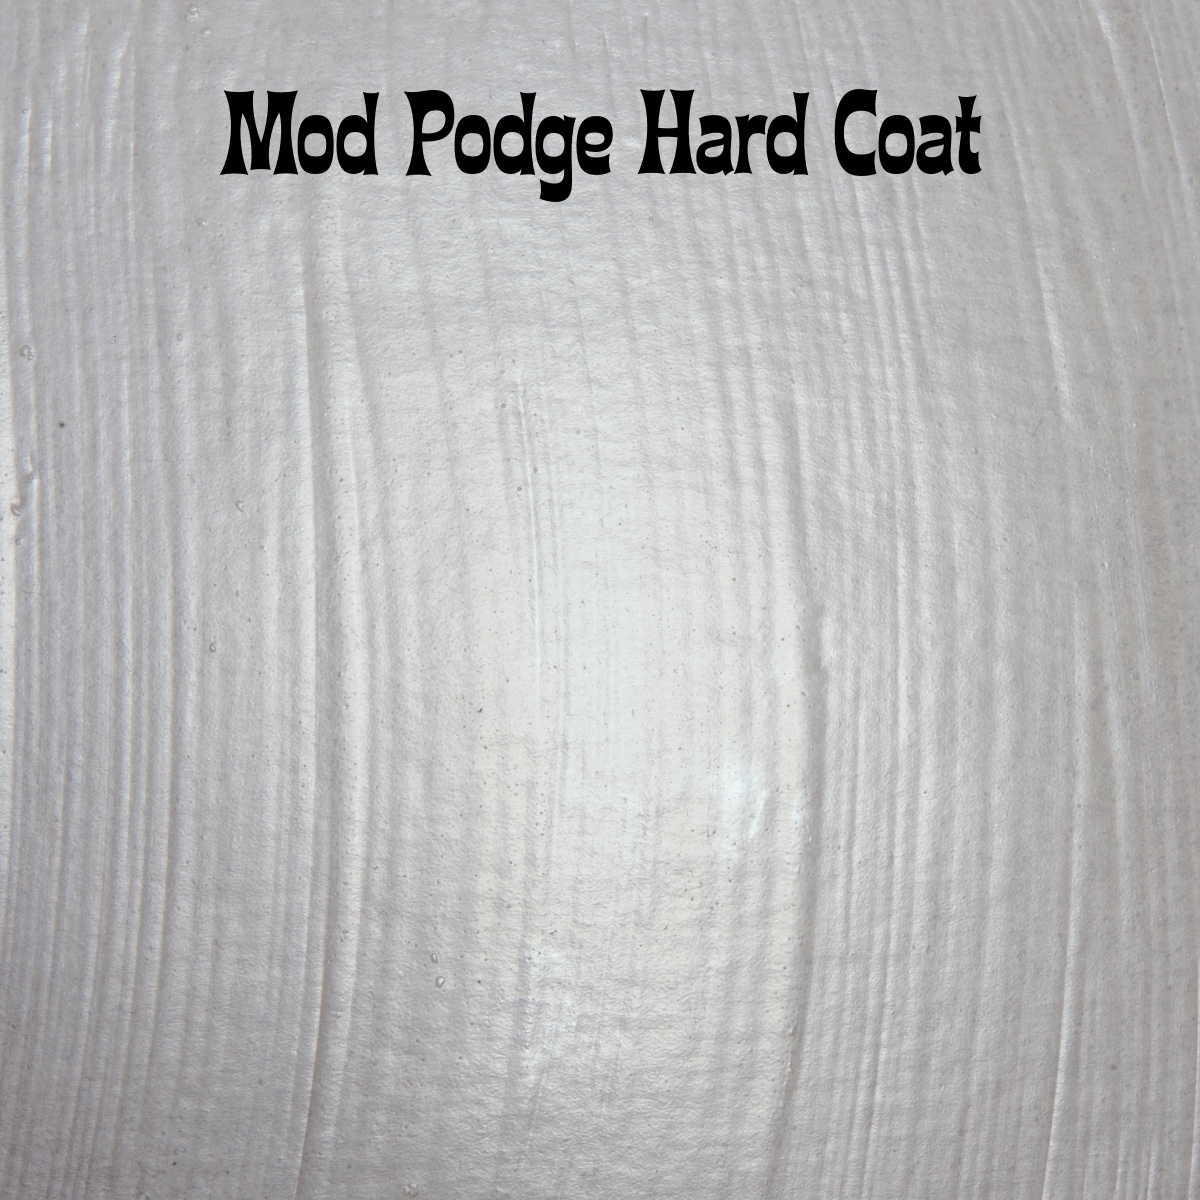
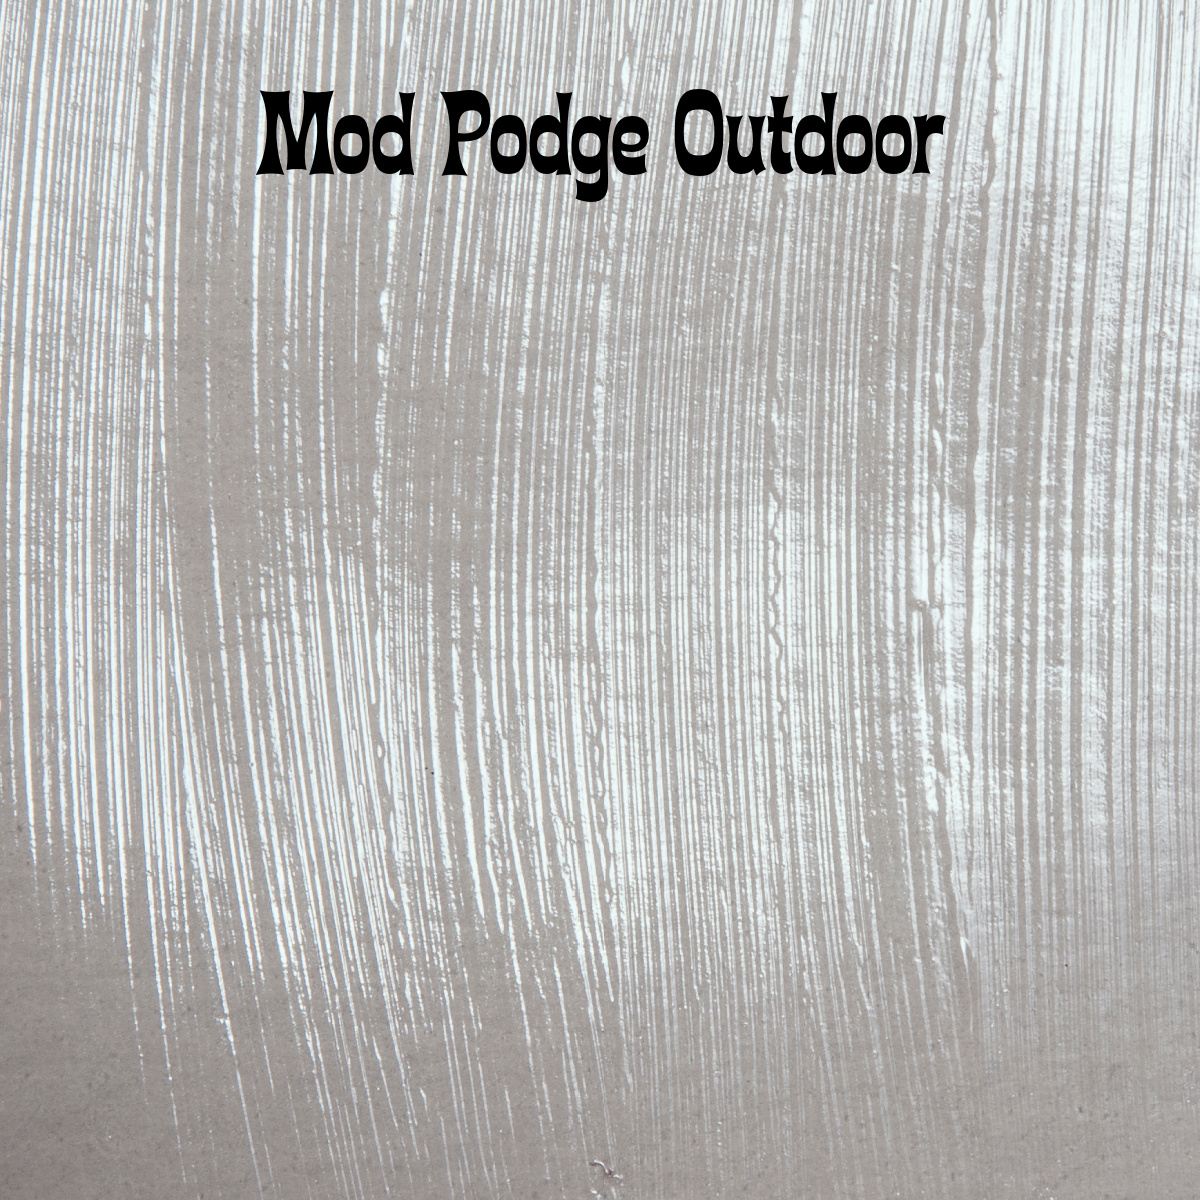
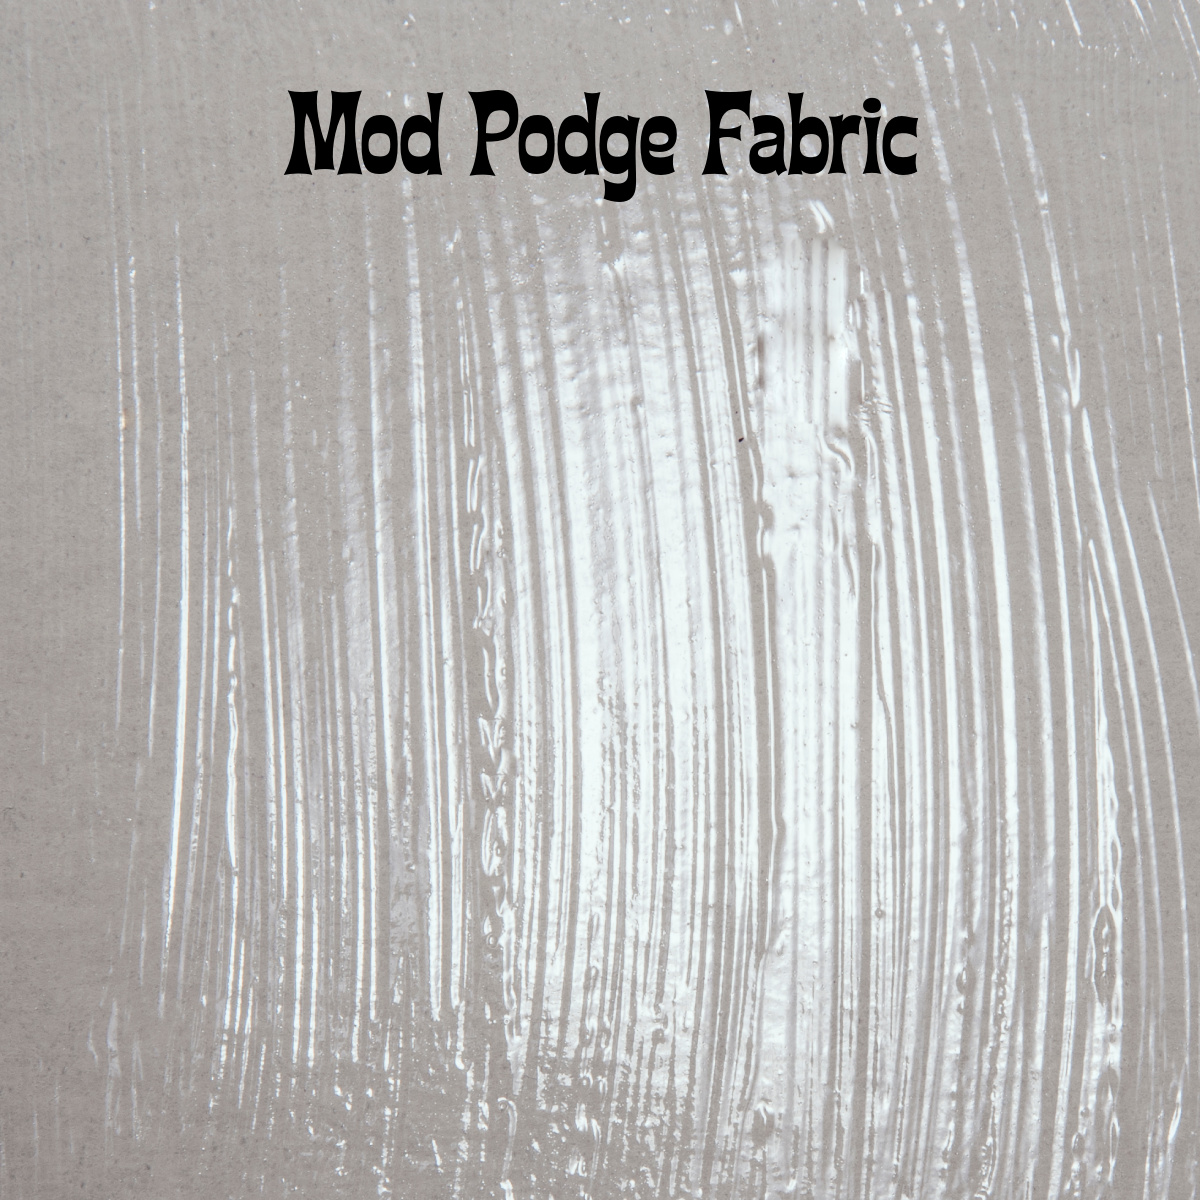
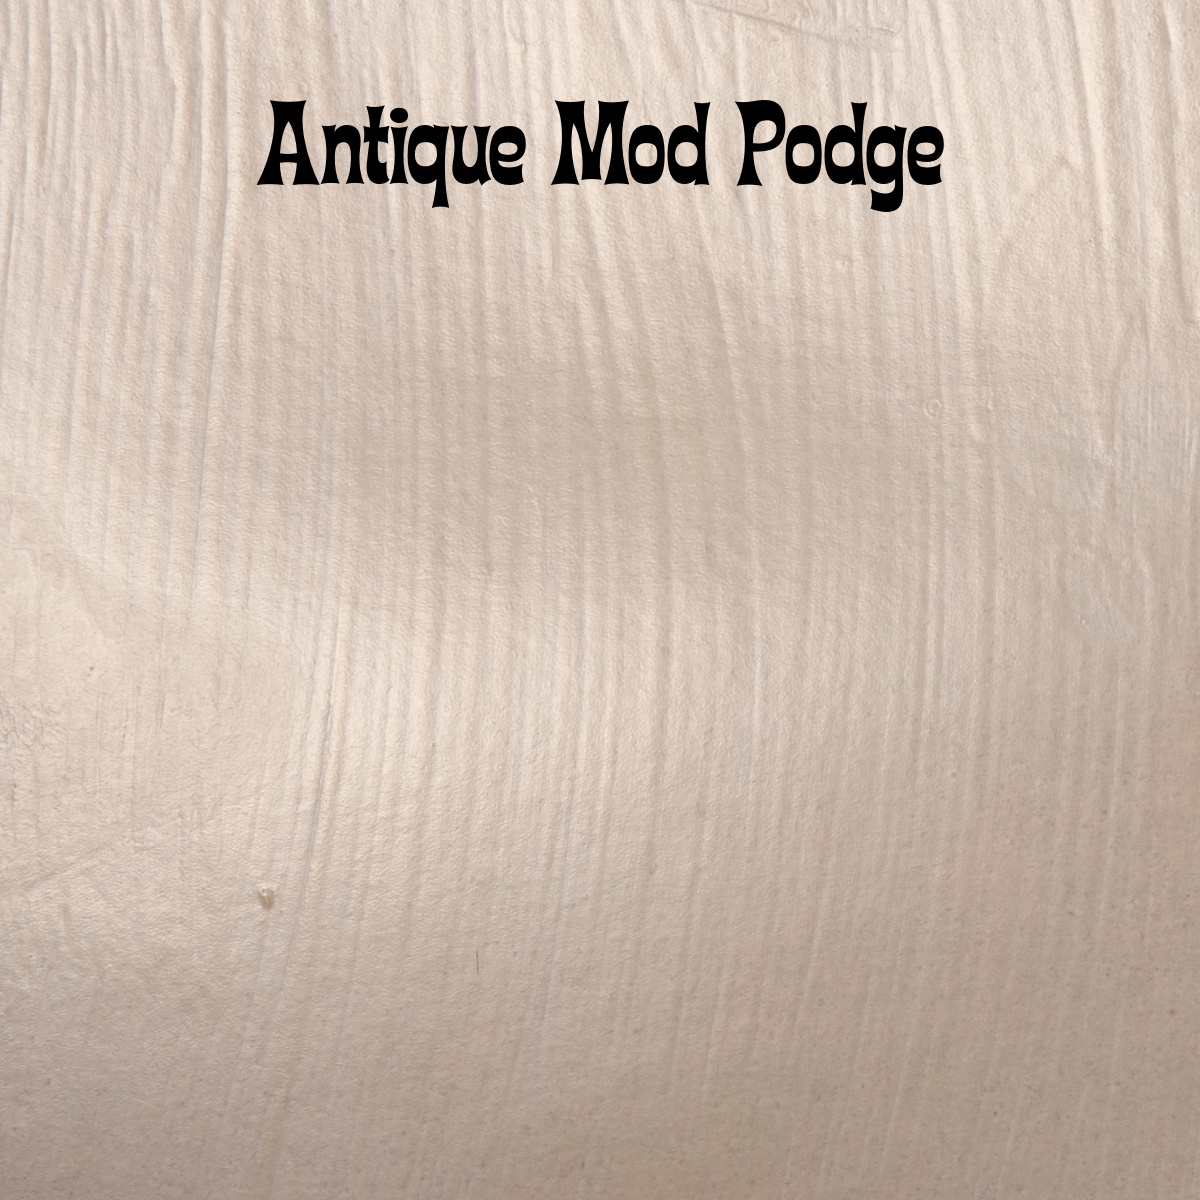
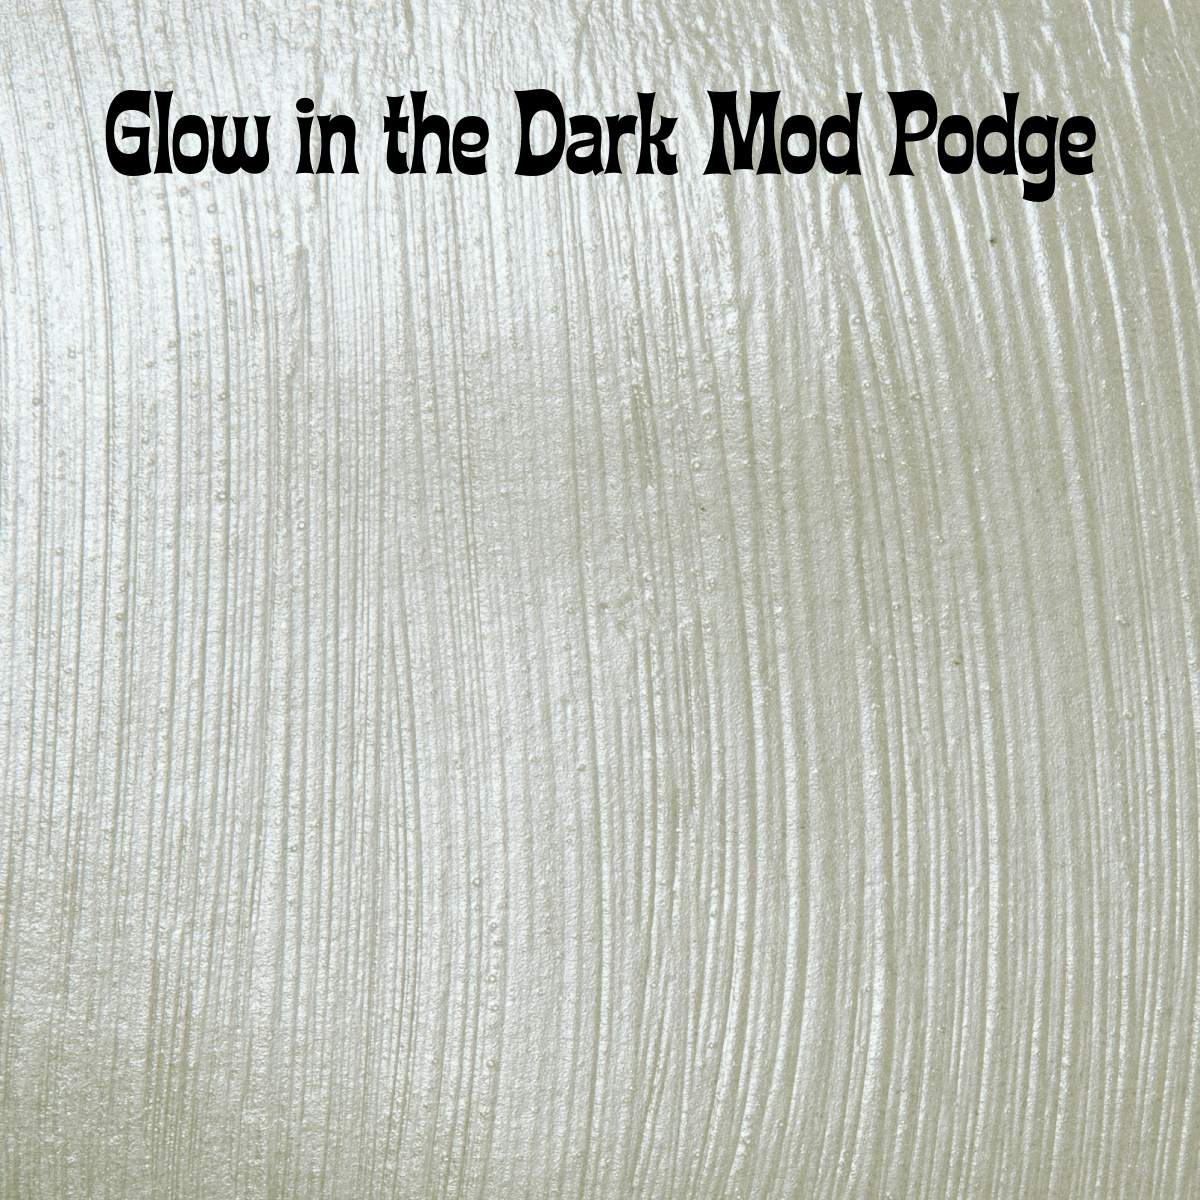
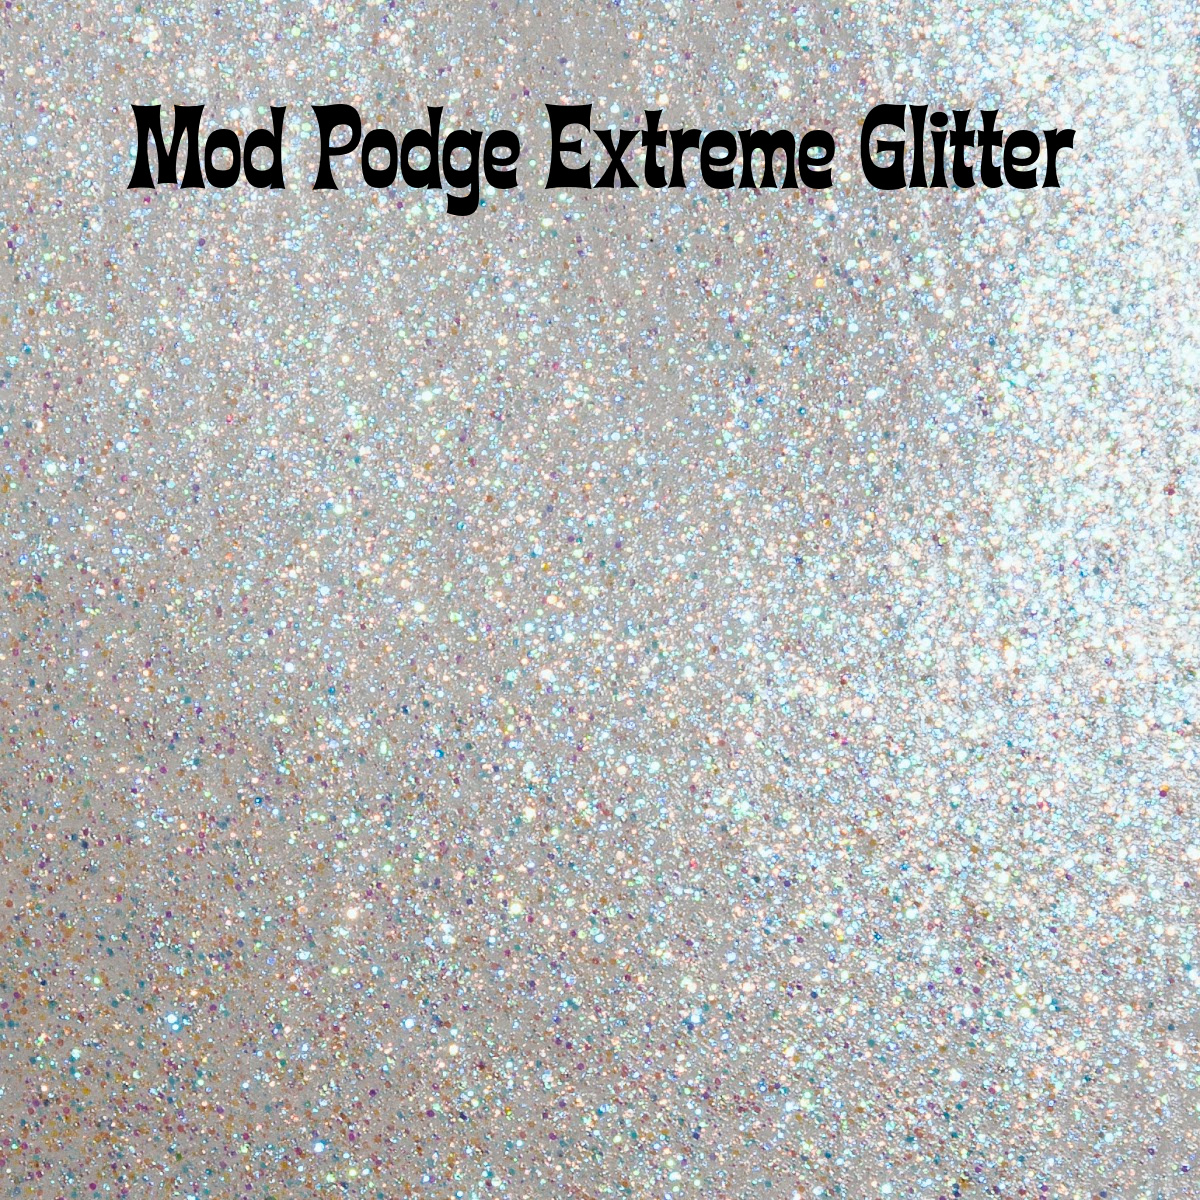
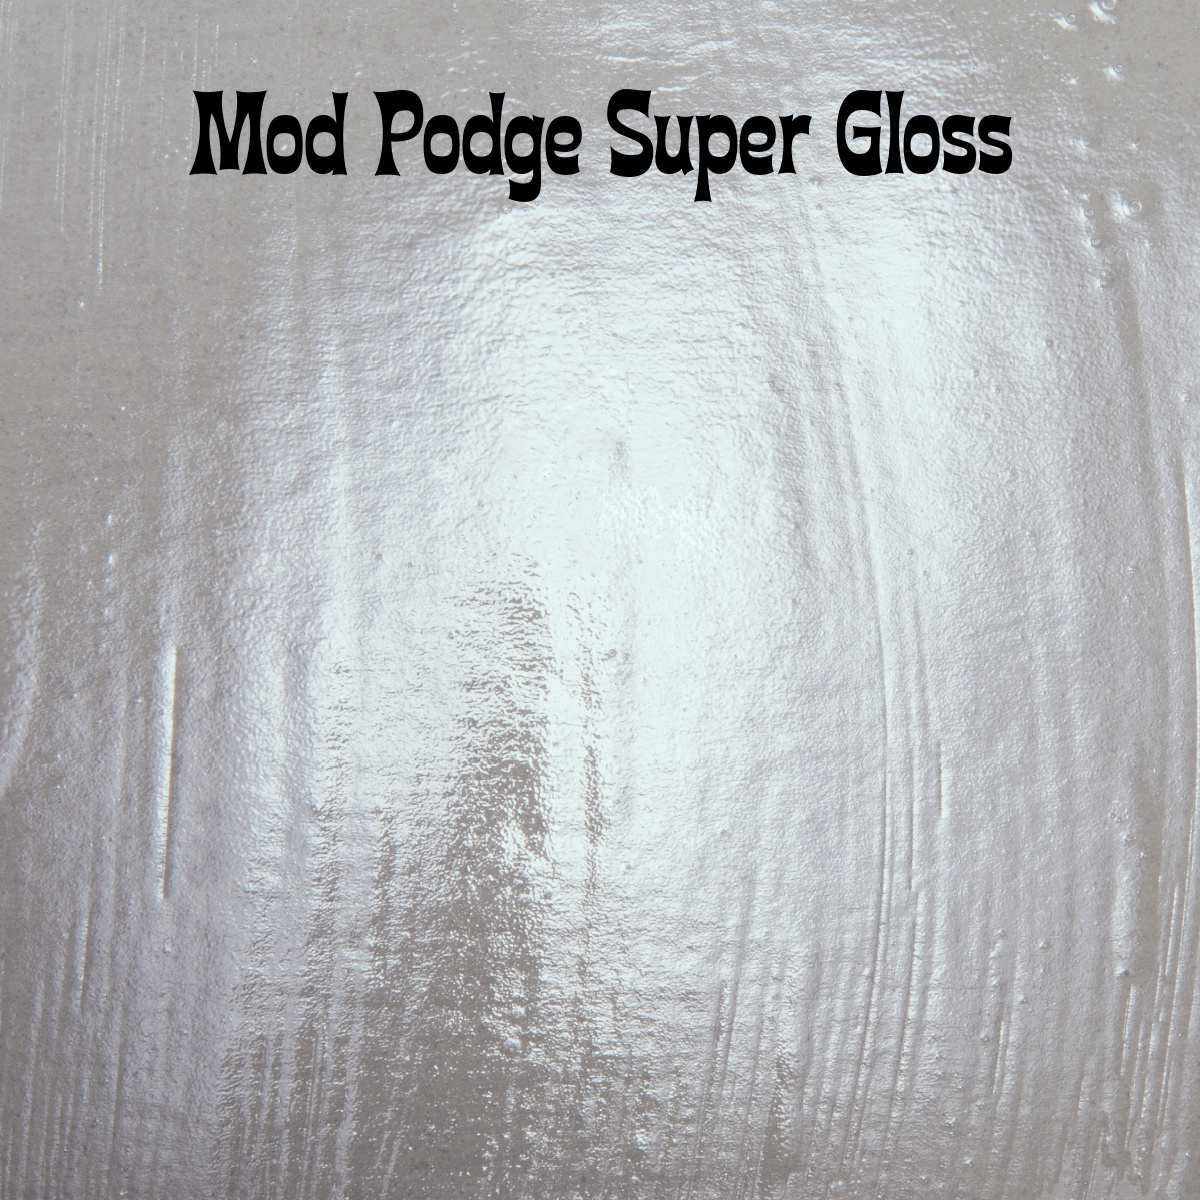
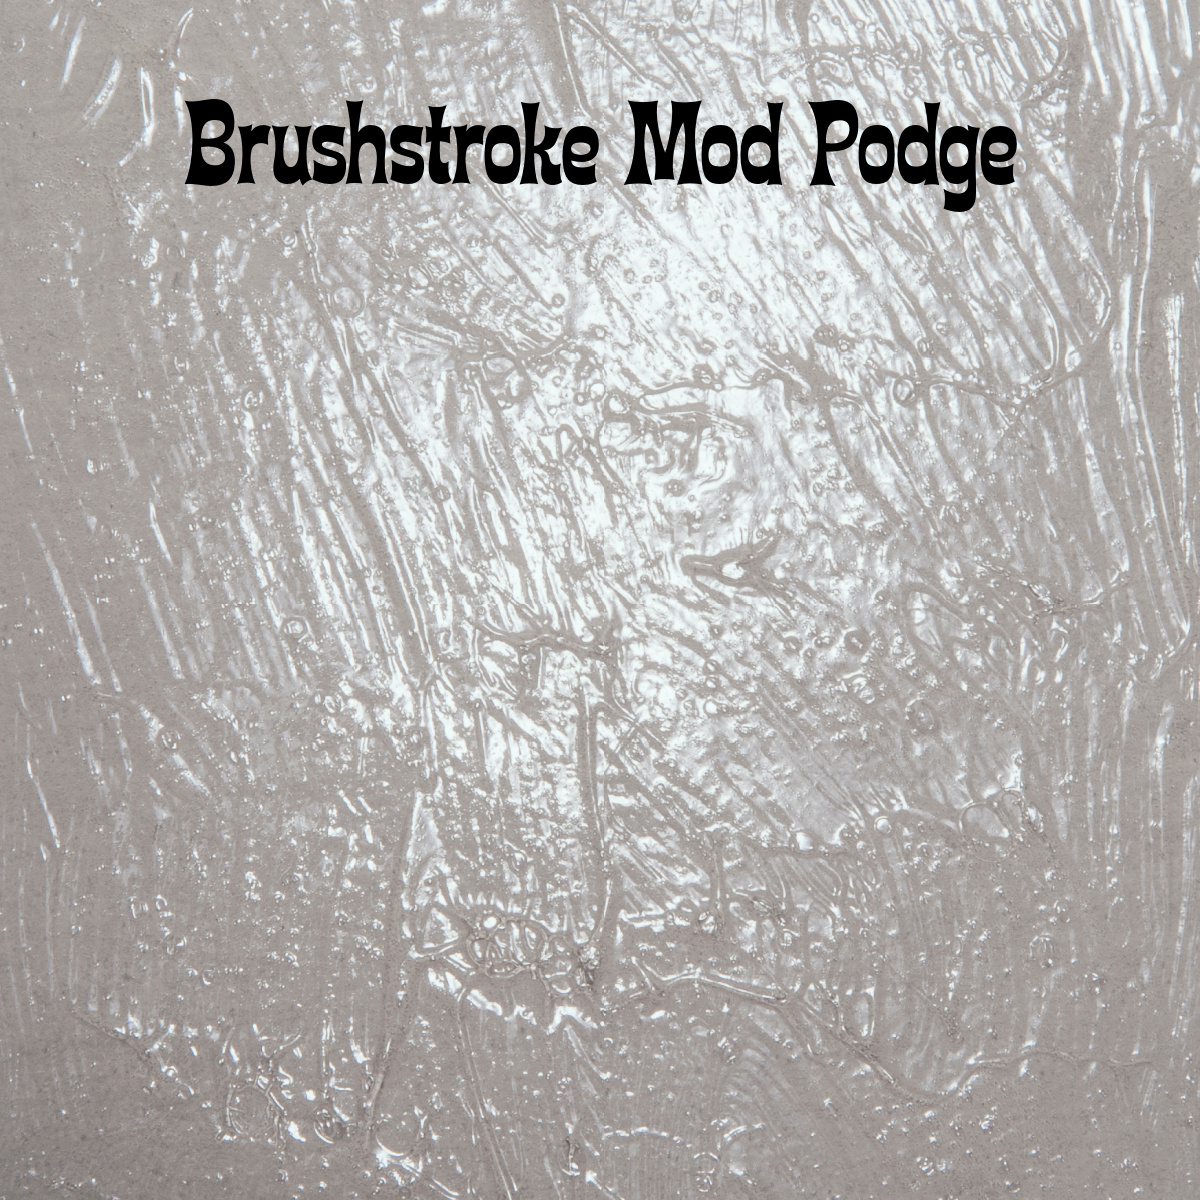
You can see what each of the Mod Podge formulas look like when they are dry below! I painted them on a gray piece of paper, so the point is to show you the light reflecting properties.
Mod Podge Gloss – Shiny, glossy finish. This was the first Mod Podge formula.
Mod Podge Matte – Flat finish with minimal shine
Mod Podge Hard Coat – Satin finish: somewhere in between a Gloss and a Matte (slightly shiny).
Outdoor Mod Podge – Shiny finish: even shinier than original Gloss
Fabric Mod Podge – Shiny finish: very similar to Outdoor
Antique Matte Mod Podge – Flat like regular matte, just with a brown tint
Mod Podge Glow in the Dark – Shiny finish that glows in the dark when charged with light
Extreme Glitter Mod Podge – very sparkly! Tons of glitter. Even more than Sparkle Mod Podge
Mod Podge Super Gloss – HIGH gloss finish. This formula is a finish only – don’t use it to decoupage items down to surfaces. Technically you can, but this is a more expensive formula that provides a self leveling finish.
Brushstroke Mod Podge – designed for adding texture to a decoupaged surface
Are you ready to see a video about the Mod Podge formulas? My friends Cathie and Steve will guide you. Press “PLAY” below.
Also, I’d love it if you would pin this graphic below!
Thanks for reading and let me know if you have any questions in the comments.


Hi there! Thanks for making this post. I was curious about what product would work best to decoupage children’t artwork onto a wood panel? Also, since some of the work could possibly bleed if brushing a topcoat, do you have a product/brush/spray that you would recommend using first to help set it before a final top coat? Thanks!
I purchased acrylic book marks and personalized them by putting my friend’s names on the book marks in vinyl. I would like to protect the vinyl on the book marks. What mod podge would I use as a sealer?
I used mod podge gloss to decoupage a lamp shade. It is to glossy. Is there a way to tone it down? And should I seal the lampshade to protect it?
Hi Kathy! Yes, you can either use another Mod Podge on top of it – (like satin or matte) OR you can spray seal it with a flatter finish. If you spray seal it then nothing else will be required.
What mod podge would be suitable for sealing glitter on cowgirl boots for a concert day out plse
I have a puzzle with gold foil on parts. What would be the best way to seal it? Thank you!
Can decoupaged piece be used as sea salt holder? Will salt affect finish
It can! I’m assuming on the outside of the vessel, as Mod Podge isn’t food safe. It’s non toxic though. The salt shouldn’t affect it!
Hi, I’m trying to cover some peeling boots with fabric. I’m using loctite spray adhesive to glue the fabric to the boot and then using gloss mod podge over the top to kind of harden the fabric. The fabric is a lighter color and the mod podge makes the fabric look darker like it has an oil stain. Do you know if there is a way to avoid that? I was thinkong about putting another piece of fabric under to see if that helps but I’m wondering if another product might work better. I was looking into the Hard Mod Podge or the Acrylic Spray, but I’m not sure if the acrylic spray would work on its own. Any suggestions? Thanks!
Hi Tina! So any acrylic product – clear – is going to darken fabric. That’s just the way it kinda works :/ So any other spray or medium will as well.
I just bought an upright oscillating fan. I want to midge podge over photos of our children all around the base of it and maybe even the pole. Pics are tiny . Do I use a clear acrylic sealer only or the gloss original?
Hi Marissa! Since it’s probably a plastic base, I would use a spray adhesive. Mod Podge doesn’t work well with plastic (one of the few surfaces it doesn’t work on). You could try it, but you might be able to just peel the photos off.
what can you use to put over a lable on a bottle from coming off?
The best way to keep a label on is from behind. You could put Mod Podge over the top, but you don’t want it to go too much onto the glass, or you’ll see the Mod Podge. It dries clear but not crystal clear. Honestly I’d just wait until the label comes off, if it’s going to, and then stick it back down with spray adhesive. You could also put a piece of clear vinyl or packing tape over the top.
Hi, I want to sandwich some plastic canvas between 2 pieces of canvas fabric as a ‘skeletons to make a holder for drinks. Which formula would you recommend?
Hi Amy! Mod Podge doesn’t work well with plastic (one of the few surfaces it doesn’t work on). I’d have to test it on plastic canvas just to be sure – I never have. You could use any formula.