
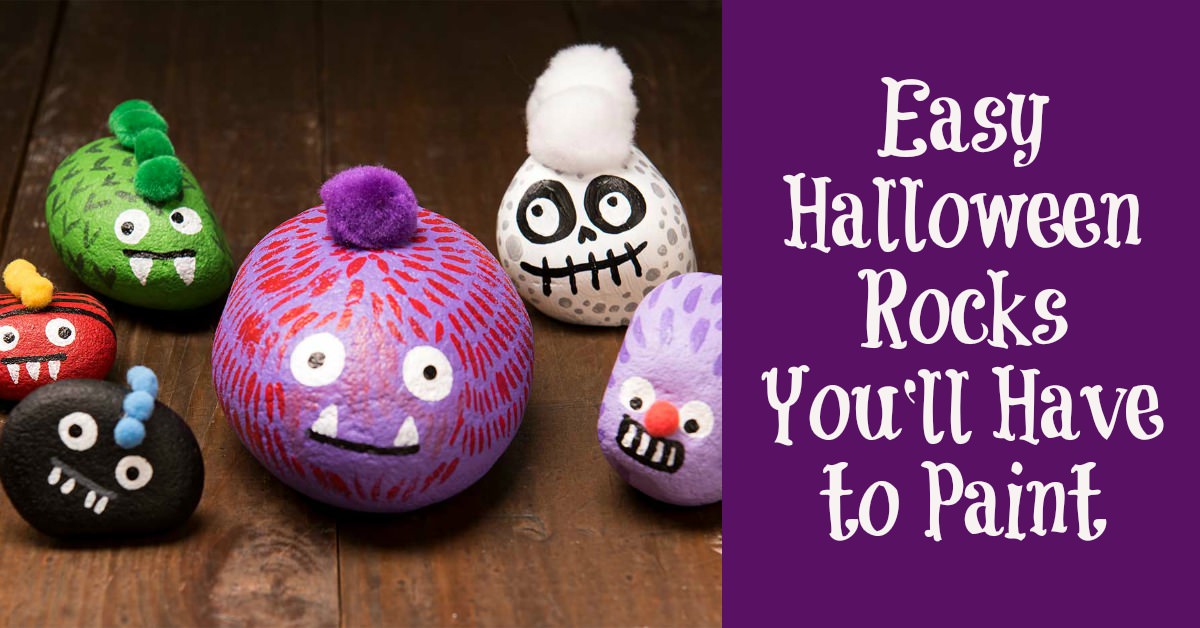
If you are looking for Halloween painted rocks, here are four seasonal tutorials! Get pumpkins, leaves, owls, and monsters. Fun and easy.
I’ve shared painted rocks and rock painting ideas with you before – and it turns out I just can’t get enough. I absolutely love painting rocks for every occasion, so it makes complete sense that I would paint stones for my favorite holiday: Halloween.
I think you know where this post is going.
I’m about to share some holiday-themed painted rock art with you, and this was a particularly fun collection to put together.
Painted Halloween Rocks
Yes, you’re about to see the cutest of the cute. I love the idea of combining all of these and making a little scene in your yard! Your children will have so much fun with the painting and placing them outside.
I’m featuring tutorials for pumpkins, owls, monsters, and leaves. The leaf painted rocks tutorial comes in video form, so don’t miss the visual! You can see the tutorial for those by clicking “PLAY” on the video in this post.
Halloween themed rocks make such a great Halloween craft for kids. In fact, kids and adults will love to make them together. Let’s dive into the Halloween rocks!
Tiny Pumpkin Rocks
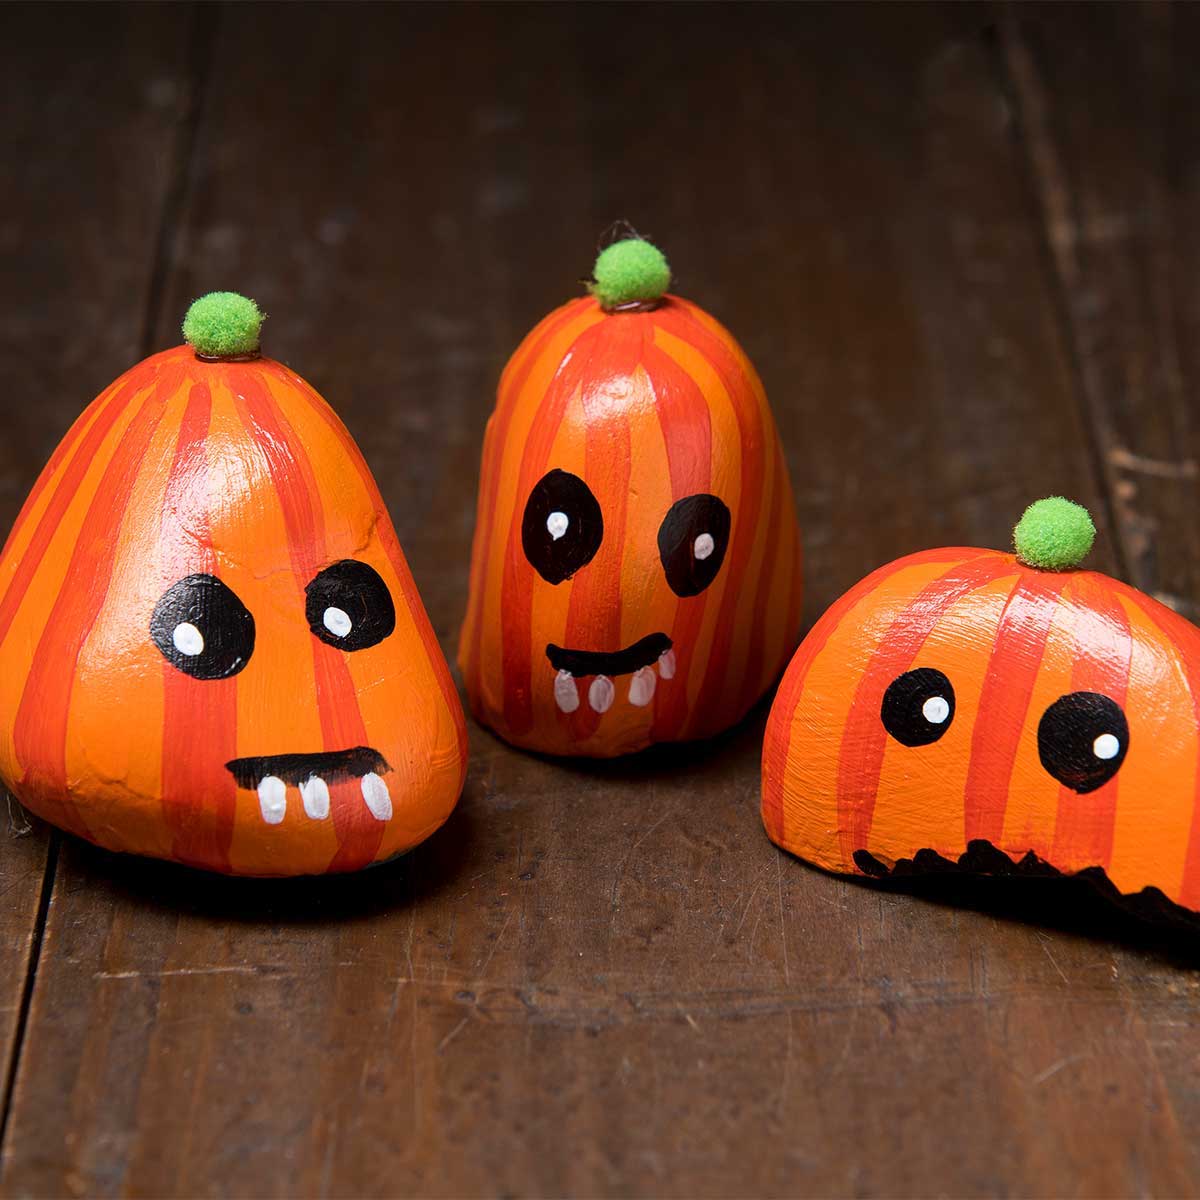
This tiny pumpkin rocks are so whimsical and cute! With those pom pom stems, I can hardly resist them. Learn how to make them below.
Gather These Supplies
- Apple Barrel acrylic paint – Outrageous Orange, Candy Apple, White, Black
- Rocks
- Pom-poms
- Hot glue
- Paintbrushes – regular and detail
Instructions
Select 3 – 5 small rocks that will stand by themselves in somewhat of a “pumpkin” shape. Broken rocks work well. To prep the rocks for painting, wash with warm, soapy water and let dry.
Paint each rock with two coats of orange using a paintbrush. Let dry.
Mix one part orange to one part candy apple – this creates a dark orange. Paint stripes on each rock using a smaller detail brush.
Paint round black eyes and a black stripe for a mouth using the detail brush. Let dry.
Paint white dot pupils in each black eye using the smallest detail brush. Paint the dots in different locations to make the eyes appear to be looking up, down, straight ahead, left or right. You can even make then look cross-eyed!
Paint white teeth underneath the black mouth line.
Attach tiny green pom-poms to the top of the dried pumpkin rocks using hot glue.
Tip: it’s easy to make the dots in eyes using the end of a small paintbrush. Just dip the end of your paintbrush in the paint and use it to dot. You can also use paint pens.
Monster Rock Buddies
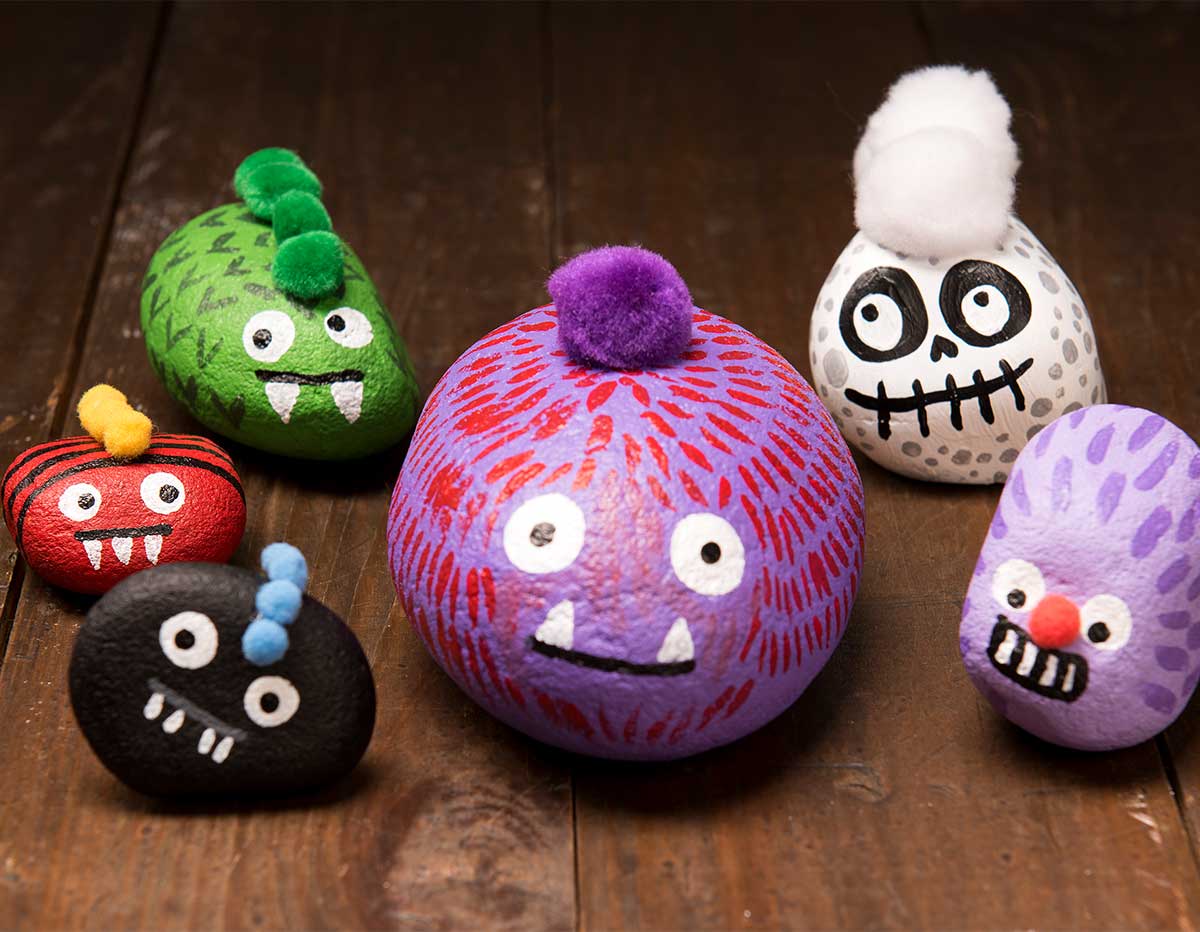
When I think about Halloween, how can I forget about monsters? The thing about these fun Halloween rocks though . . . they aren’t that scary. They are really colorful and cute, actually. I think they’d be perfect for a no candy trick or treat. Learn how to make them below.
Gather These Supplies
- Apple Barrel paint – Princess Purple, Candy Apple, Clover Fields, White, Black
- Rocks
- Pom-poms
- Hot glue gun
- Paintbrushes – regular and detail
Instructions
Select 8 – 10 rocks in various sizes, and with a relatively smooth texture. To prep the rocks for painting, wash with warm, soapy water and let dry.
Paint each rock a different solid color using a paint brush. For the lighter purple rock shown, mix one part white to one part princess purple. Let dry.
Paint a black line for a mouth on each rock. Let dry.
Paint round white eyes and pointed teeth on each rock.
Paint details on each rock to create hair, scales, bumps, stripes and dots using the detail brushes. Let dry.
Paint black dot pupils in each white eye using the smallest detail brush. Paint the dots in different locations to make the eyes appear to be looking up, down, straight ahead, left or right. You can even make then look cross-eyed!
Attach various pom-poms to the rocks using hot glue. See project photo for inspiration.
Painted Rock Owls
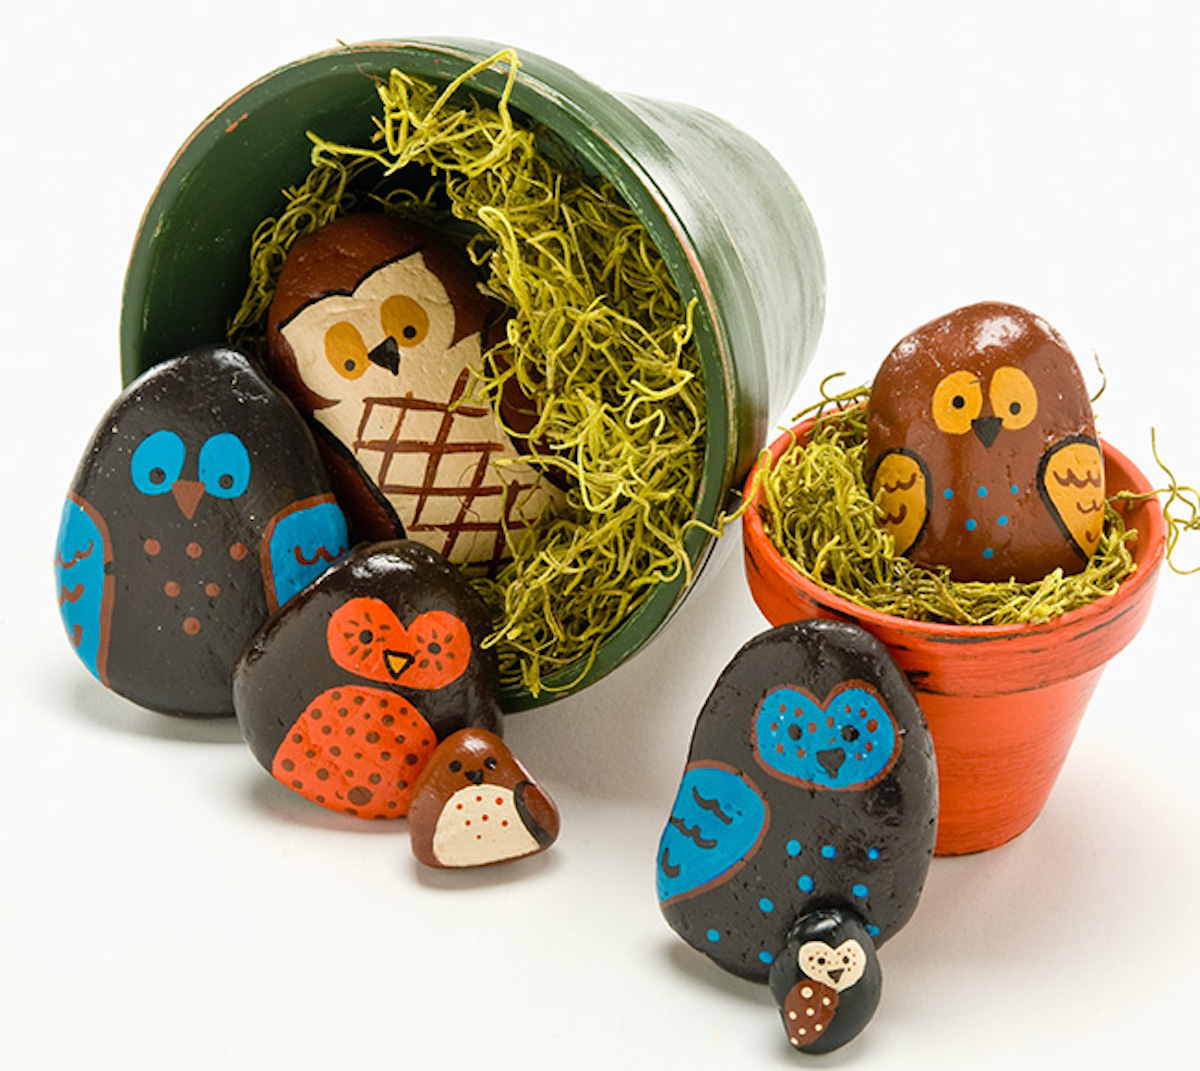
I absolutely love owls! I have an owl tattoo, which not a lot of people know. They are so wise.
They also represent Halloween to me, to a certain extent. I love a dark night where owls are flying about and hooting. These Halloween rocks aren’t flying about, but you can almost hear a hoot if you listen closely . . .
Here’s the step by step to paint them.
Gather These Supplies
- Delta Ceramcoat paint – Eggshell White, Rhythm n Blue, Straw, OJ, Bittersweet Orange, Mermaid Blue, Raw Sienna
- Rocks
- Paintbrushes – regular and detail
Instructions
- Basecoat the rocks as shown.
- Using the colors listed above, paint the details. Use the end of the brush handle for polka dots.
Leaf Rocks
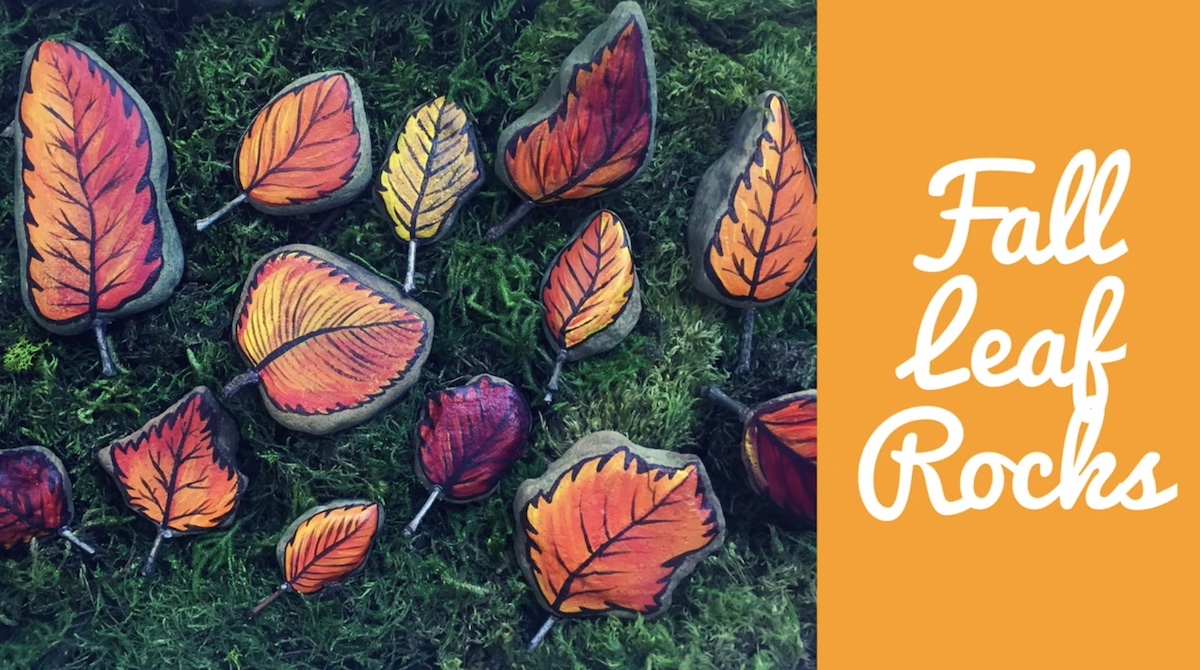
We’ve saved the best for last (in my humble opinion), because these leaf rocks are really cute! They compliment the rest of your Halloween decorations quite nicely and are a great fall craft.
Rather than give you the tutorial, I’m going to show you! We’ve got a video that shows you how to make these cool rocks in this post. Just press PLAY!

Halloween Rocks
Materials
- Apple Barrel paint Outrageous Orange, Candy Apple, White, Black
- Rocks
- Pom-poms
Video
Instructions
- Select 3 – 5 small rocks that will stand by themselves. Broken rocks work well.
- To prep the rocks for painting, wash with warm, soapy water and let dry.
- Paint each rock with two coats of orange using a paintbrush. Let dry.
- Mix one part orange to one part candy apple – this creates a dark orange. Paint stripes on each rock using a smaller detail brush.
- Paint round black eyes and a black stripe for a mouth using the detail brush. Let dry.
- Paint white dot pupils in each black eye using the smallest detail brush.
- Paint white teeth underneath the black mouth line.
- Attach tiny green pom-poms to the top of the dried pumpkin rocks using hot glue.
Notes
What are your favorite Halloween rock painting ideas? Let me know how you paint your Halloween rocks in the comments! I want to make some candy corn rocks next!
If you enjoyed this Halloween craft, please feel free to check out these other unique ideas:
BOO Letters • Button Art • Cheesecloth Ghost • Coffin Tray • Decorative Blocks • DIY Wreath • Dollar Tree Wood Pumpkin • Duct Tape Pumpkin • Fairy Garden • Halloween Ornaments • Painted Pumpkins • Mason Jar Lanterns • Mummy Luminaries • Paper Plate Crafts • Potion Bottles • Spooky Candle Holders • Spooky Pumpkins • Wood Ghost Decor


Awesome rocks. You have great ideas!! I think it’d be cool to paint a bigger rock like a pumpkin too. 🎃🍁🍂
I love these painted rocks. Great job!
Thanks for all the cute Halloween ideas. Your instructions are very easy to follow.
Thank you so much!
I love your rocks. we painted some pumpkins, monsters and ghosts for hiding in our local area.