
Are you looking for a unique polymer clay jewelry idea using Mod Podge Dimensional Magic? These pendants are perfect for gifts!
Skills Required: Intermediate. I recommend having prior experience with image transfer before trying this project. At least practice first to ensure you’re happy with the final product.
My name is Johnnie and I blog over at Saved By Love Creations. I’m excited to share some polymer clay jewelry with you today! Jewelry is one of my favorite fashion crafts, and I think you’re going to love this project.
Today, I will be showing you how to make a polymer clay pendant using an image transfer (yes, the Target Missoni line has everything to do with the inspiration behind this project). Once you get started with these DIY necklaces, you’ll want to make a bunch of them for gifts!
If you have never touched polymer clay, it is ok. You can do this. Polymer clay jewelry is super easy, fast, and cheap, so let’s go!
Mod Podge on Polymer Clay
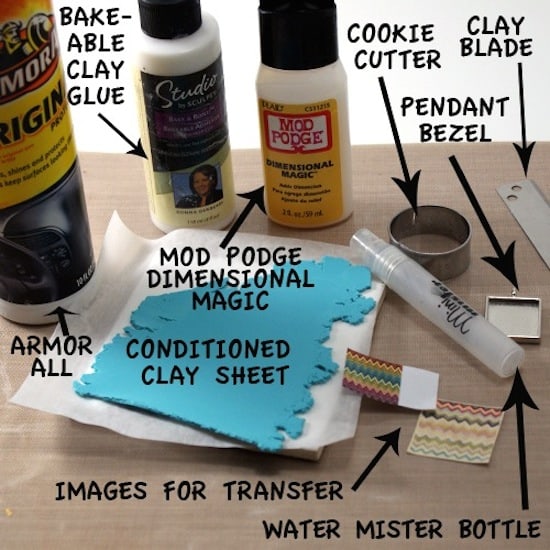
Gather These Supplies
- Polymer clay in a light enough color to make your transfer visible. White clay shows the image the most true to color, but you can get interesting effects by using lightly colored clays as well. Here, and in general I use FIMO Soft. It is easiest to work with, in my opinion.
- Pasta machine, or acrylic roller or drinking glass to roll clay into uniform sheet
- Small tile to bake clay
- Mod Podge Dimensional Magic
- Mister bottle with water
- Pendant bezel for the square pendant, Pendant bail for the round pendant
- Cookie cutter in desired pendant shape
- Craft knife or clay blade
- Armor-All
- Bake-able clay adhesive
- Chevron images here courtesy of Etsy shop Annie Howes. For this technique, the images must be printed using a laser jet.
Instructions
1. Condition clay: Polymer clay is composed of a bunch of particles that need to be “conditioned” before using, which is a fancy way of saying squished and rolled until they are mixed together evenly.
I roll the clay around in my hands, pulling twisting and mashing it together until it is soft enough to flatten using my clay dedicated pasta machine.
This is handy because it has 9 different numbered thicknesses, and for serious clay-ers, sometimes exact thickness is important.
For this project, just warm the clay up by kneading it in your hands for a couple of minutes, and roll into a thin sheet using an acrylic roller or drinking glass.
2. Working on a ceramic tile (these are great for clay because you can work right on them and they are safe to bake your clay on, so you don’t have to handle the raw piece anymore than necessary), lay your conditioned clay sheet flat and place your image face down on the clay.
Here I am using patty paper underneath the clay, which is also bakeable. I do this when I am baking several pieces on a big cookie sheet so I can just move the patty paper instead of touching the raw clay with my fingers.
Fingerprints have ruined one too many finished works, which is also the reason for the rubber gloves.
3. Burnish (rub) the image down on the clay to get rid of any air bubbles between the image and the clay. Spray a few squirts of water on the back of the image . . .
4. Lightly run a finger across wet image to remove paper backing. You may want to re-wet the paper to get it to roll off. Water will not remove the ink, but too much pressure may ruin the image transfer.
5. For the bezel setting pendant, spray the bezel with Armor All (or similar). This is a release agent, preventing the clay from sticking to the bezel.
Line the bezel up with the image and place it face down, pressing the back to create a impression in the clay.
6. Carefully lift the bezel, and cut along the square impression using a craft knife or clay blade.
7. Next, you can bake the square as-is (275° for 20 min), remove from oven, let cool for 5 min, then glue it into the bezel using E-6000 or you favorite strong hold craft glue.
I chose instead to bake the clay in the pendant bezel. It is metal, and withstands the low temp required to bake the clay no problem. This way I know for sure it fits perfectly.
I use a dab of bakeable polymer clay adhesive to adhere the clay to the metal bezel. If you don’t have this, and you still want to bake the clay in the bezel, you can do that.
Just pop the piece out of the bezel after it is baked and put a dab of E-6000 or super glue on the bezel before replacing the clay piece. Your first piece of polymer clay jewelry is almost done!
8. For the round pendant with no bezel, I folded the clay sheet in half to double its thickness, then cut out my image with a circle cookie cutter (don’t forget to spray the cutter with armor all so it won’t stick to the clay).
Bake the clay per package instructions. You will have to glue a pendant bail to the finished piece to attach it to jewelry, or you could poke a hole through the pendant for wiring.
9. After baking the round piece, I sanded the edges with 2000-grit wet to dry sandpaper to smooth it out, then inked around the chevron image with color box chalk ink to get the blue color you see in the finished pendant. I love chalk inks with polymer clay! They are so vibrant, and blend-able.
10. FINISHING your polymer clay jewelry: You can touch up any areas the image transfer didn’t take using a permanent marker before sealing with Mod Podge.
Use a baby wipe to get rid of any stray paper backing, then cover with Mod Podge Dimensional Magic. Several thin coats are best, drying an hour or so in between. Let dry completely overnight, then add a chain.
Here is another bezel setting piece I made using the printable provided . . .
This polymer clay jewelry is a great project to keep in mind for handmade holiday gifting. You can use family photos, pets, custom text, anything you can print on a laser jet.
Polymer Clay Jewelry
Equipment
- Pasta machine or something to roll out the clay
- Small tile to bake clay
- Mister bottle with water
- Cookie cutter in desired pendant shape
- Craft knife or clay blade
- Armor-All
- Sandpaper
Materials
- Polymer clay
- Mod Podge Dimensional Magic
- Pendant bezel for the square pendant
- Pendant bail for the round pendant
- Necklace chain length of your choice
- Chevron images
- Bake-able clay adhesive
Instructions
- Condition your clay before starting the project.
- Lay your conditioned clay sheet flat on a ceramic tile. Place the image face down on the clay.
- Burnish (rub) the image down on the clay to get rid of any air bubbles between the image and the clay. Spray a few squirts of water onto the back of the image.
- Lightly run a finger across wet image to remove the paper backing. You may want to re-wet the paper to get it to roll off. Keep your pressure light so the image isn’t removed.
- For the bezel pendant, spray the bezel with Armor All. This is a release agent, preventing the clay from sticking to the bezel. Line the bezel up with the image and place it face down, pressing the back to create a impression in the clay.
- Carefully lift the bezel, and cut along the square impression using a craft knife or clay blade.
- Bake the square as-is (275° for 20 min), remove from oven, let cool for 5 min, then glue it into the bezel using E-6000 or you favorite strong hold craft glue.
- Ink around the edge of the pendant with chalk ink if desired.
- Touch up any areas the image transfer didn’t take using a permanent marker before sealing with Mod Podge.
- Cover the top of the pendant with Mod Podge DImensional Magic. Let dry 24 hours before placing on a chain or necklace and wearing.
Notes
Thank you for reading. I hope you enjoy. Stop on over and check out my other polymer clay and craft tutorials! I’d also love for you to visit the following posts:


This depends on what kind of clay you are using!
Mod podge reacts with certain brands of clay, including Primo & Sculpey, it will stay sticky and not cure.
I’ve used Mod Podge with Primo and Sculpey many times. It works just fine. The stickiness isn’t a reaction – it’s a normal part of Mod Podge. The clay just needs to be cured.