Learn how to decoupage a wood tray with adult coloring pages! This is a pretty home decor project that can be easily personalized, and makes a great gift idea.
Skills Required: Beginner. It helps to have experience with Mod Podge for this project. You’ll be painting, then decoupaging squares of coloring pages onto a wood tray.
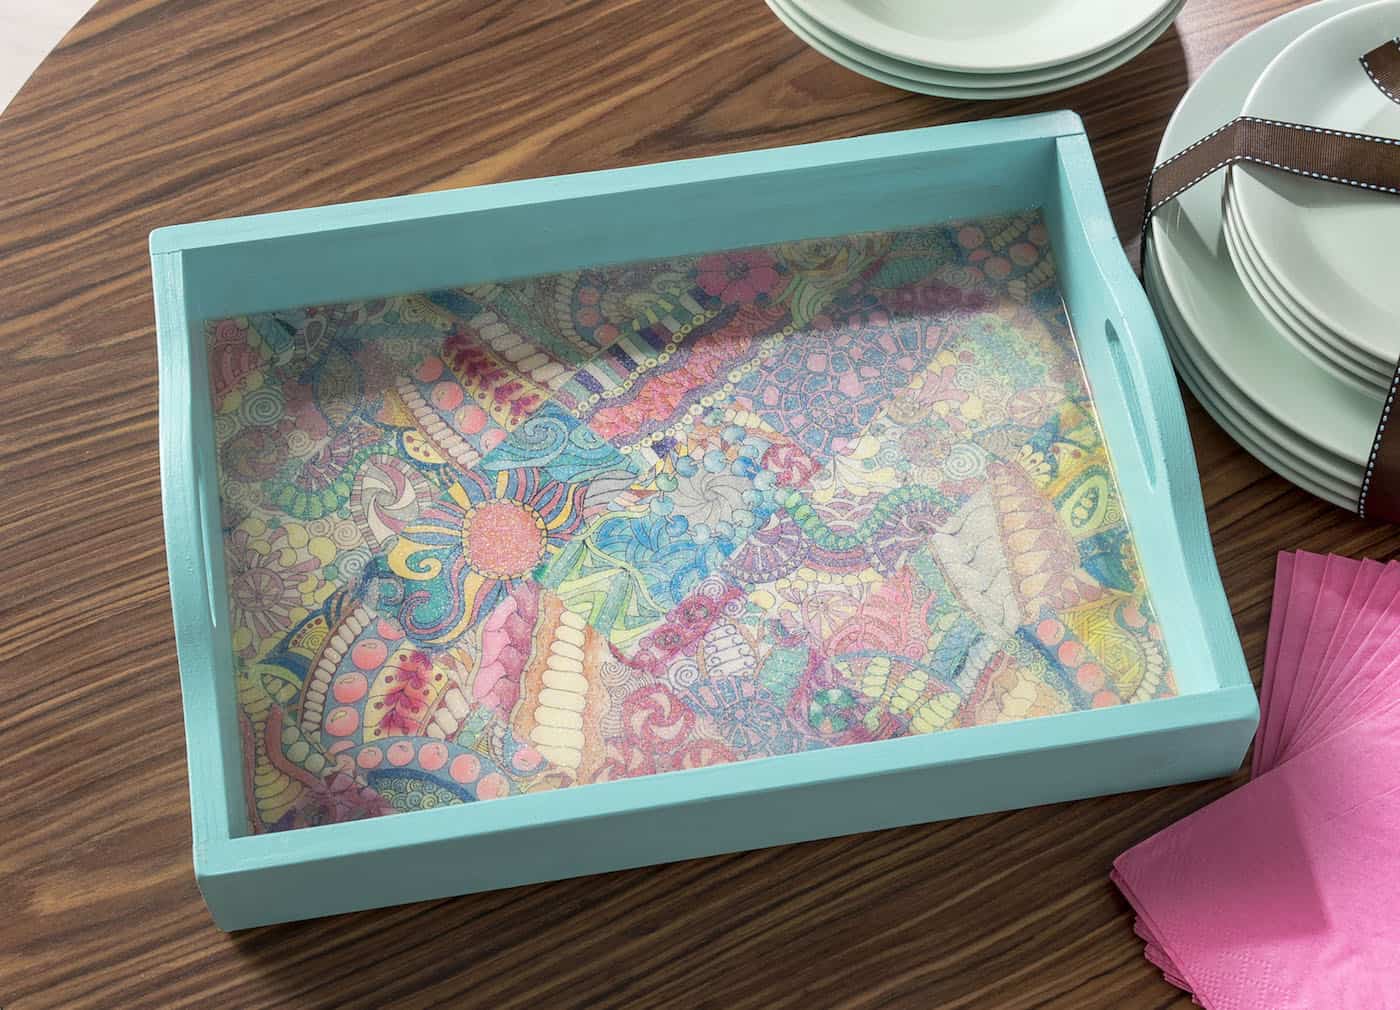
If you’ve ever caught yourself doodling away in an adult coloring book, only to wonder, “Now what do I do with all these pages?” then boy, do I have a treat for you!
I’ve been all aboard the coloring book craze over at DIY Candy, diving deep into the sea of pencils and markers, guiding you through the forests of the finest coloring books, and emerging on the other side with a treasure trove of tips and tricks.
But the adventure doesn’t stop there. Instead, it leads us to an even more thrilling quest: turning those meticulously colored pages into something both beautiful and functional. I’m excited to share my decoupage wood tray with you!
Welcome to the art of decoupage, my friends, and not just any decoupage – we’re talking about transforming a simple wood tray into a stunning masterpiece adorned with your very own coloring pages.
This crafty endeavor was inspired by the latest Michaels Makers challenge, which got me thinking about the perfect Mother’s Day gift.
Remember those days when a handmade card with a lopsided heart was enough to make Mom tear up? We’re bringing back that heartfelt sentiment, but with a little more finesse and a lot more Mod Podge.

This isn’t your kindergarten craft; it’s a sophisticated, adult version of showing our moms just how much they mean to us. Through the swirls of color we’re saying, “Mom, you inspired my creativity, and this is how far I’ve come.”
It’s a painted wood tray, sure, but it’s also a symbol of love, growth, and the endless possibilities of creativity.
So, are you ready to roll up your sleeves and dive into this project? Whether you’re a decoupage aficionado or a novice eager to learn, I promise you this: by the end of this wood craft, you’ll have not just a beautifully crafted decoupage wood tray but also a piece of art that tells a story.
A story of love, creativity, and a little bit of Mod Podge magic. Let’s create something that Mom will cherish not just because it’s beautiful, but because it came from you!
Gather These Supplies
- Wood tray
- Mod Podge Satin
- Mod Podge Dimensional Magic
- Acrylic paint – color of your choice to basecoat tray
- Coloring pages – to cover the inside of the tray
- Paper cutter or craft knife and mat
- Ruler
- Paintbrush
- Mod Podge brayer (optional)
- Seed beads (optional)
Tips and Thoughts for This Project
Make sure you have plenty of coloring pages to cover your tray, that you’re going to want to cut up. Because you’ll be doing some tiling of the pages. If you are wondering which kinds of markers/pencils you’ll be able to use, this article will help.
You’ll be able to use most markers and pencils on your adult coloring pages and then Mod Podge them – the key will be allowing them to dry (let the pages at least dry overnight). Crayons will work just fine.
Resin also works well instead of Dimensional Magic – and makes for a heatproof and waterproof surface. Learn the difference between the two here, and why I might use one over the other.

Get the printable how to card for this tray below!
Decoupage Wood Tray
Equipment
- Paper cutter or craft knife and mat
- Brayer (optional)
Materials
- Wooden tray
- Mod Podge Satin
- Mod Podge Dimensional Magic
- Acrylic paint color of your choice to basecoat tray
- Coloring pages completed
- Seed beads optional
Video
Instructions
- Color several adult coloring pages with colored pencils or bleed proof markers.

- Paint your tray – completely basecoat using an acrylic paint color of your choice. Let dry for several hours.

- While the tray is drying, cut the adult coloring pages into strips. Our strips are 3" x 3" and 3" x 6" – use a variety of strips or any size of square you like.

- Begin in the center of the tray. Add Mod Podge to the back of a coloring page piece, then place down on the tray and smooth (the Mod Podge brayer helps here tremendously). Continue with the pages, adding and making a pretty tile pattern.

- At the edges, use the ruler and craft knife to help you score the pages and remove the excess.

- Continue until the entire tray is covered with coloring pages, then let dry for 15 – 20 minutes. Put a top coat of Mod Podge over the top of the coloring pages. Let dry for 24 hours.
- Add the Dimensional Magic to the tray. Place seed beads into the Dimensional Magic if you like. Let dry for 24 hours before using.

Did you enjoy this colorful home decor project? If so, leave me a comment! I’d also love for you to check out the following posts:





Beautiful. Where did you get the tray. The trays I see are flimsy.
Dee, the tray was from Michaels. They had two sizes – a larger and smaller. This the larger. It’s definitely solid and not flimsy!
I love this! I too am a colorist and wonder what to do with my creations but live in the UK where there are no Michaels stores…not seen any quality blank trays like this to decorate unless you know of anywhere that ships overseas or has a branch over here?
This same process could be used with a different style of tray that doesn’t have high sides; like a cafeteria style tray. Years ago I bought one in a restaurant supply store and I’m sure it would work as well. (It would need to be a paintable surface if you’re following this project plan real closely).
Even stiff cardboard would work, if it’s the size you want.