
These decoupage plates are so easy to make – and they don’t have to be owls. Choose your favorite fabric and shape; just add Mod Podge.
Skills Required: None. These Mod Podge plates are easy because you’ll be using fabric squares as opposed to one continuous piece. This is a great beginner craft, even if you’ve never done anything creative before.
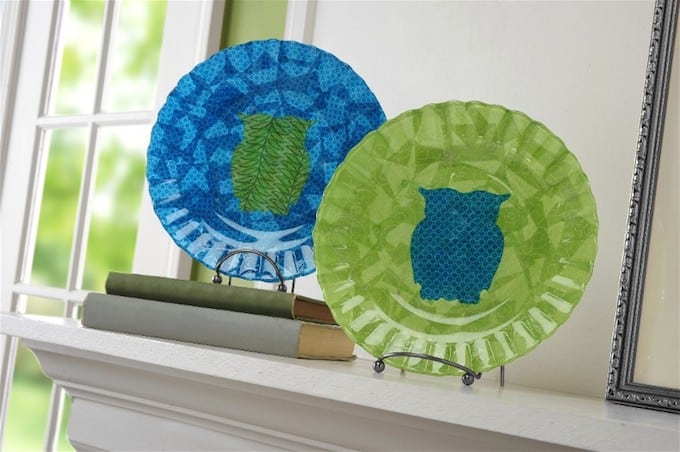
I get a lot of beginners on this site, asking me where to start. I also get another question a lot: “can I decoupage glass?” I feel like these decoupage plates are perfect because they address BOTH issues!
Not only that, but the holidays are coming up quickly, and there are lots of edible gifts to be given. My suggestion? Decoupage glass plates from the thrift store! Yes . . . Mod Podge a design on the back and you are good to go.
You aren’t going to believe how easy this is, there are minimal ingredients and steps and you really can’t mess this up. I know a lot of bloggers say that, but I’m serious. You can’t. Here’s how I made my fab decoupage plates.
Decoupage Plates
Gather These Supplies
- Glass plates – at every thrift store in the world, or the dollar store
- Fabric Mod Podge
- Fabric scraps from your stash – as many bits and pieces as you like
- Paint brush
- Scissors
- Design you would like to cut for the center of your plate
Note: this post was created before Dishwasher Safe Mod Podge was developed. Updating this post to say that you can now use Dishwasher Safe Mod Podge on this project. Learn more about Dishwasher Safe Mod Podge here.
You’ll first need to decide what you are going to put on the back of your plate. I just got fabric scraps and started going, which is what I recommend that you do. Pick through your stash and see what you have, then lay some things out. This is the fun part.
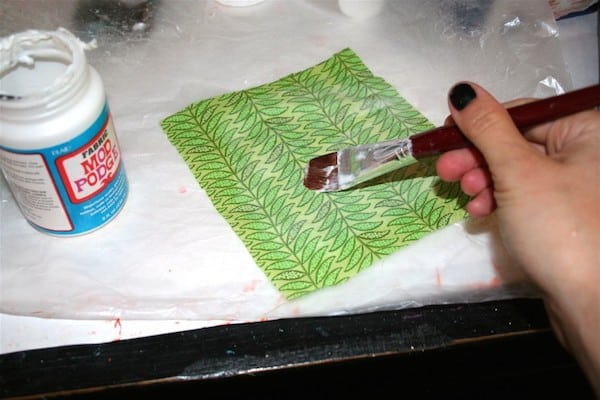
The key to successfully Mod Podging with fabric is preparing it first. This means you wash and dry the fabric to remove the sizing. Iron it and place it down on wax paper.
Coat the surface of your fabric with Mod Podge and allow to dry. This will allow you to cut your fabric with NO FRAYING. It’s kind of awesome. Allow the fabric to dry for about 20 minutes before cutting.
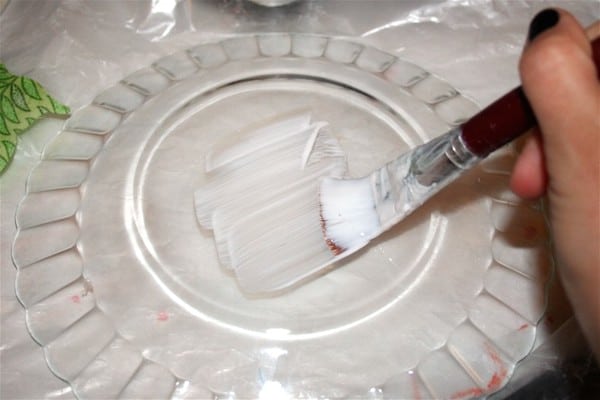
Make sure that your plate is washed and dried. Your fabric should be dry, so now cut a design for the center of your plate. I used the Spellbinders Nested Owls and my Sizzix Big Shot – yes, you can run Mod Podged fabric through a die cutter.
You can also cut a design freehand, or put pieces of fabric together to make a design. This is up to you.
Add a THIN layer of Mod Podge to the center of your plate. You don’t want to add too much Mod Podge on this project because your plate will never dry (learned from experience).
Place the owl or shape of your choice into the center and smooth. Wipe away any Mod Podge that seeps out the side.
PS – Make sure your fabric is pattern side down. This is a mistake that I would totally make.
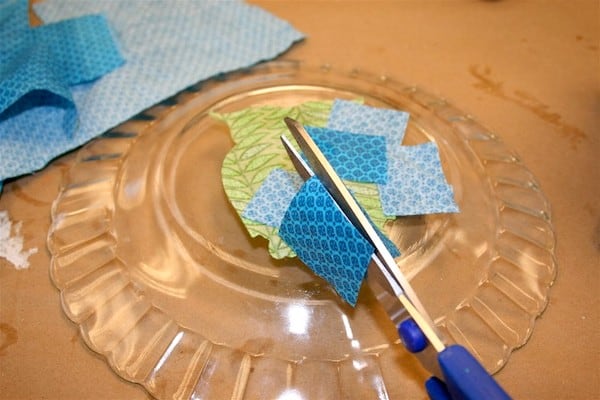
I decided to patchwork the back of my plate, so I grabbed my contrasting fabric (also prepared with Mod Podge) and kept cutting squares/rectangles/4-sided shapes until I had enough to cover the back.
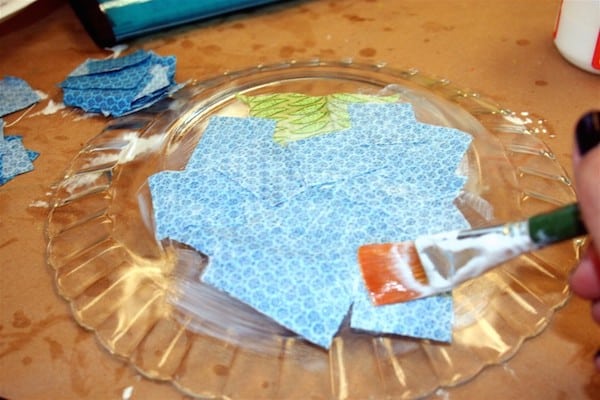
This part is so easy you will not believe it. Keep Mod Podging fabric down – add a thin layer of Mod Podge to the back of the plate and press down a square, over and over again until the back is covered. Remember, don’t use too much Mod Podge.
Completely cover the back of the plate and then allow it to dry. For me it took two full days, because I probably used too much Mod Podge even though I told myself not to. So it shouldn’t take that long for you, because you will likely listen.
Once the plate is dry, trim the fabric around the edges and add another coat to seal the plate over the entire back. Allow to dry and you are good to go.
As I said, if you are a beginner, you should try this project. You’ll love it and because there isn’t much too it, wrinkles are easy to avoid. Enjoy, because you are going to be the hit of the party/gift-giving with your rad plates.
Oh, and one more note. Just hand wash these on the top, and don’t soak them in water. You can use a damp cloth to wipe off the Mod Podged part – Fabric Mod Podge is not waterproof unless attaching fabric to fabric. Even then it’s not completely waterproof.

Decoupage Glass Plates
Equipment
Materials
- Glass plates
- Mod Podge Fabric
- Fabric scraps
- Design you would like to cut for the center of your plate
Instructions
- Wash the plate(s) with warm soap and water or rubbing alcohol; let dry.
- Cut the design that will go in the center of the plate out of fabric. Add a layer of Mod Podge to the plate, smooth down the fabric design, and let dry.
- Cut several fabric squares out of a contrasting color of fabric, enough to cover the back of the plate.
- Apply Mod Podge to the back of the glass plate in a medium layer, doing a small area at a time. Place the fabric squares down.
- Continue applying the squares, adding Mod Podge as you go.
- Once the entire back of the plate is covered, let dry. Apply a coat of Mod Podge over the back of the plate and let dry.
- Trim around the edge of the glass plate with scissors to finish.
If you enjoyed this post, I’d love for you to check out these others!

This looks awesome. If my friend ever gets the fabric like she says I’ll have enough to do this with but right now I’ll have to use scrapbook paper! 🙂
Note to self: URGENT! Find glass plates.
Thanks for the great project idea. Good for those who play with Mod Podge regularly too.
can the plates be washed in the dishwasher and/or the microwave after they’ve been mod podged?
Good call on the little squares of fabric! Much easier to avoid bubbles when dealing with small pieces 🙂
I used my Mod Podge Hard Coat all weekend… I can’t wait to take and post pics! I too had to be patient over multiple hours/days… but the result was awesome!
Are you freaking kidding me? I love this!
~The Mama Monster
Hey folks! Thanks for the comments! I added an addendum to the end – you can only handwash the top of the plate, not the Mod Podged part. It’s not dishwasher safe at all! On the Fabric Mod Podge part, just use a damp cloth and then set aside to dry with the “bottoms up.”
I love this idea! We are your newest followers and hope you will come check out our site!
Blessings!
Holy Cow… there’s FABRIC ModPodge??!!!
Fabulous idea!! I think I
‘ll give this a try with my granddaughter. If I can ever find some fabric mod podge around here.
I subscribe to this blog your Plaid paints blog too!
I would love to win a sampler of Mod Podge since I haven’t tried the fabric or extreme glitter.
The glass plates are truly inspiring! Do you think it would work on clear plastic plates? That would be perfect for bake sales & bringing in treats for kids’ classrooms!
Cute!
Just Brilliant! Love it! I am so making these for Christmas gifts, Christmas themed and stacked with homemade goodies! Awesome idea! Thank you so much!
Thanks everyone!
Casey, It *might* work with plastic plates. Mod Podge doesn’t work with all plastics, so you would have to test a corner of a plastic plate that you bought. Put down a square of fabric and let it dry; see if it sticks. If it doesn’t, your plastic plate just needs to be washed and you can still use it!
What if you used Outdoor Mod Podge over the fabric when you finished it? Would that make it okay for handwashing? I’ve never used Outdoor or Hardcoat, so I don’t know whether it’s then more waterproof or what.
too cute and easy!!
This is an awesome idea that would be great to put baked goods on for Christmas gifts. Do you think this same project could be done using patterned scrapbook paper instead of fabric?
Aunt_B – yes, you definitely could, although you might want to make sure the bottom of the plate is completely round without ridges. The paper would wrinkle going over the ridges.
I LOVE this idea Amy!!! Thanks for linking up too!
this is wonderful! I’ve been trying to decide how to package my Christmas cookies for our annual exchange and I think this is it for sure! Thanks!
Here from tidymom, have a happy halloweekend!
Wonderful tutorial! I am going to create a “Cookies for Santa” plate with your idea.
I shared this idea on http://www.facebook.com/homemadegiftideas
I hope you don’t mind but if you do please lmk.
Thanks again!
Hi! Awesome idea! But instead of fabric, can I use paper instead? And what kind of paper would be good if ever? I don’t have fabric so paper is my only option. Thanks!
Hi Kim! You can use scrapbook paper but you’ll have to cut it up into pretty small squares – paper is harder to work with on surfaces that aren’t flat. Good luck!
I made a dozen of these Love it, but some show shadowing on the front side is the plate. Some bubble up on the back no matter how many times I push out the bubbles
I loved this so much I tried it! I used red and black Buffalo check fabric, so cute! The only problem I have is that I can still see some of the mod podge on the plate, it’s been 2 weeks and it should be completely dry. Did I use too much mod podge?