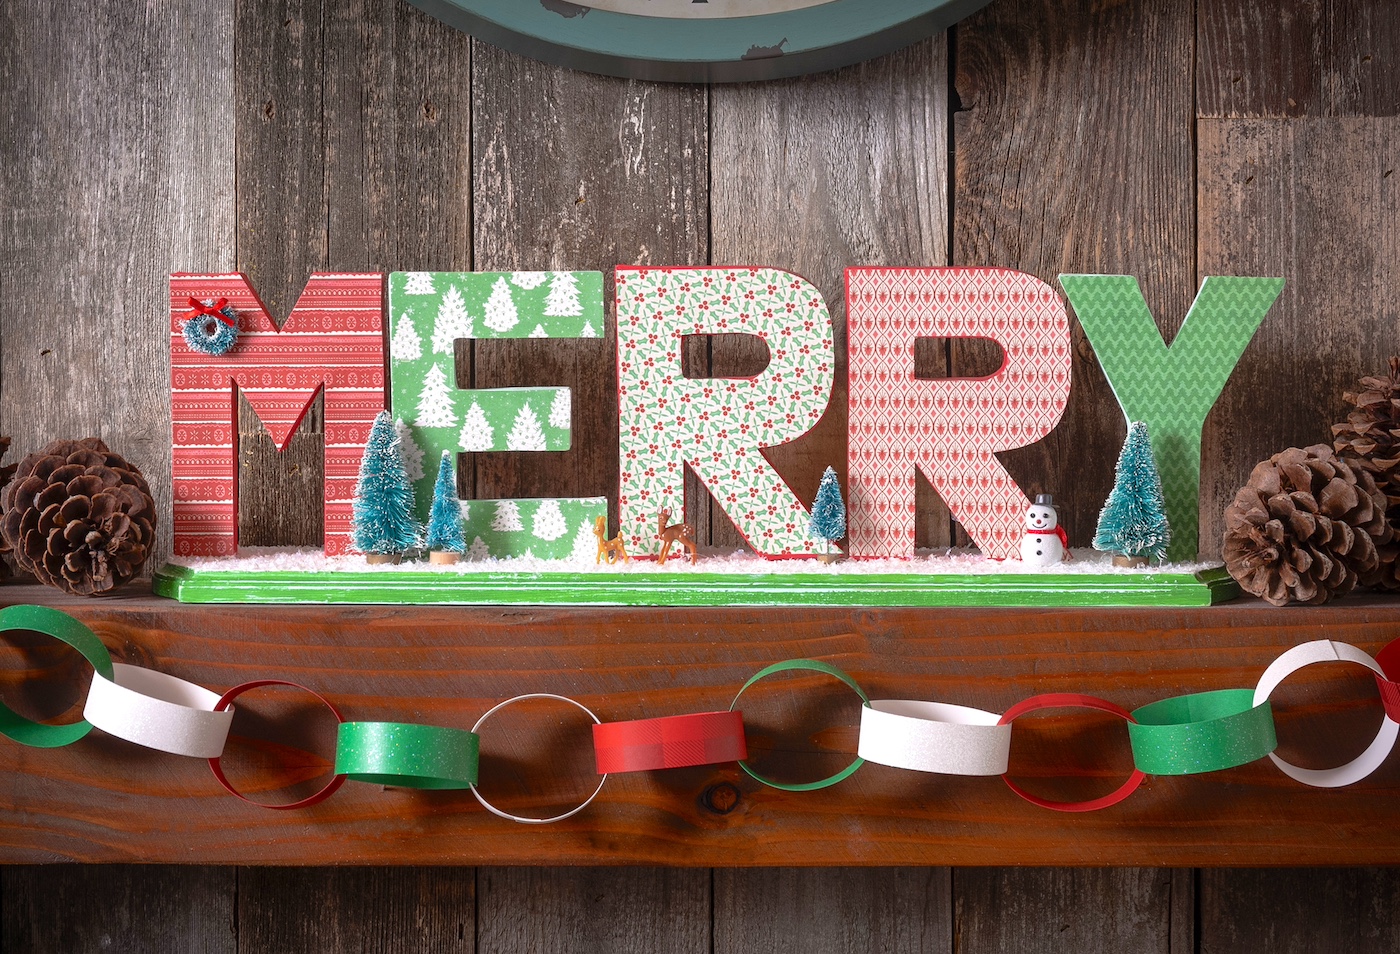
Learn how to make this “Merry” Christmas decor using paper mache letters, a wood plaque, and other fun holiday supplies! Such a cute idea.
Skills Required: Beginner. You’re going to be painting, cutting paper, Mod Podging it to letters, and gluing. This is relatively easy if you work slowly and follow the steps.
As we jingle all the way into the festive season, it’s time to add a dash of handmade charm to your Christmas decor.
If your mantel looks as though it’s longing for a touch of holiday cheer (and let’s be honest, who isn’t this time of year?), I’ve got just the crafty solution for you – DIY Merry Christmas decor that’s as fun to make as it is to display!
I promise this project is more “ho-ho-ho” than “no-no-no.” We’re going to take a plain wood plaque and transform it into a festive masterpiece with some paper mache letters.
First things first, let’s talk materials. We’ll start with a long, unfinished wood plaque – your canvas for the Christmas magic.
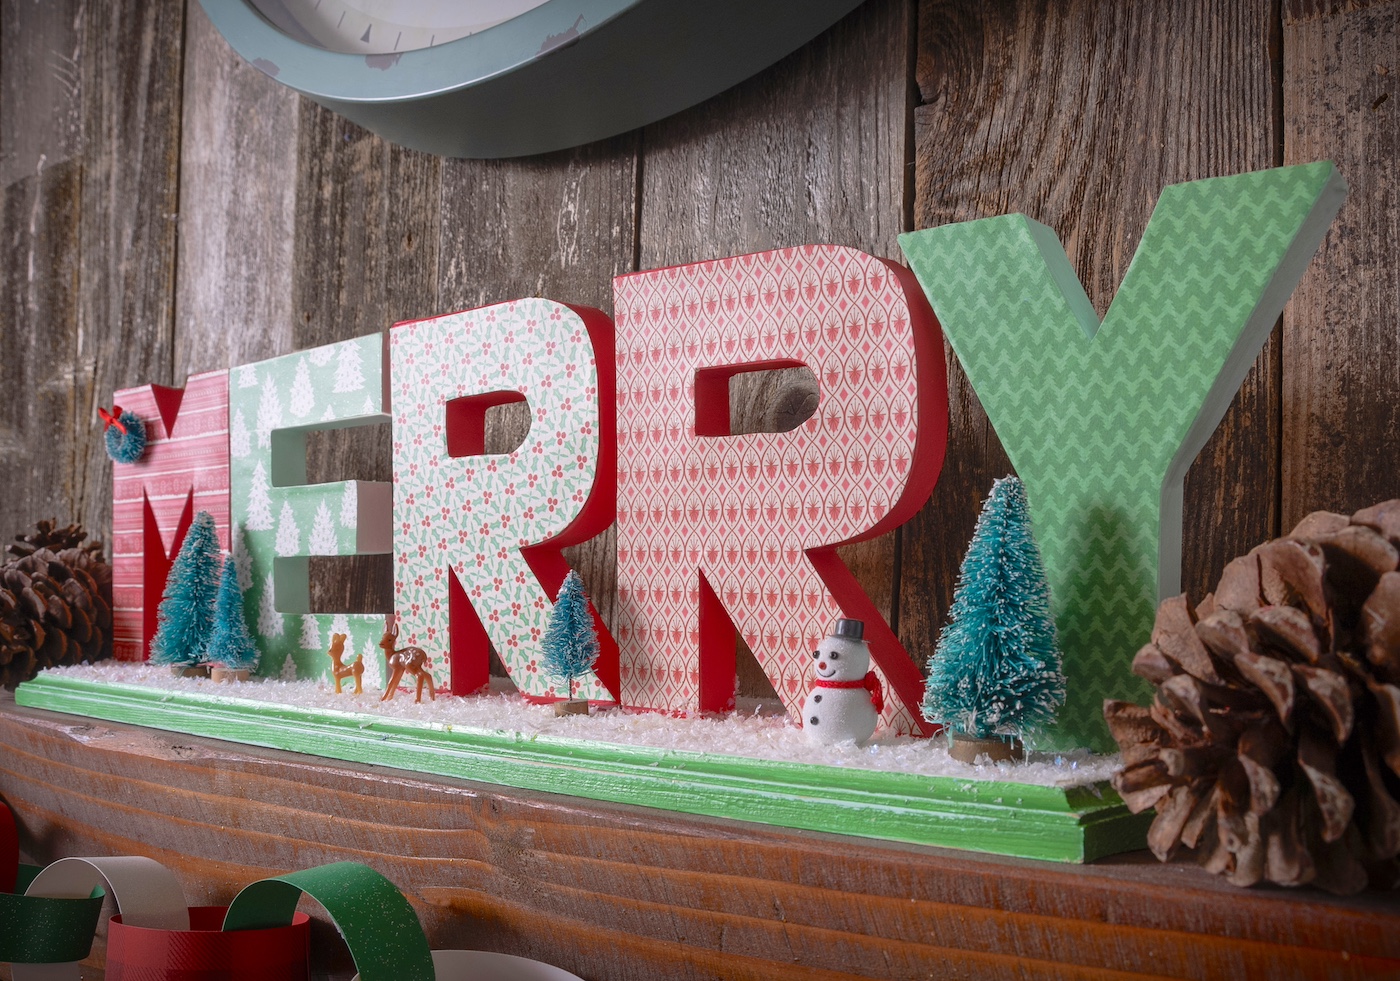
Then we’ll add some paper mache letters spelling “MERRY. These letters are going to get a fabulous makeover with some Christmas scrapbook paper.
Next, we add color. A bit of paint to set the mood. Once our letters are all dressed up and our plaque is painted, we’re going to bring them together in a beautiful, crafty union.
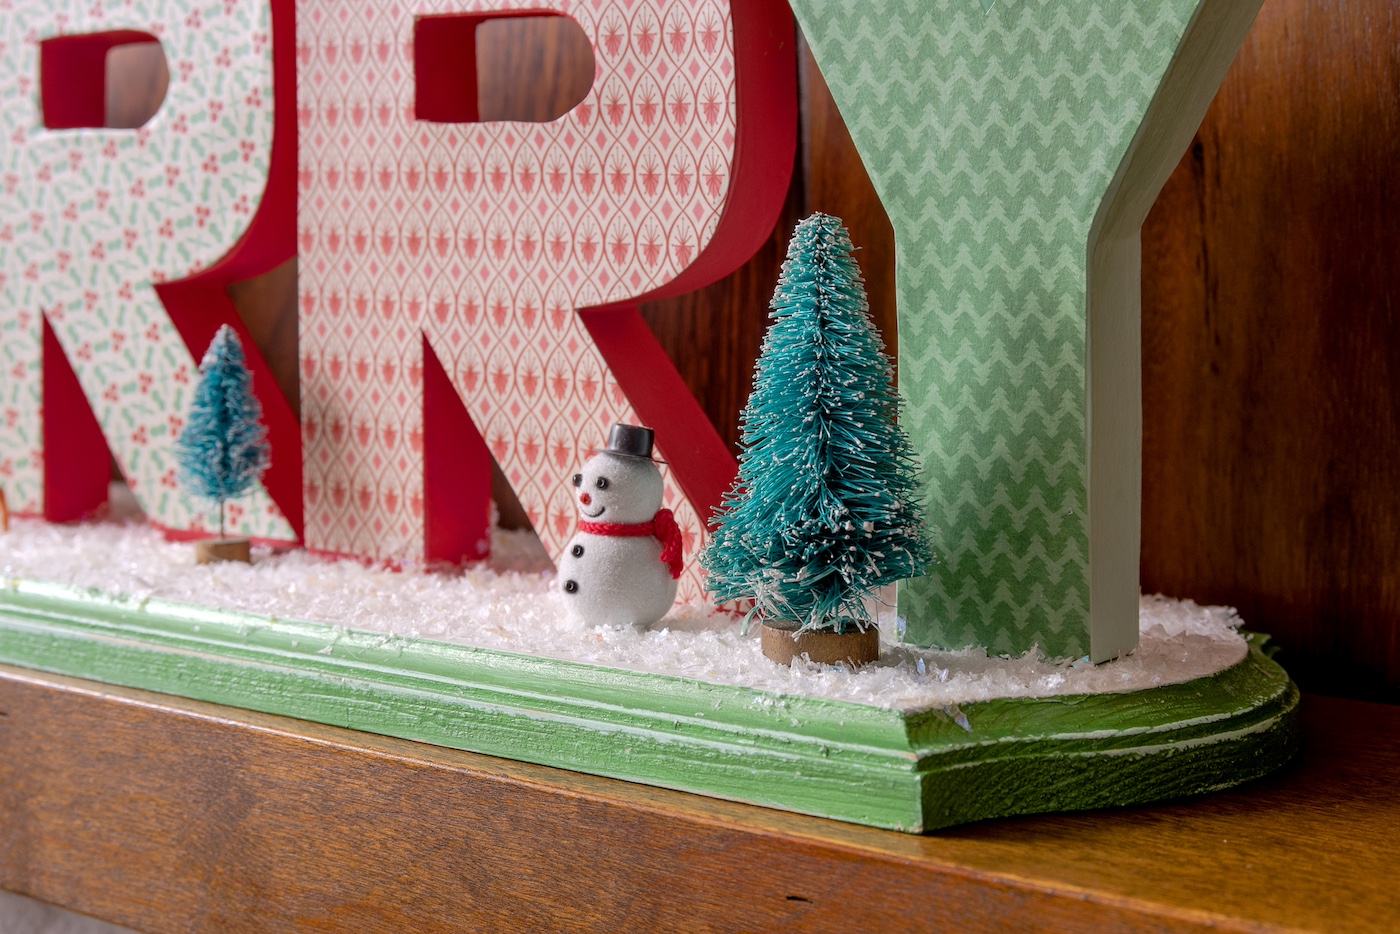
And just when you thought it couldn’t get any more festive, we sprinkle on some faux snow. It’s like a White Christmas, but without the need to shovel your driveway.
The result? A ‘Merry’ sign that’s as joyful as a Christmas carol and as cozy as a cup of hot cocoa.
Now, I know you’re eager to start spreading that Christmas cheer, and I’m just as excited to show you how. Scroll down to find the full tutorial on how to make this DIY ‘Merry’ decor.
It’s the perfect project for a chilly afternoon, a cup of your favorite holiday drink in hand, and maybe a Christmas tune or two playing in the background.
Let’s make something that not only lights up your mantel but also brings a smile to everyone who sees it.
Because that’s what Christmas crafts are all about – spreading joy, one decoupaged letter at a time. So, grab your glue and let’s get crafting!
First, here’s what you’re going to need.
Gather These Supplies
- Wood plaque – 23.2″ x 5.4″
- Paper mache letters – 6″, spelling “MERRY”
- Craft paint – colors to coordinate with your papers plus white
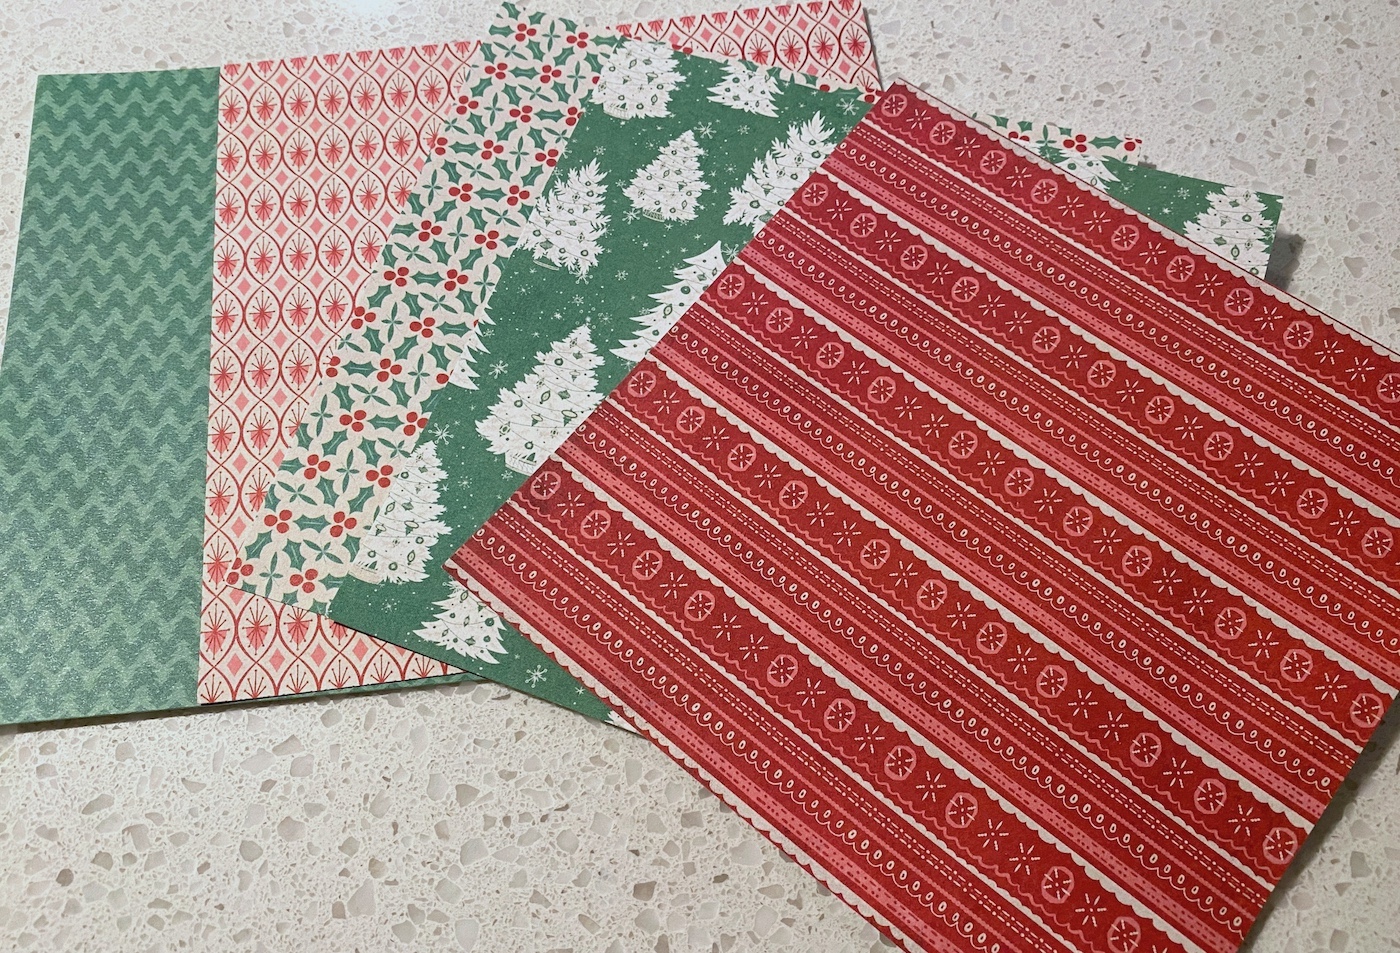
- Scrapbook paper – five sheets
- Faux snow – got mine from Dollar Tree
- Mod Podge Satin
- Bottlebrush trees and other Christmas embellishments (deer, snowmen, wreath, etc)
- Paintbrushes
- Pencil or pen
- Hot glue gun and glue sticks (or craft glue)
- Craft knife and mat
- Scissors
- Sandpaper
- Wax candle
Tips and Thoughts for This Project
You don’t have the distress the base of the plaque but I love the way it came out. The distressing of metallic paint with regular paint is hard to see in the photos but looks great in person!
If you use craft glue for this project instead of hot glue, glue any embellishments to the letters before gluing them to the plaque (so you can keep them flat while drying).
If you see any blank areas after applying the faux snow, you can go back and add some additional Mod Podge and more snow to fill in.

DIY Merry Christmas Decor
Equipment
- Pen or pencil
- Hot glue gun and glue sticks (or craft glue)
- Sandpaper
- Wax candle
Materials
- 1 Wood plaque(s) 23.2″ x 5.4″ – mine's from JoAnns
- Paper mache letters – 6″ spelling “MERRY”
- Craft paint colors to coordinate with your papers plus white
- 5 sheets Scrapbook paper
- Faux snow
- Mod Podge Satin
- Bottlebrush trees and other Christmas embellishments deer, snowmen, wreath, etc
Instructions
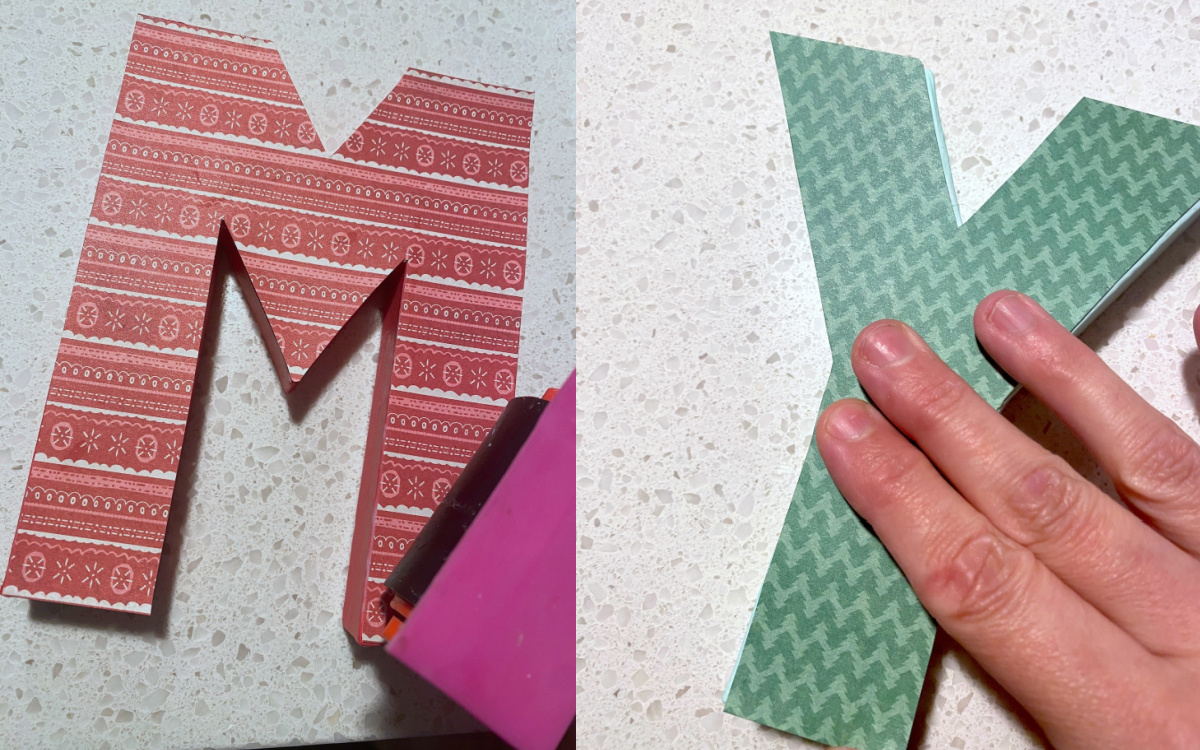
- Choose the papers to cover your letters. Lay out the papers and decide on your paint colors for each letter.
- Trace the letters onto the back of the scrapbook paper using a pencil or pen.
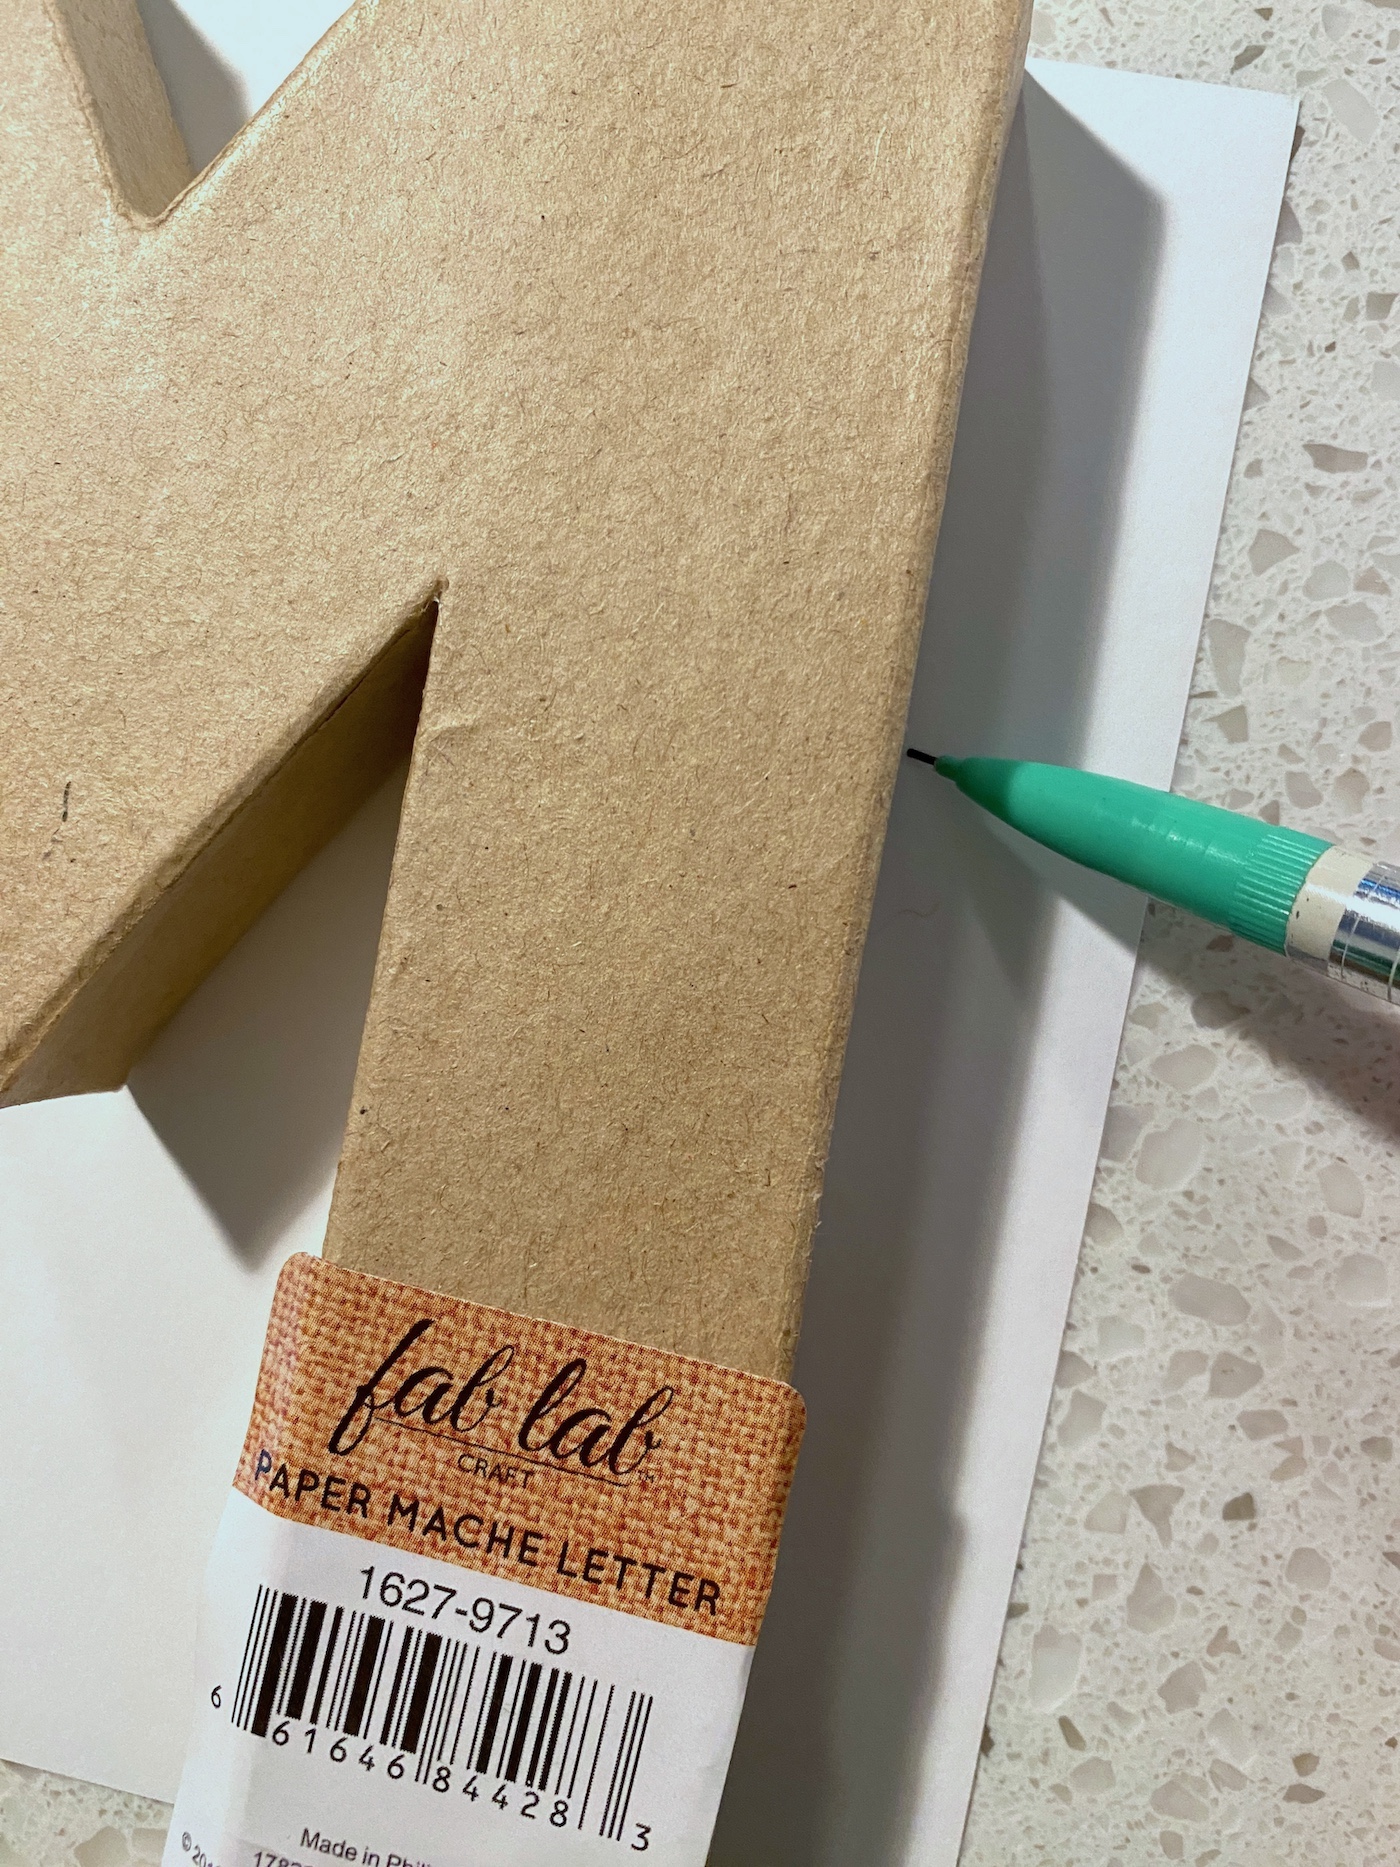
- Cut out the letters using your scissors. For tricky areas like the insides of some of the letters, it's easier to use a craft knife.

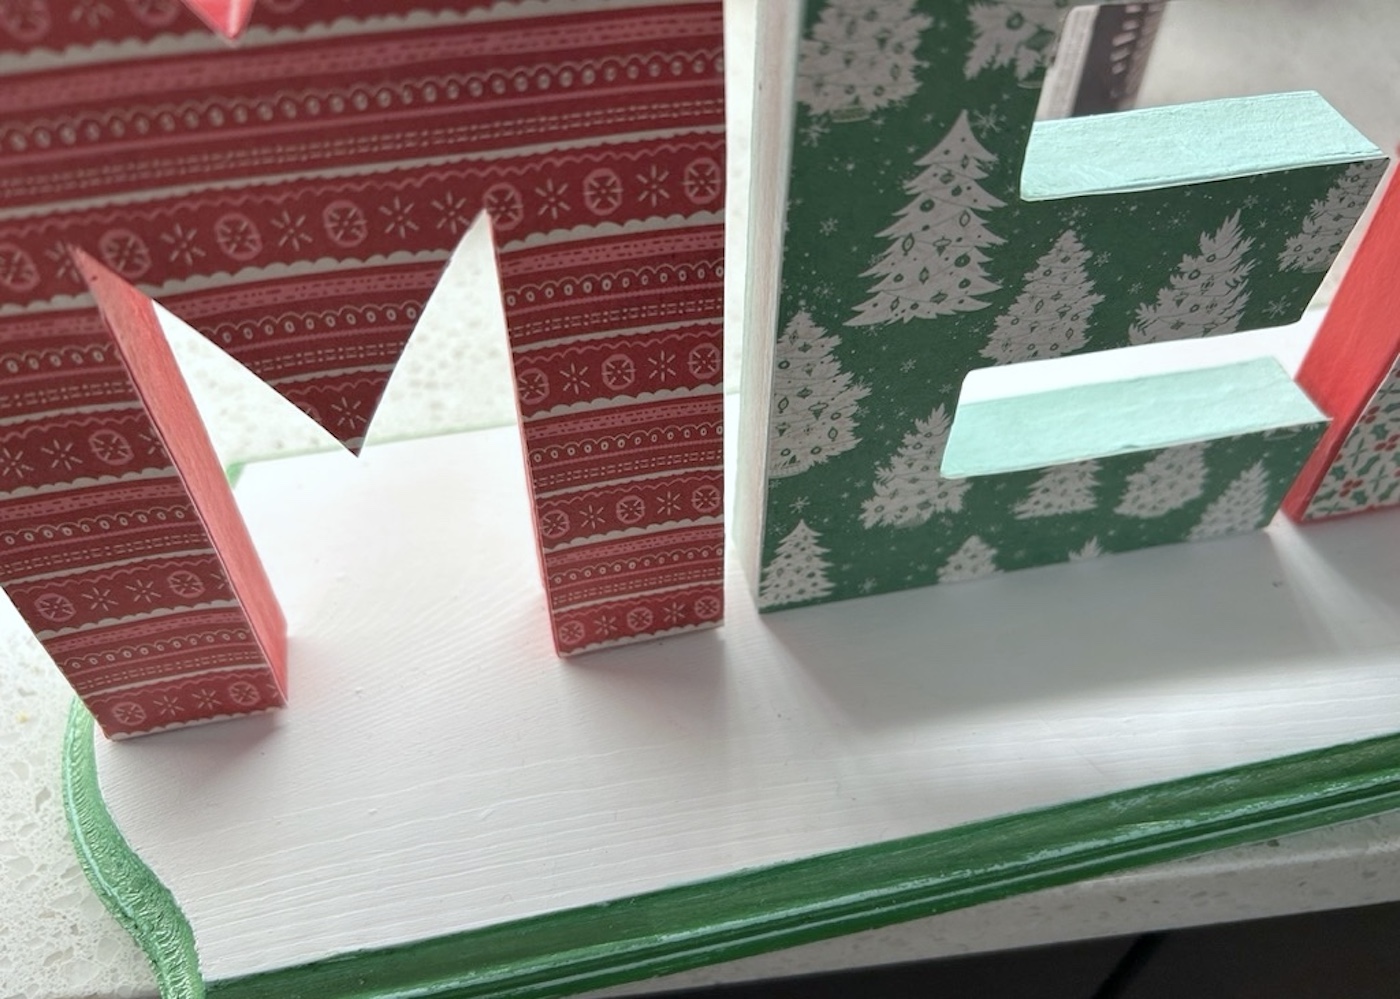
- Paint the top of the wood plaque with white craft paint. Paint the edges of the plaque with another color (I used light green) and a smaller brush. Paint the sides and back of the letters with the colors of your choice at this time. Let dry.
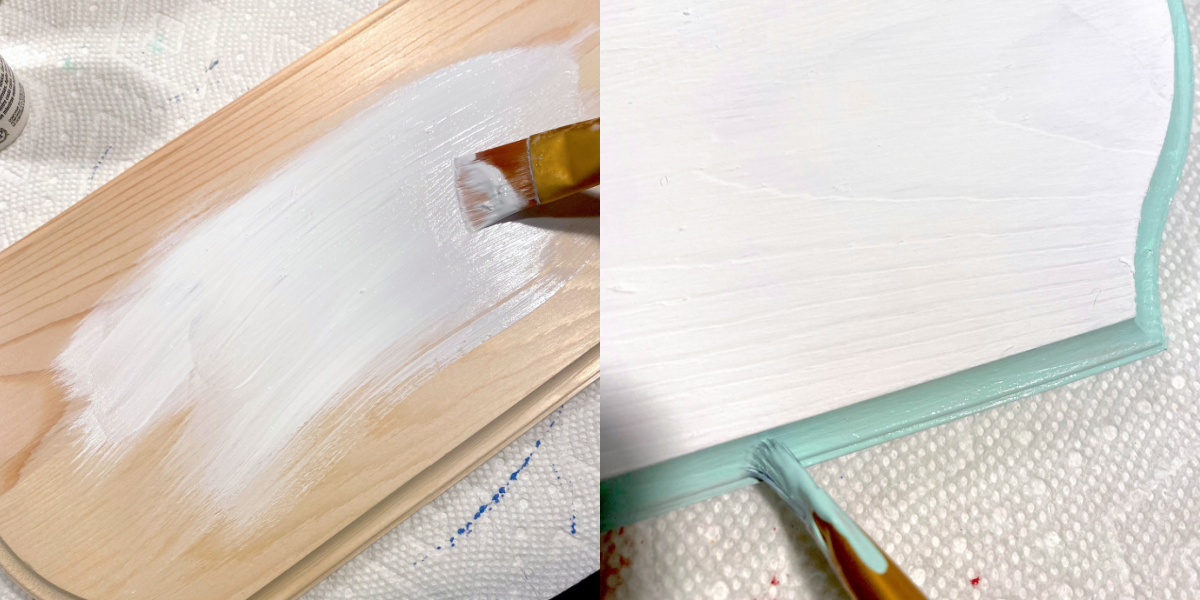
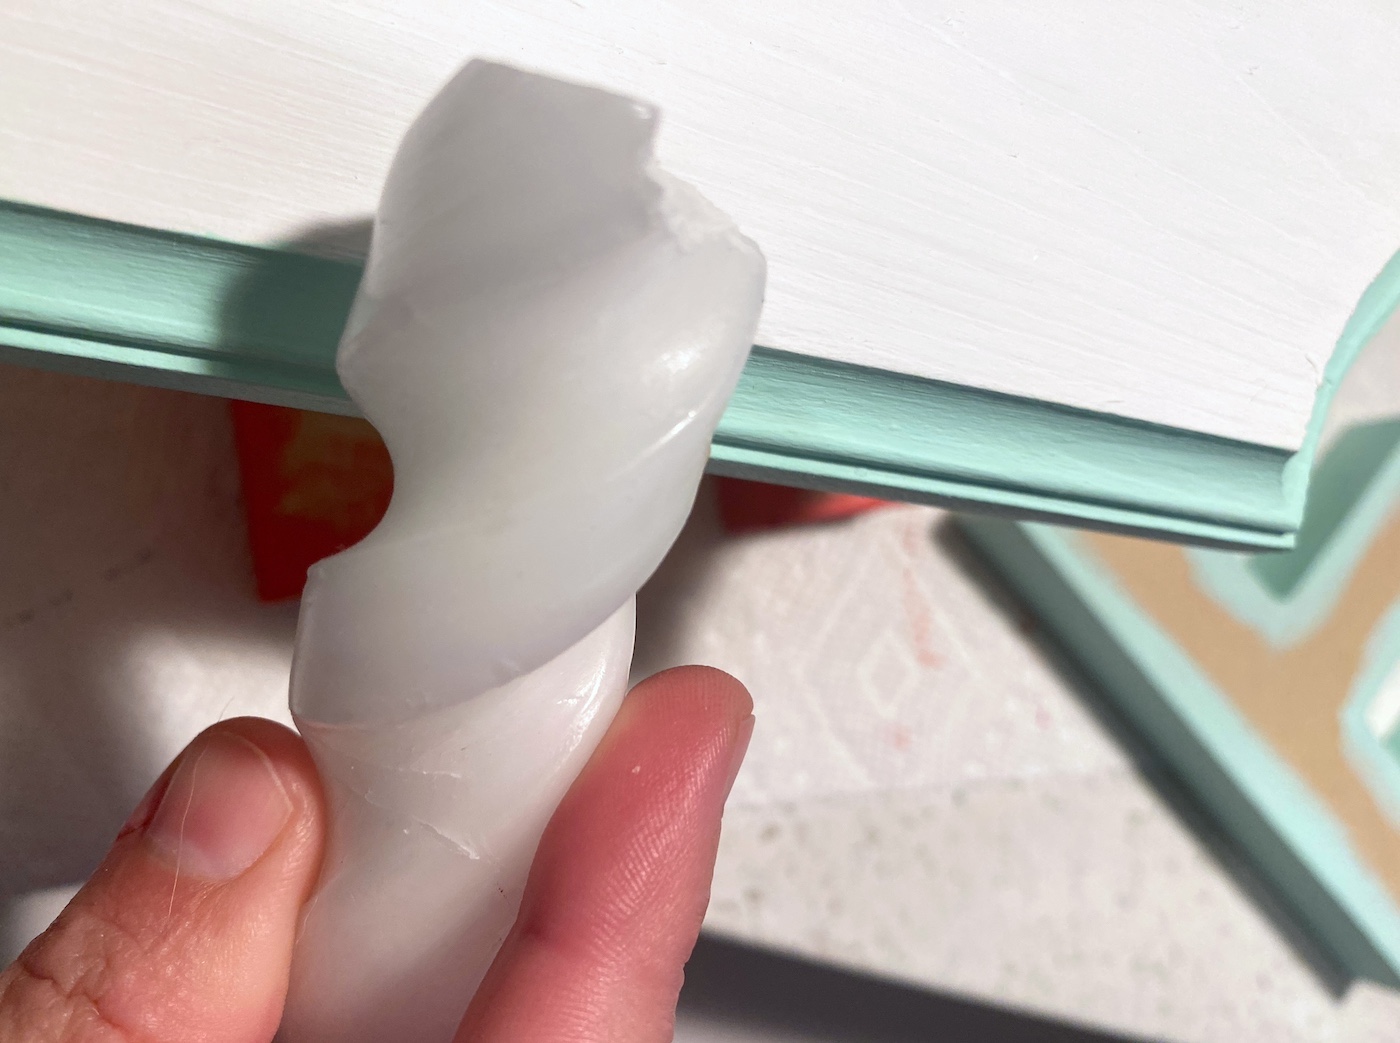
- Wax the edges of the plaque with a white candle. Just do it lightly all the way around the plaque.
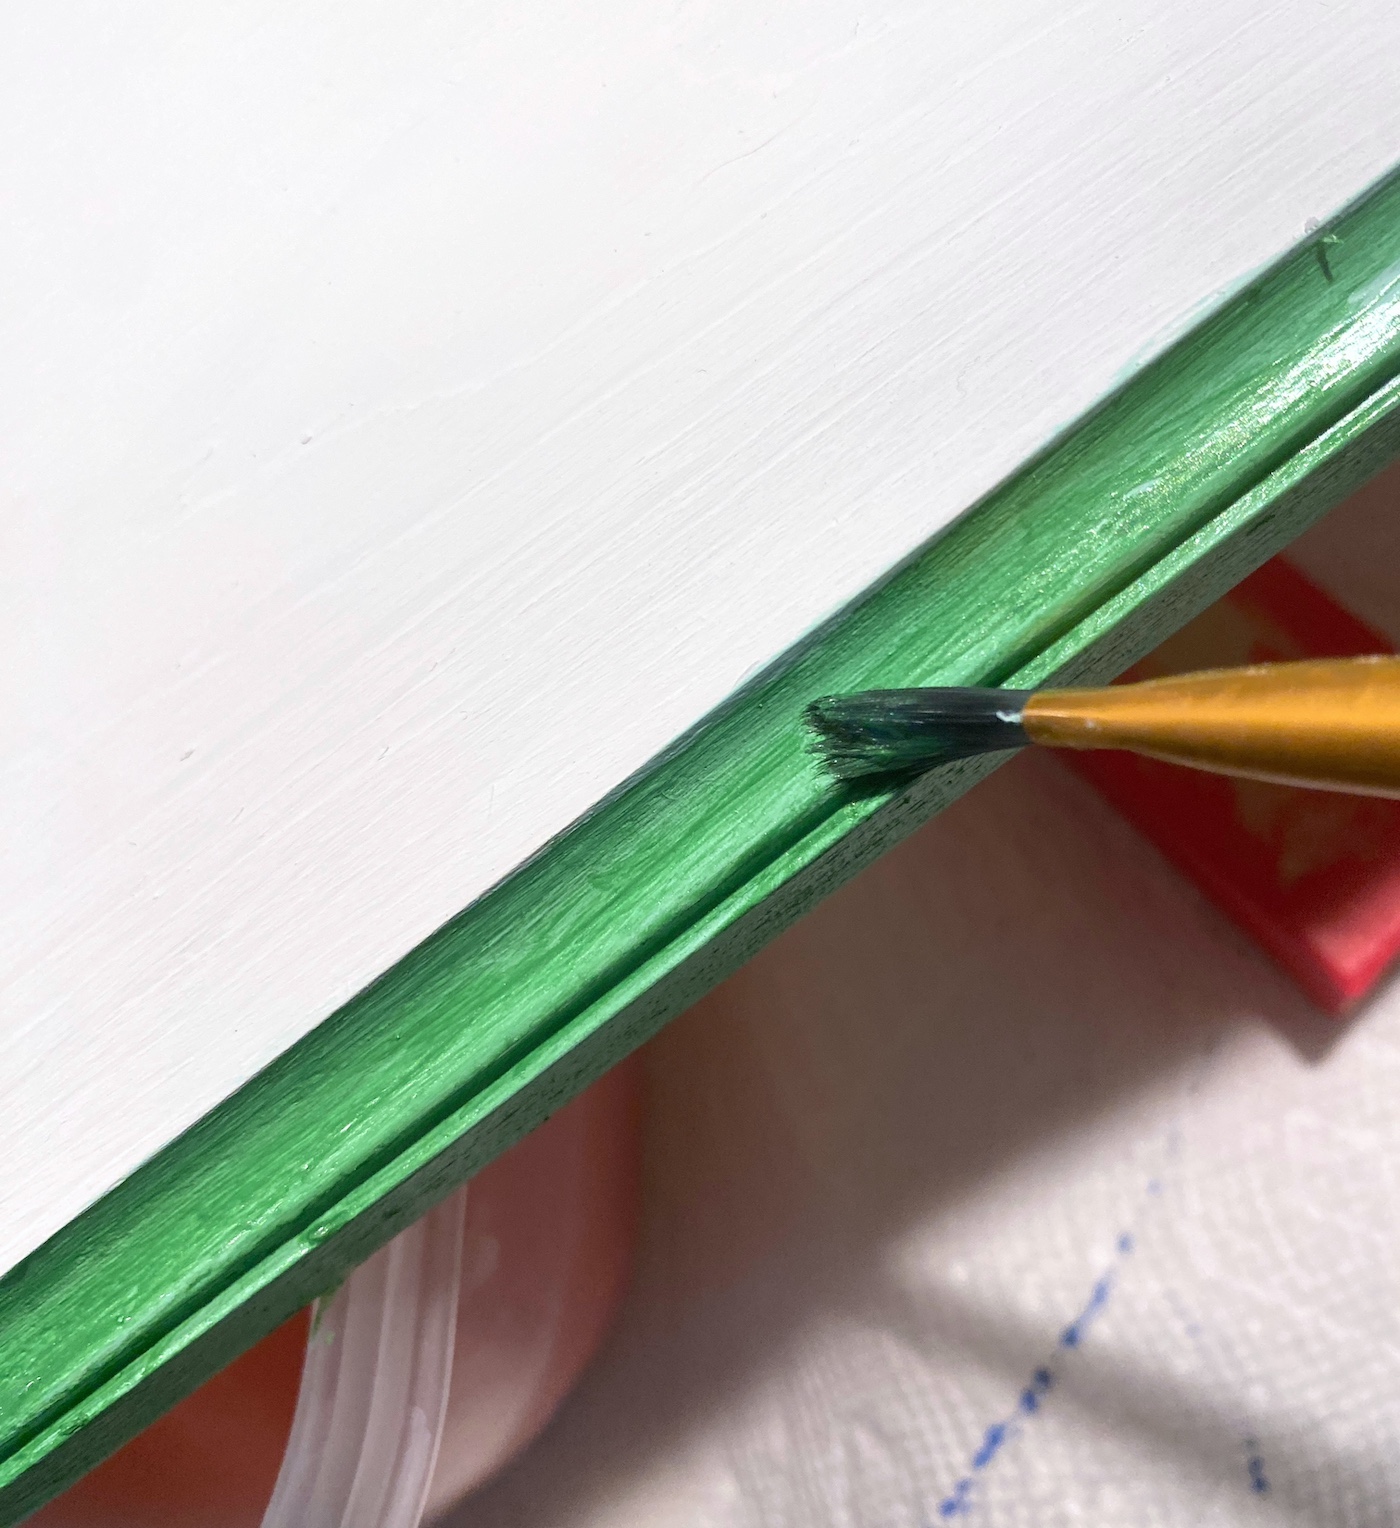
- Paint around the edge of the plaque with green metallic paint, or your choice of color. Let dry.
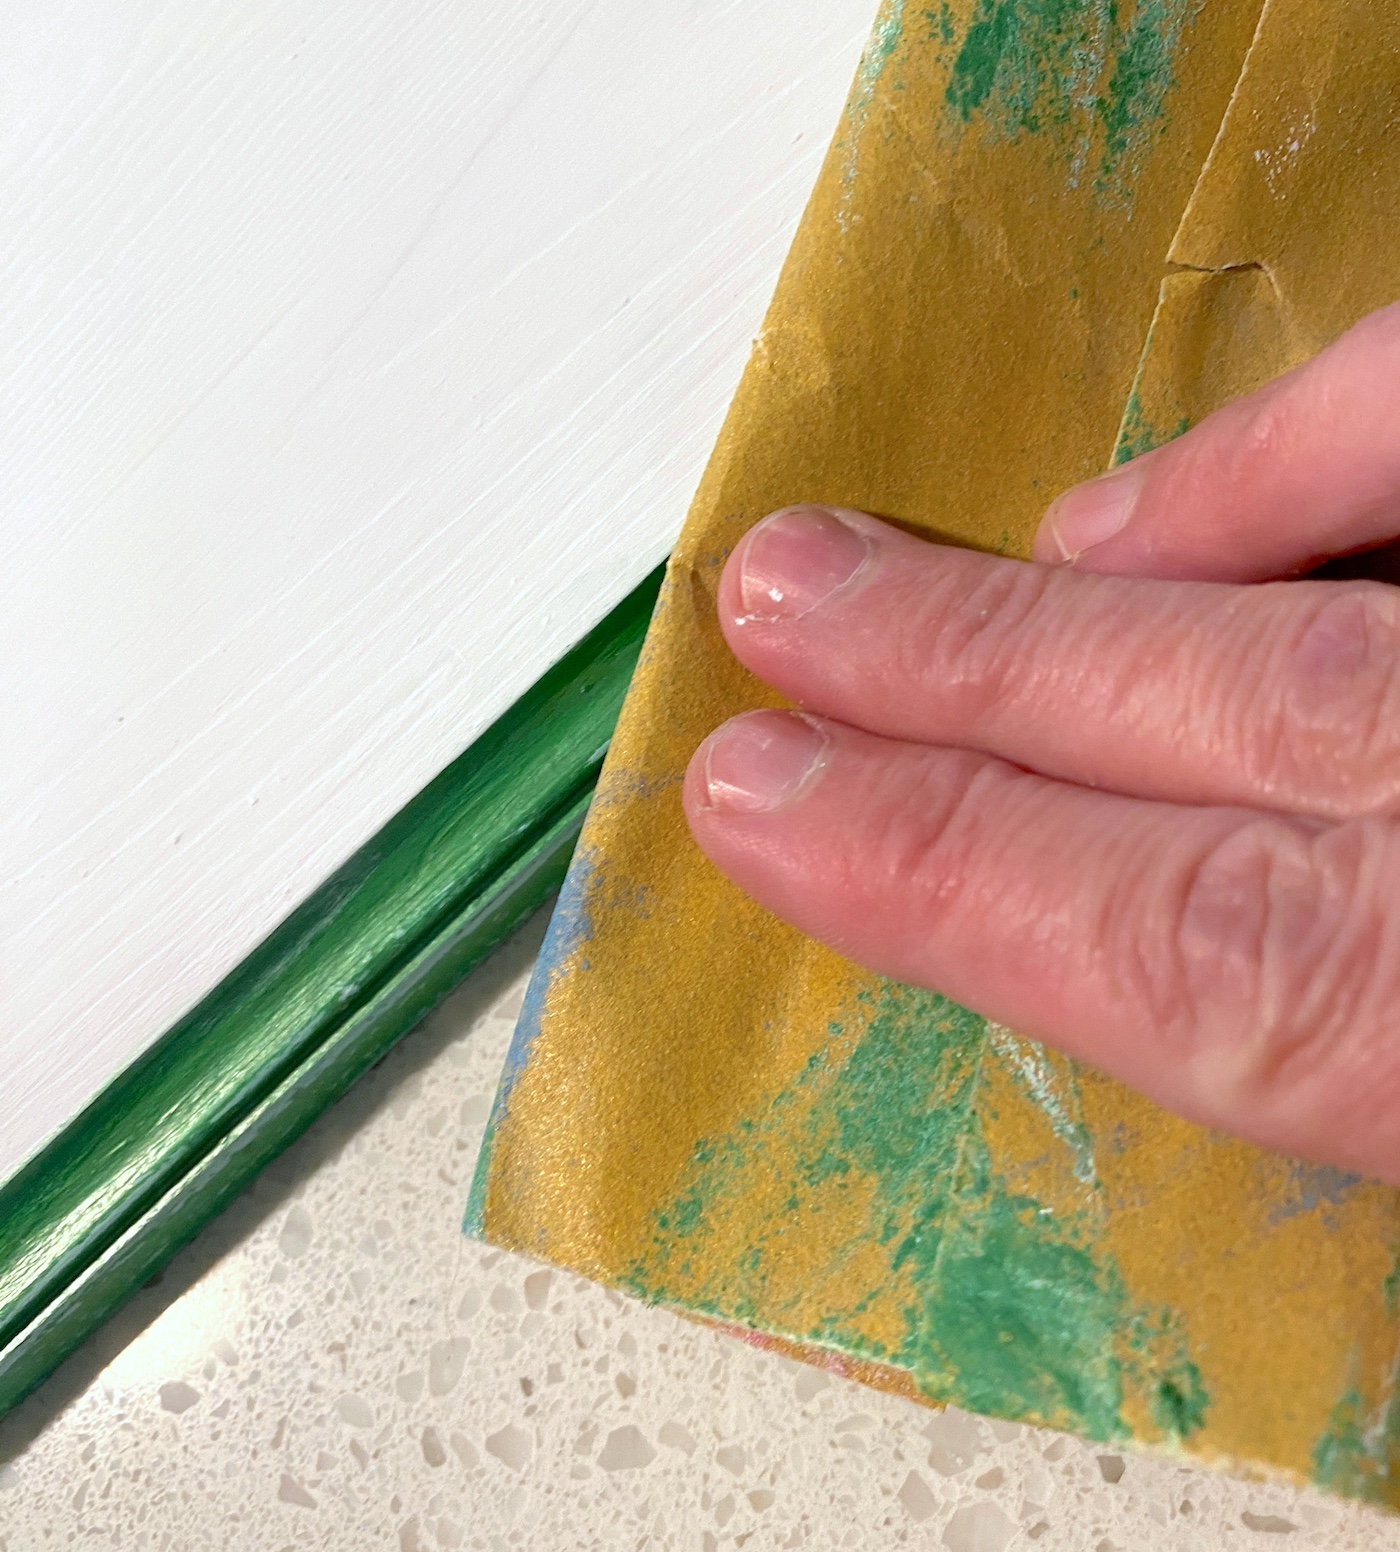
- Use the sandpaper to lightly remove some of the metallic paint. Wherever the wax is, you'll reveal paint below. Sand until the desired effect is reached.
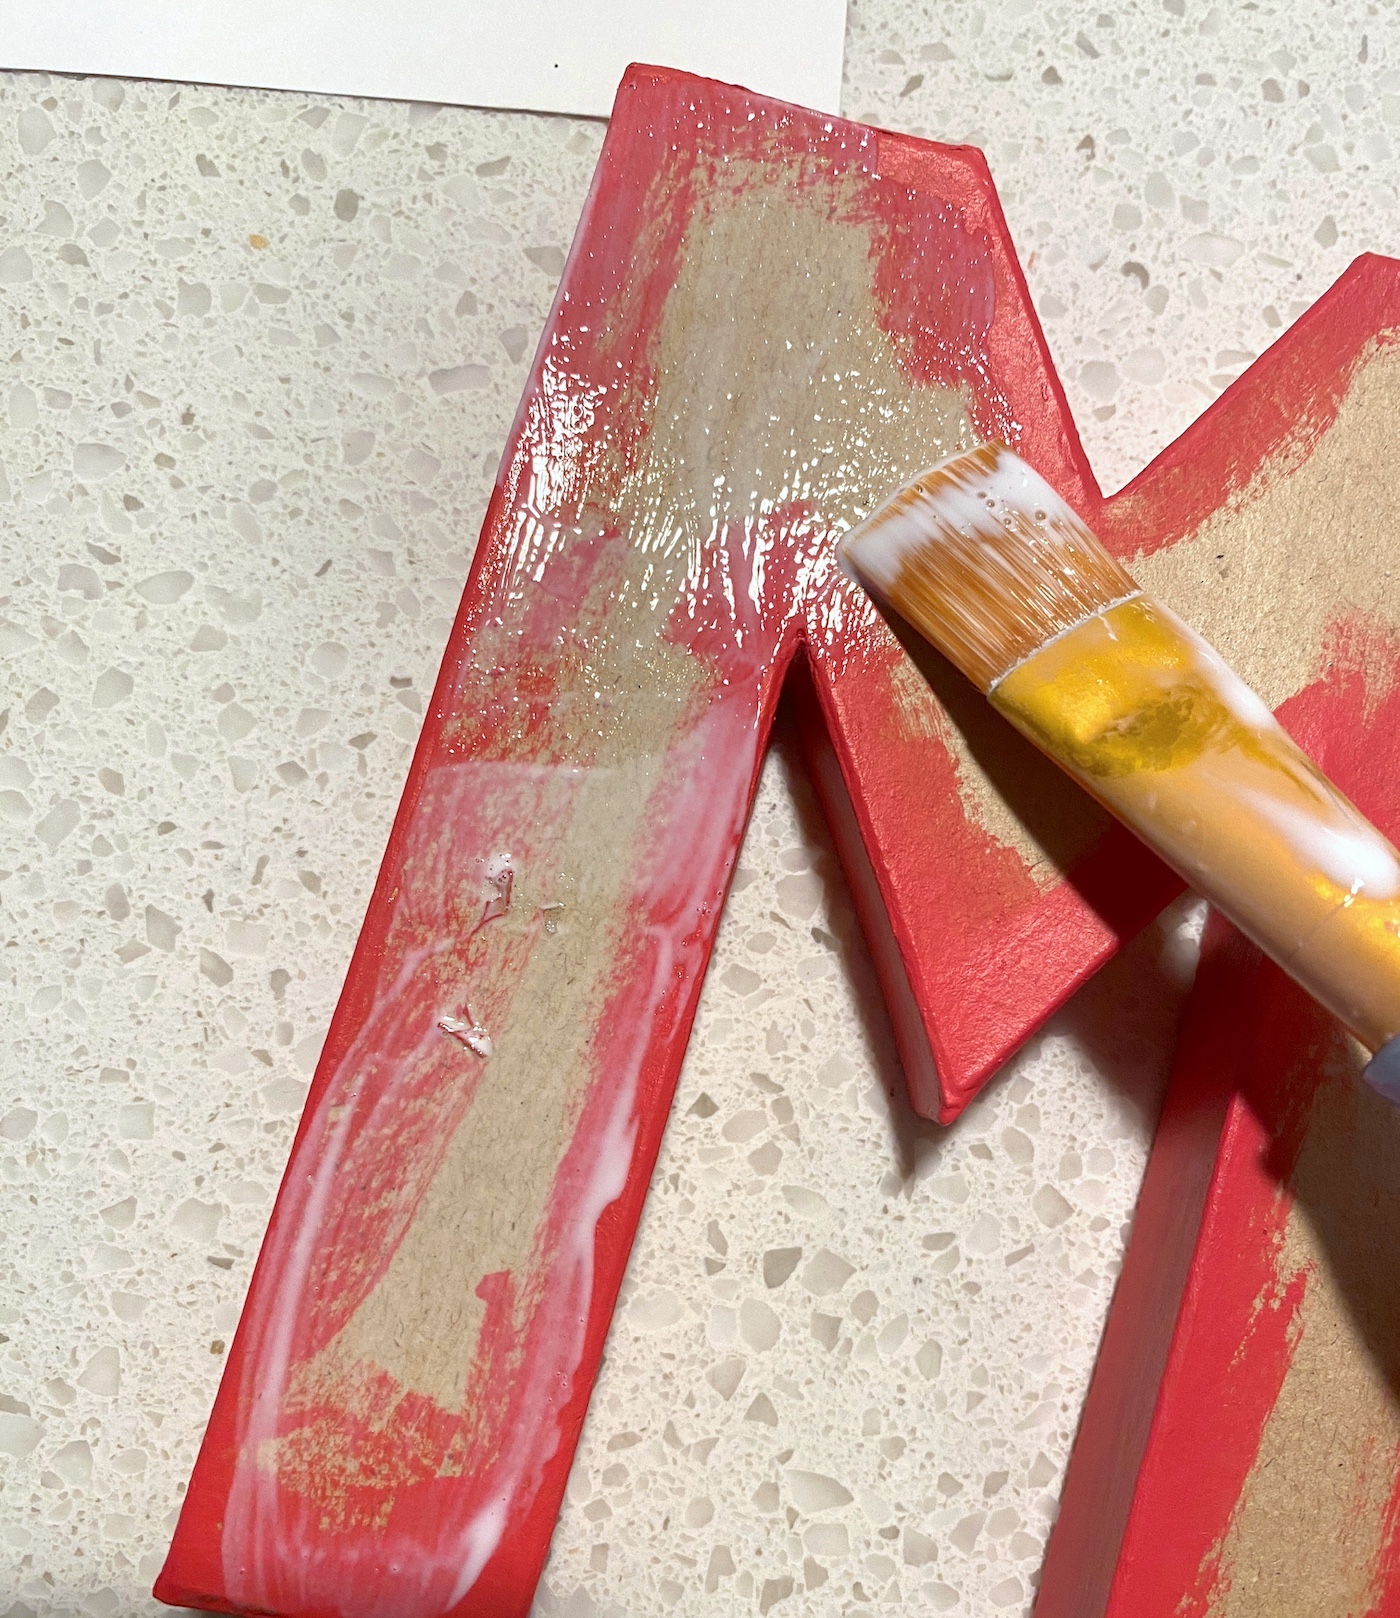
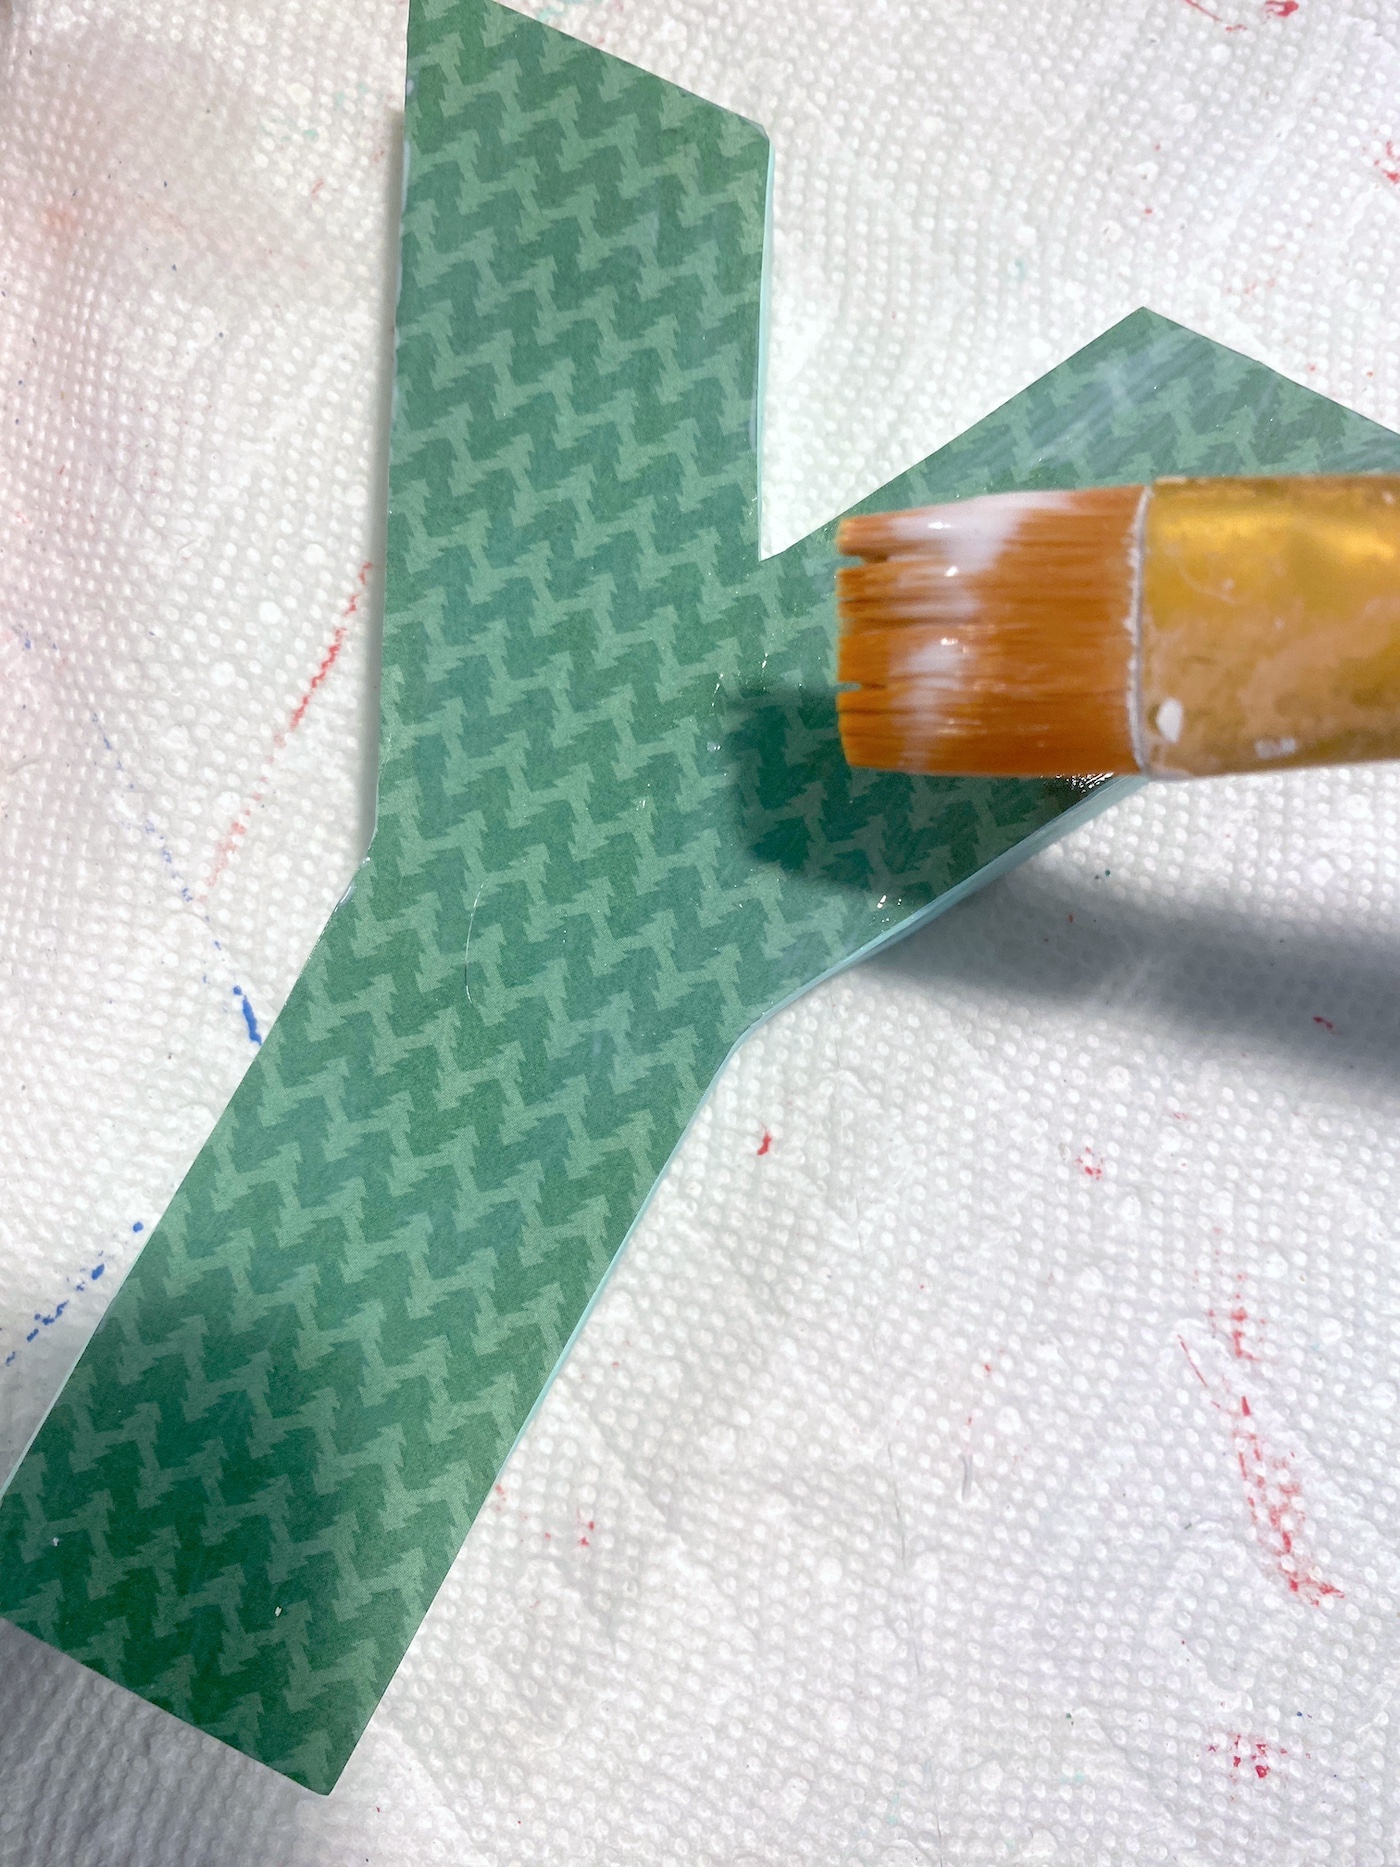
- Apply a medium coat of Mod Podge to the letters, one at a time.
- Smooth the paper down on top of the first letter, using a brayer or your hands. Wipe away any excess Mod Podge that comes out the edges. Let dry. Repeat with remaining letters.
- Once all the letters have the paper on the fronts and are dry, coat them all with a layer of Mod Podge. Let dry.
- Place the letters on the plaque in the desired format. Once you have the placement you like, tilt the letters back in place and add some hot glue to secure. Tilt the letters forward to adhere to the plaque.
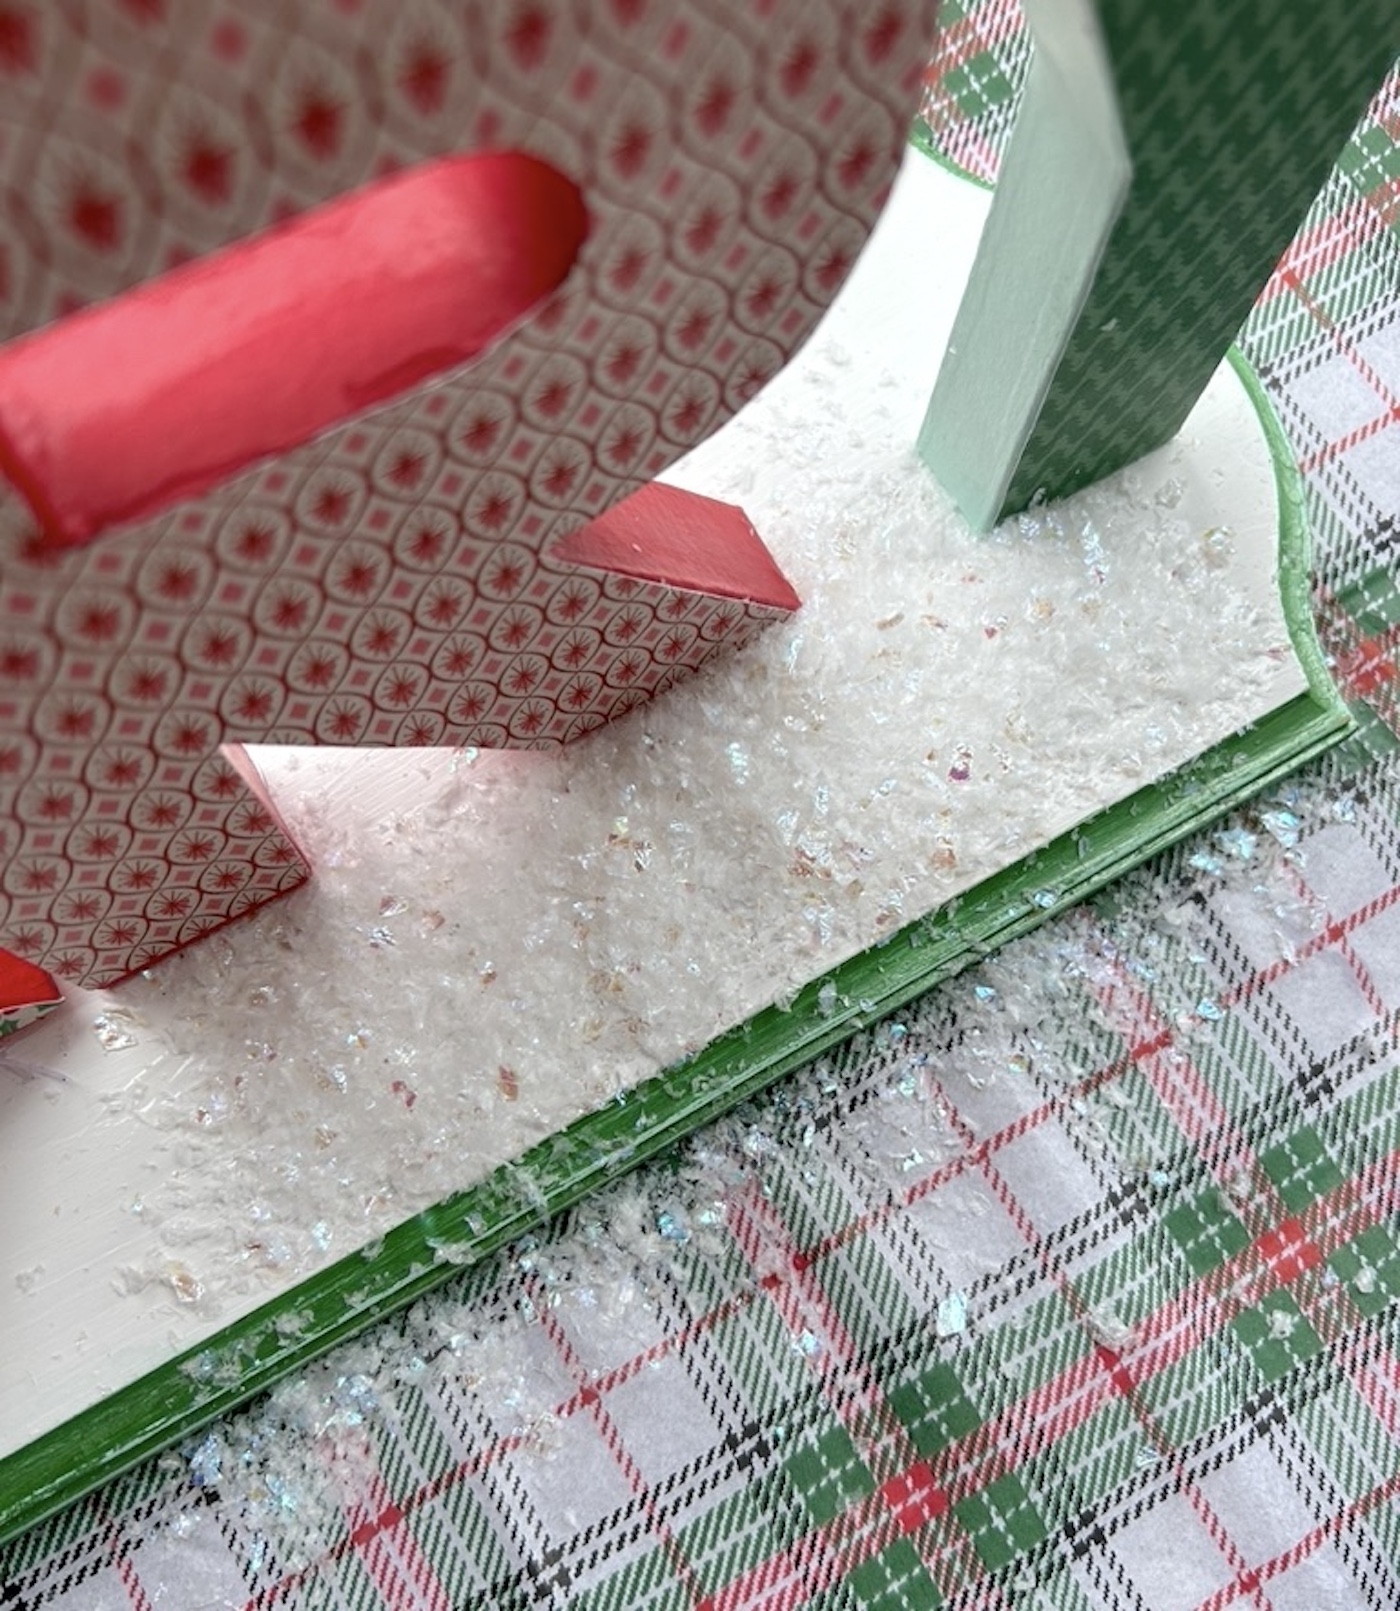
- When the letters are secure, add a layer of Mod Podge to the top of the plaque. Sprinkle on the faux snow and tap off the excess.
- Decide where the embellishments are going. Hot glue them directly to the plaque and let set before displaying.

If you enjoyed this DIY Merry Christmas decor, let me know in the comments! I’d also love for you to check out the following projects: