Do you love Shrinky Dinks? This Shrinky Dink necklace was so easy! If you love Shrinky Dink jewelry, this is a fun project to try with Sharpies and stencils.
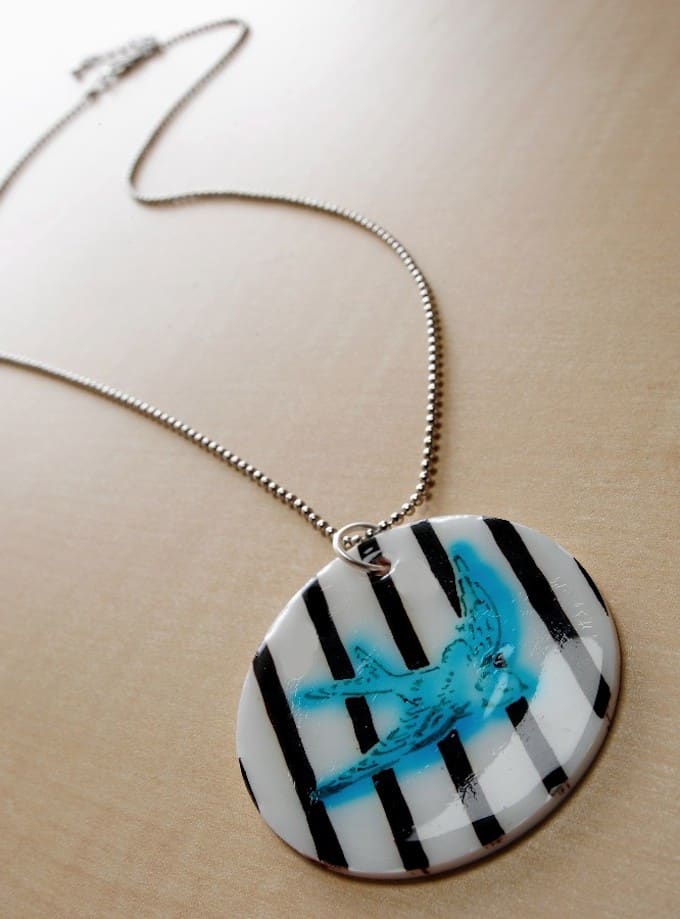
I’ve been on a DIY jewelry kick for a while, and I’ve had some shrink plastic in my stash for about six months that has been begging to be turned into something.
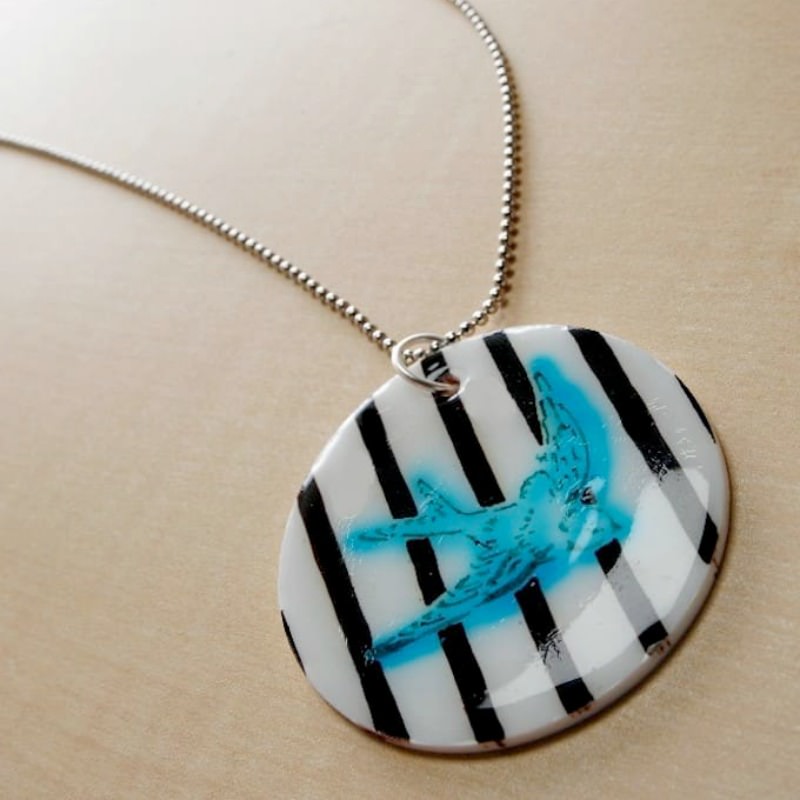
Combine these two things with some Dimensional Magic and you have a Shrinky Dink necklace! If you like making DIY necklaces, you’re going to love trying this project.
This Shrinky Dink jewelry project is actually a little bit of a CraftFail because it didn’t go as planned, but it might be okay (the ink blurred a bit).
I’m wondering what you think and I want you to let me know in the comments!
Important Things to Remember
Shrinky Dinks shrink to about 1/3 of their original size and get nine times thicker. It’s magic, people. The nice thing about Shrinky Dinks is that even though they get smaller and thicker, they’re still very lightweight.
You also need to remember to punch your holes before baking your Dink. If you don’t, you’ll have a heck of a time trying to get them punched afterwards.
I’m pretty sure the only way it would happen is if you used a drill. I learned from experience and after throwing a few Dinks in the garbage!
Are you ready to give this project a try? Get the printable how to below:
Shrinky Dink Necklace
Materials
- Shrinky Dinks
- Sharpie(s) Dark Brown and Teal, or colored pencils
Video
Instructions
- You will first need to cut a circle shape out of your Shrinky Dink material. I used a circle cutter and did about a 3 3/8" circle (it was completely random, I just made sure my stencil fit), but you can also trace a shape and cut it with scissors.
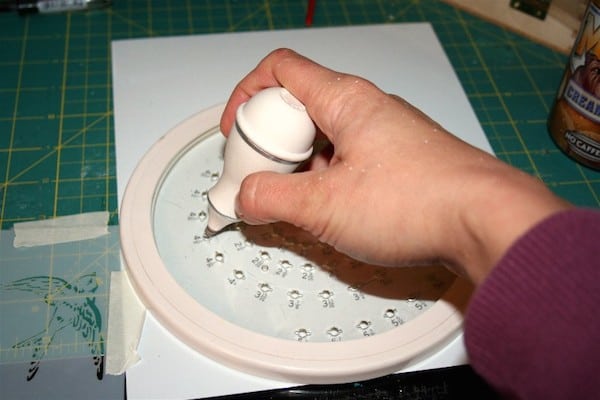
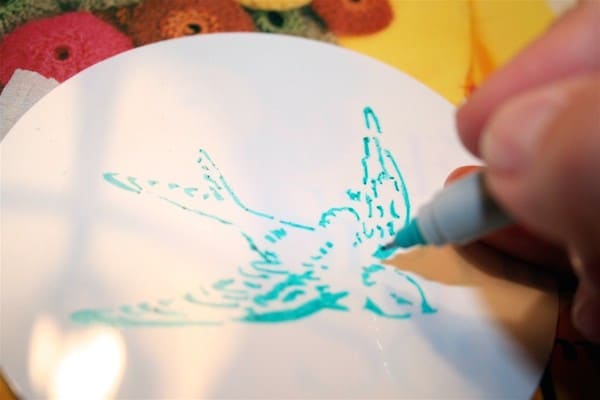
- Create your design on the Shrinky Dink material using Sharpies and stencils.
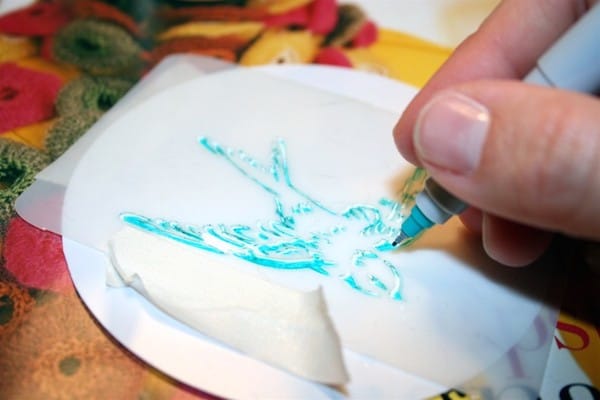
- After removing the stencil, go back and thicken any lines that might not have fully transferred with the stencil.
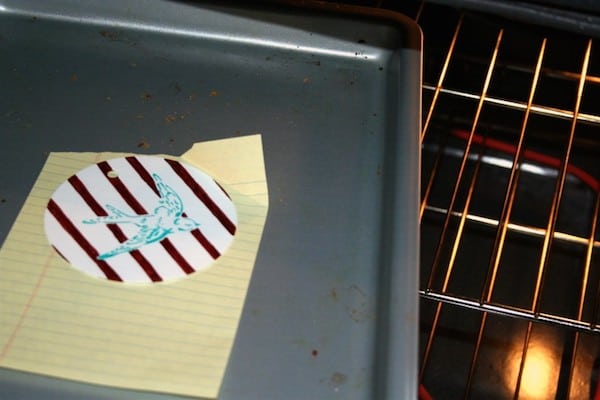
- Punch any holes BEFORE baking the Shrinky Dink sheet. Preheat the oven to 325 degrees Fahrenheit. Place the Shrinky Dink shape on a cookie sheet with aluminum foil.
- Put the cookie sheet in the oven for 1 – 3 minutes, watching the Dink shrink. If the item folds on itself, untwist it and flatten while still hot. Remove the cookie sheet from the oven and let your Shrinky Dinks cool before handling.
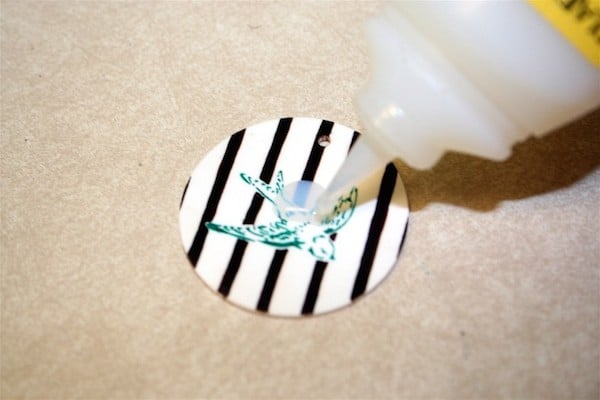
- Finish by putting Dimensional Magic on the pendant and allowing to dry.
Notes
- I’m wondering if I would’ve let the Sharpie dry a lot longer before baking if there would’ve been a difference in the blurring. Just thinking that maybe the Sharpie would’ve set more in the material somehow.
- It’s been recommended to me by several people that the Ruff n’ Ready sheets might help with the blurring. They are made to look frosted so have a textured side, which may take the ink better.
Also if you like handmade jewelry and accessories using Dinks, visit some projects from my friends below:




I think it looks super cool. The blurring makes it look like a silk screen.
How big is the final pendant? About 1″?
Yeah, that looks horrible. Like, so horrible that you should save yourself the embarassment of wearing it and MAIL IT to me. Like ASAP!
I LOVE LOVE LOVE it! I think the blurring is very cool, almost Warhol-ish, if that make sense.
I think it’s too cool, definitely does not deserve the flush! lol
How funny that the stripes changed color like that! I didn’t notice the blurring until you pointed it out actually. lol I think it’s a cool effect but trying to work with it to see if you could get it to not blur would be cool too.
Wow, that answered nothing. LOL
I thought the blurring looked intentional! Either way looks great, need to get some Dimensional Magic to play with
This is Oh so COOL. I used to love Shrinky Dinks when I was a kid. I was obsessed with them. Drove my mom crazy because I was always wanting to buy more and more kits.
Also, I like the bird, I think it looks perfectly fine the way it is.
Wear it. Definitely.
I don’t think it’s a CraftFail at all. I love it!
I say: fine as is, use a fixative before adding the dimension magic next time around.
It totally looks like you meant to do that. It’s awesome and so cool! I love Shrinky Dinks. They always take me back to the 1980s when I was a kid. So much fun! And they really are magic.
I’ve never done shrinky dinks but now I want to! I remember other kids doing them. I like your bird!
Love “Dinks.” Just bought blank sheets of Shrinky Dink plastic at Hobby Lobby, and have made a series of original charms for a bracelet. So fun!
Where can I buy Shrinky dinks like now?
That is really cute!
I like the blurring. I commend you! I’ve worked with shrinky dinks for jewelry (except I went the extra painful step of trying to get it to fit into a pewter pendant), and it’s a royal pain in the butt! (But I got a super-sweet stormtrooper necklace out of it to wear at conventions. That’s as close as I get to dressing up!)
I wouldn’t have guessed that it isn’t what it’s supposed to be if you hadn’t told us. I think it looks great the way it is. And yeah, VERY weird that one Sharpie ran and the other didn’t. I haven’t done one this big but the few times I’ve played with Shrinky Dinks(without a lot of success getting them to color the way I want them), I’ve used my heat gun to shrink them. It’s a very violent process as it flops around shrinking but FAST.
I like the way the bird looks. I don’t think there’s anything wrong with it. Honestly – if you didn’t point it out, I’m sure most people (like myself) would have thought that it was supposed to look like that. I really think it’s beautiful!!!! 🙂
While I support supporting CraftFail, this does not qualify! (See even Heather said so!)
I had no idea what you were talking about as far as a mistake until you pointed it out, and then I had to go back and look… no fail for youuu! 🙂
I would forsure wear it, I love the bird and I love how the color of the stripe turned darker. I really like it 🙂
I thought the blurring of the bird was intentional. Your friends aren’t lying, it’s definitely a keeper! And pfft, I’ll send you a stamp to send it to me before having you flush it! 🙂
Love it! I’ve used Shrinky Dinks before… They’re fab.
I think it looks awesome and I love the blurring. It’s just a really sweet design overall actually.
Looks good to me. Thanks for the tutorial.. I never heard of Shrinky Dinks until now… time to check it out!
I love it just the way it is! It looks like your spray painted the bird instead of carefully coloring it. I didn’t realize you could use Sharpies on Shrinky Dink. Duh! Well, good thing I have both Sharpies and Shrinky Dink waiting for me. Thanks of another great idea that’s going on my To Do List.
I have had that happen to me and it didn’t come out cool like that! It’s funny how the bird ran, but the stripes didn’t…weird. It’s sweet. Btw…I heart dimensional magic.
I love it, and I’m totally making one when I get home. I actually might try it with the plastic cup trick I saw on Dollar Store Crafts!
I love how you perceived this as a fail, when I think it looks like it could be intentional. Like a stamp, then a water colored highlight. I bet you could find someone to love it, easy. I’ve found people that looooved things I’ve made that I thought were disasters.
I thought the way the bird was painted it was on purpose since the stripes aren’t that way. If both bled, I probably wouldn’t like it, but I def. do like this one!
-Stefanie
2ndChanceCreations.etsy.com
I think it looks great!!!! I have some shrinky dink in my stash and I believe I will be finding it tomorrow!! 🙂 Thanks so much!!
http://lamarkham.blogspot.com/
I would totally wear this. It is really cute. I love that the lines turned a dark color-almost black from the photo. Great!!!
I just cannot find the dimensional mod podge in any of the stores around me though!!!
I would wear it! Great Job!
DON’T FLUSH! I think it’s beautiful! And it’s even more unique because it didn’t exactly turn out the way you intended.
that’s such a cute idea.. The blurred bird looks intended and very nice.. You better wear it and enjoy 🙂
Love
Hani
http://craftionary.blogspot.com
EEEK! I love it! Really, I do. And I just have to say that “shrinky dink” makes me laugh. And think of a Seinfeld episode. That. Is. All.
I like it. Not a fail, but an epiphany.
Love it! I’ve been wanting to try some Shrinky Dink crafts for a while now! Great job!
Love it! The bird blur looks like you meant to do it that way, like it’s a shadow of the bird. Very nice.
This is great! Thanks for sharing!
What a fun use for shrinky dinks! We’re featuring birds over at the M&T Spotlight this week and I’d love for you to submit this! https://makeandtakes.com/
ok I can’t find any shrinkadink at my $ store.
would luv for you to add it to our linking party this week.
https://www.passionatelyartistic.com/category/arts-and-crafts/
Thanks
Maggie
I think it looks awesome!
I say wear it and be proud. Or you can gift it to me…LOL! I want to try to make one of these. Come visit me at http://barbwired0117.blogspot.com/
looks great, and would be wonderful paired with black and white polka dots……thanks so much for sharing on Craft Schooling Sunday, great to see you! xoxoxo Sara
I think its lovely…and I think the blurring gives it more character. If you didn’t tell anyone you hadn’t meant to do it we would never have thought any different. Lovely.
Great tutorial. Now I have to try it..
thank you
Happy St. Patrick’s Day
Judi
I keep coming back to this article! I want to try this! (I can’t find Dimensional Magic anywhere in town. I keep asking over and over again at JoAnn’s, I think they might be getting annoyed with me.) Will have to buy some online.
I love the blurring of the bird, I think the whole project is beautiful!
I think it looks great, love the bird drawing.
I have NO IDEA what dimensional magic is…
Hopping over from T&J…
I love the blurring! I did shrinky dinks with my 2.5 year old daughter the other day with sharpies. It was way different than I remember & my mom agreed. We had a princess jewelry kit & I was making plans to do some more that were not from a kit before we were done.
I have kept this tab open in my browser for weeks and finally tried making one of my own. I tried a second one with colored pencil. On the pencil version, the brown blurred, but not the blue! I still like both though. 🙂
Awww. Don’t beat yourself up too much. This came out great, mistake or no. 😉 If you, or your readers, want to avoid future heartbreak, here’s a couple of hints and tricks I use. Get some spray fixative from the store and kit that bad boy before you modgepodge over it. Also, and this is a trick I LOVE, put your pan in the oven while you are pre-heating. Your pan will be hot when you put the dink on it to cook and that stops a LOT of the curling. It will make them a lot easier to deal with. Take the flat bottom of a glass and smush them as soon as they come out of the oven to make them as flat as possible. Hope that helps!
This is awesome! My 5 yr old daughter got a pack of this for Christmas from my parents as a stocking stuffer. Gonna play with it with her tonight. I was born in 86 and actually didnt even know what this stuff was!
I like the blurriness of the bird- looks intentionally cool! Anyway, to keep the design from blurring in the future, you might want to try painting a thin layer of elmer’s glue on top of the pendant (after it’s done cooking) to create a barrier and then apply to the Mod Podge Dimensional Magic. Hope that helps and keep up the great work!
I like this also. I would not change a thing in it. Love the colors and the stripes and the swallow.
Thank you
I like this. It is really neat simple. Love the colors and strips and the bird being a swallow. Sometimes mistakes turn out to be a good thing!
Your pendant is really pretty! May I ask what kind of circle cutter you used? I’m looking for a circle cutter for shrinky dink in 1 3/4 inches. Any helpful tips on where to find one would be appreciated! Thank you!
Hi Anonymous! I used the Martha Stewart circle cutter. Works pretty well!
Hi there, I featured this project on FaveCraftsBlog’s Sharpie Crafts Link Love Roundup! See it here:Thanks so much. I love the project!
Very nice necklace! Wou make it look easy to make!
I think the blurring is awesome and looks totally intentional. It adds more texture and dimension. It also adds more color. It has sort of an overlay or screen printed look.
How did the brown turn to black?
Hi Anonymous! It’s because it shrank. The colors do that when you shrink them. The particles come together and make a darker color. It still looks kinda brown in real life, but black in photos.
I think it looks great like that. I just wish i could do this, I havent had much luck with the shrink products. The never seem to turn out like the instruction.
It’s perfect! I was once told that the way to know something was truly hand-crafted was by the small errors within the finished project. I thought you created this effect on purpose until you pointed it out. Love it!
I love it… the blured bird looks like you planned it that way… I tried the same thing on a color pencil project and it faded it in ramdom spots ruinning my piece…… I was glad to see this one, it gives me the gumption to give it another go 🙂 thank you for sharing…
I love this! I want to try this myself. Thanks for sharing your photos! This gives me the motivation to make my own shrinky dink pendant necklace.
I love the blurred bird! Wouldn’t have known it wasn’t intentional if you didn’t say. Keeper.
I love it! You can save money by using # 6 plastic that you probably already have in your kitchen to make your own shrinky dinks. Check clear food packages (grocery store muffins, salads and party trays) for the #6 recyclable symbol, then proceed with shrinky dink instructions.
I love the blurring better because it makes it stand out more. It pops. Really pretty. Never played with any modge podge before but I sure am seeing a lot of stuff with it now………… 😉
This is really cool looking. And I think I like the washed out bird better. You can still see the lines, but it gives it a watercolor feel. Weird the brown didn’t bleed, but it looks great. WEAR.
Found this looking for things to do with shrinky dinks. LOVE IT! I would have thought that was totally intentional!
Worth wearing! Love it
I love how the bird glows! I clicked because I wanted to know how to make it do that. Best mistake ever!
I love it. even with the blurry bird!! I would wear it
I love it. The blurring makes the bird look like its moving…really really cool!
Blessings, Joanne
I use Glossy Accents by Ranger. Buy it from AC Moore. They have the best price. It has never blurred the Sharpie(on the shiny side) or Crayola oiled based pastels(on the scratchy side) on the Shrinky Dink Rough n Ready version. I put the Accents on front and back and it looks 3D. I also have used my diecut machine to cut and emboss the plastic. It’s amazing stuff!
Miriam