
Are you looking for a fun way to decorate clay pots for your herb garden? Here are three flower pot decoration ideas using paint and some other simple craft supplies. Scroll down to see the video of the pot decorating in action!
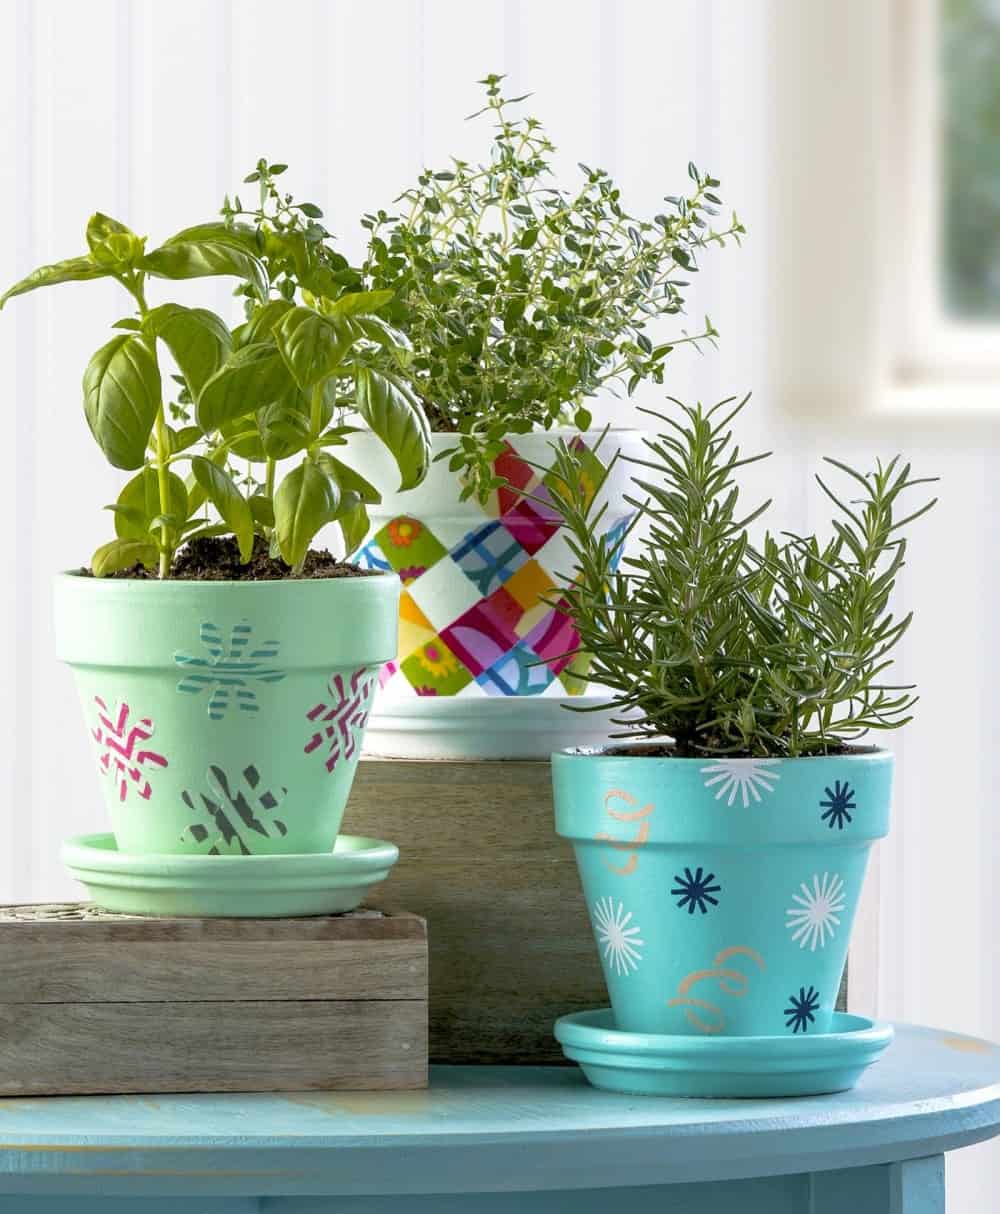
With spring here and summer right around the corner, I’m thinking you might have some flower pot decoration projects on the agenda.
Decorating Clay Pots
I actually get quite a few questions about this particular topic given that people like to use Outdoor Mod Podge in their projects.
I’m going to show you how the process works, give you some tips, and share three unique flower pot decoration ideas with you! For even more tips, visit our clay pot painting and decorating post.
Where to Buy Clay Pots
Flower pots are readily available at craft stores, hardware/home improvement stores, garden centers, Dollar Tree, and even stores like Target or Walmart in the seasonal section. Don’t forget to check the thrift stores and Goodwill as well – you never know what you’re going to find!
The selection at home improvement stores and garden centers seems to be the best, but I often just get mine from Michaels since they have enough sizes for me.
Note that any of the instructions and tips below only apply to pots made of terra cotta (clay). Those same stores sell plastic or resin pots (typically), but those are a different material, so the instructions are also different.
Before I share my three flower pot decoration ideas, I wanted to give you some tips! Here are some pot decoration guidelines I always use to guarantee success.
How to Clean a Used Flower Pot
If you happen to get a used clay pot, follow these tips. You don’t have to do any prep work (besides removing labels) if you purchase a new pot. Just brush away debris if there is any on the surface.
- Thoroughly remove dirt and salt residue; if needed, scrub the surface with a wire brush.
- Once clean of dirt and debris, soak the flower pot in a solution of 9 parts water to 1 part bleach for 24 hours in order to kill any lingering bacteria.
- After soaking, thoroughly rinse the pot with clean water and allow it to dry completely. Follow by sealing your terra cotta pot before decorating.
Sealing Clay Pots
If you are going to use Mod Podge in your pot decoration, you’ll definitely want to follow these steps to seal them first. Most clay pots found in stores are unglazed and porous—meaning they are not waterproof.
Unglazed or unsealed terra cotta will draw moisture away from the plant and soil, keeping the pot moist, which in turn may affect the external decoration by causing the paint to blister.
- Seal the flower pot by applying two coats of sealer—inside and out—using either Clay Pot Sealer or an outdoor sealer. It’s not going to hurt the plants. Allow the first coat to dry completely before applying the second coat.
- Once the sealed clay pot is dry, it is ready to be painted. For flower pots that will be used outdoors, use either FolkArt Outdoor or FolkArt Multisurface Paint. For painted flower pots that will be used inside, use any premium-quality acrylic paints—FolkArt Acrylics, Delta Ceramcoat, or Apple Barrel Acrylic Paint.
Sealing Your Pot Decoration
If you use the flower pot outside, you can use Outdoor Mod Podge as your sealer. If the area you live in is pretty rainy or sunny, opt for a brush on polyurethane sealer or something similar as additional protection.
A polyurethane-based sealer provides the maximum durability for outdoor projects and keeps the Mod Podge from being tacky. Apply it 48 hours after you’re done, when the paint and Mod Podge (if you use it) have completely cured.
Are you ready to check out three unique flower pot decoration projects? Keep reading!
Gather These Supplies
- Terra cotta pots and saucers
- Multisurface paint
- Mod Podge Outdoor
- Washi tape
- Adhesive stencils
- Fabric squares (scraps will work)
- Freezer paper
- Decorative punch
- Scissors
- Paintbrush
- Spouncers or daubers
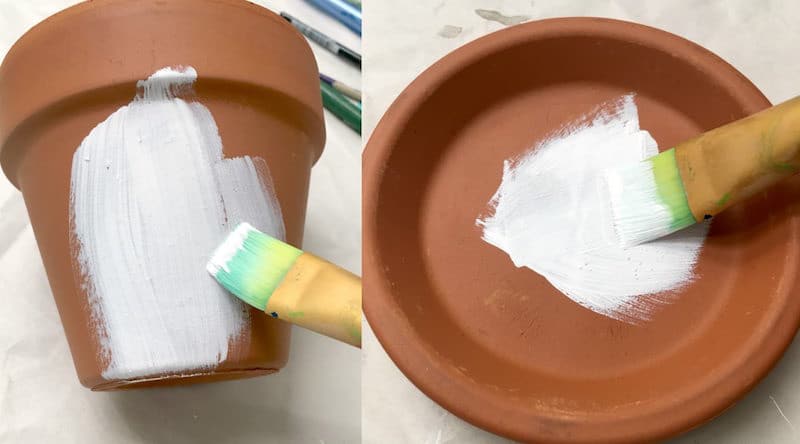
Regardless of the decorating method you choose, you will paint all of your pots and saucers with multisurface paint in the colors of your choice. The color won’t fade on the outside of your pots!
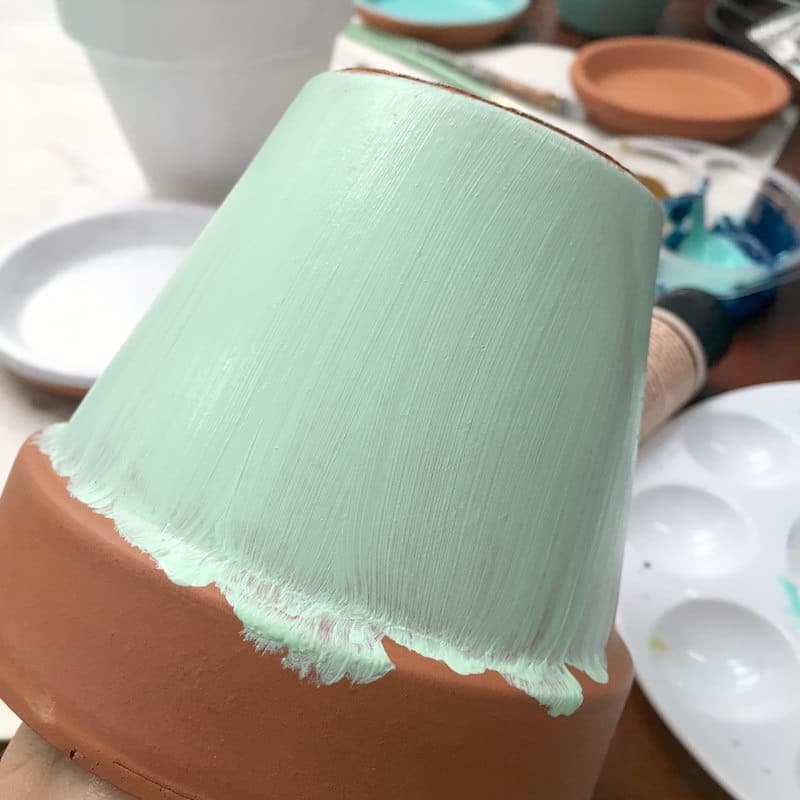
You’ll want to give the pots several coats until they are fully covered and then let them dry. Don’t forget to seal the inside based on the tips I gave you.
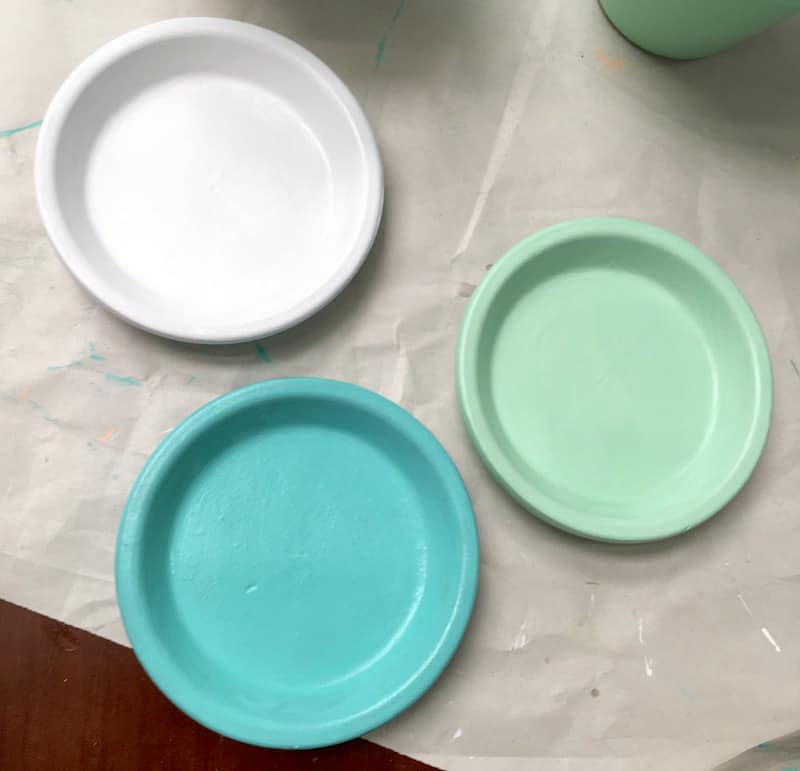
The coverage on multisurface paint is really good so you’ll be done in no time. I love the colors I chose!
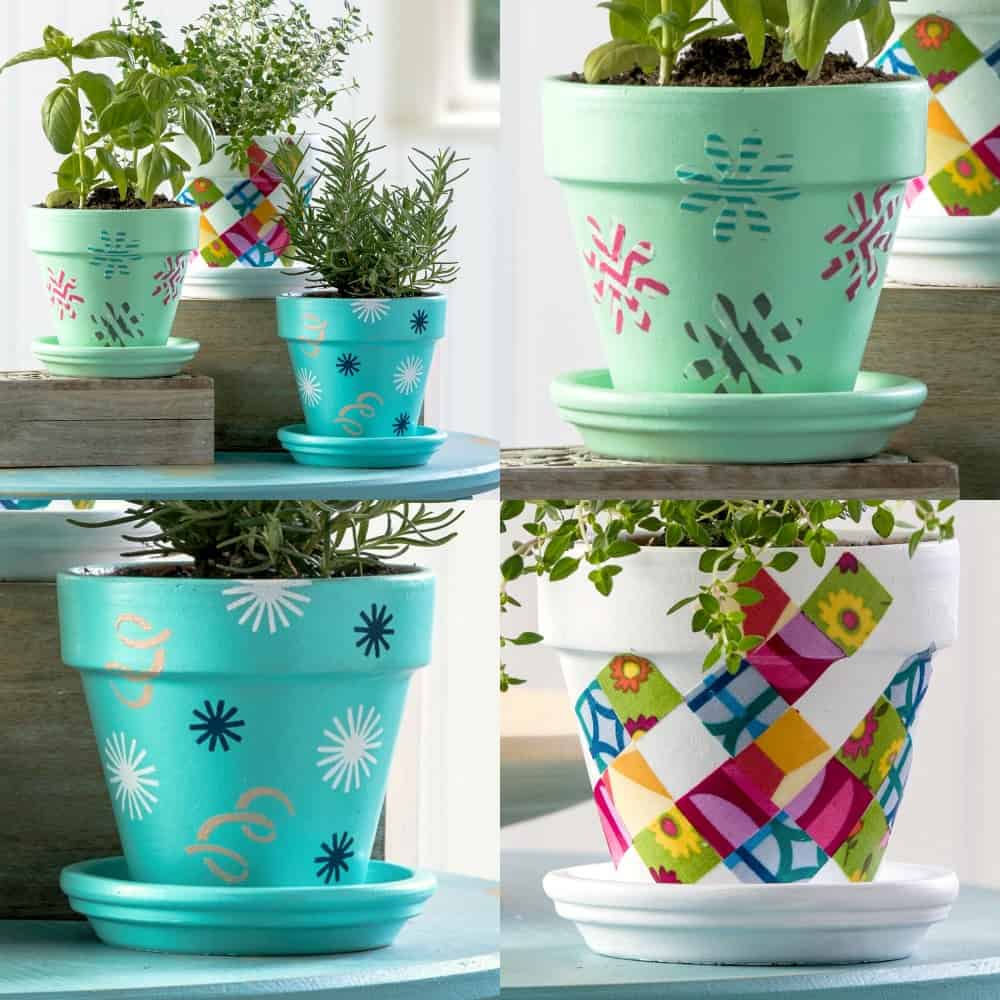
Next you’ll move on to the specific flower pot decoration technique that you want to apply. Let’s start with Mod Podge.
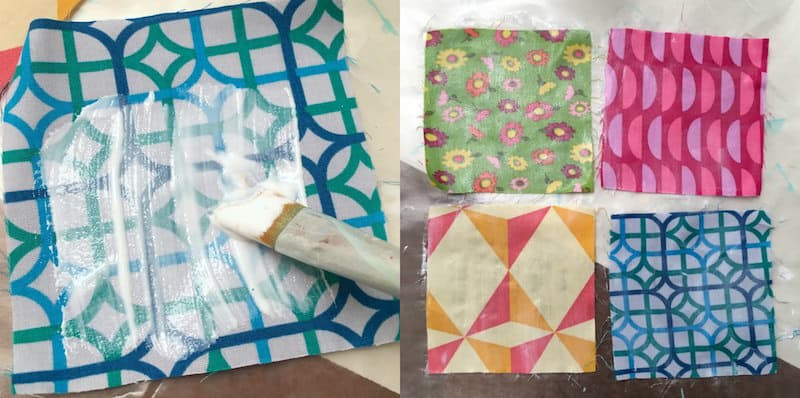
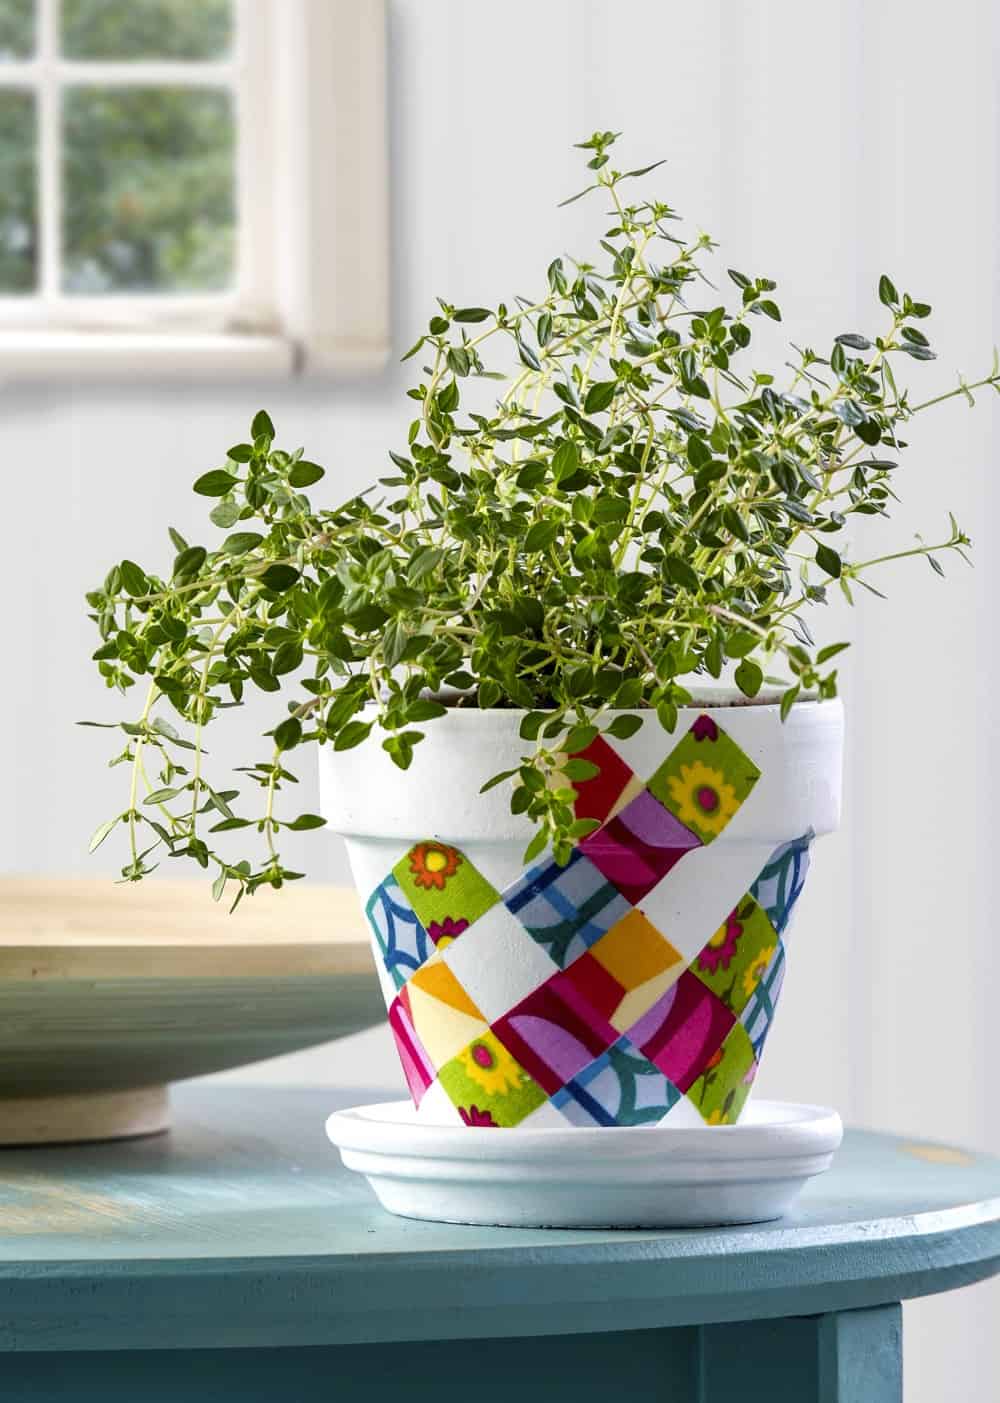
This is an optional step, but it can make the fabric squares/scraps easier to cut and prevent fraying on the edges. Place the fabric squares down on freezer or wax paper and paint them with a layer of Mod Podge; let dry.
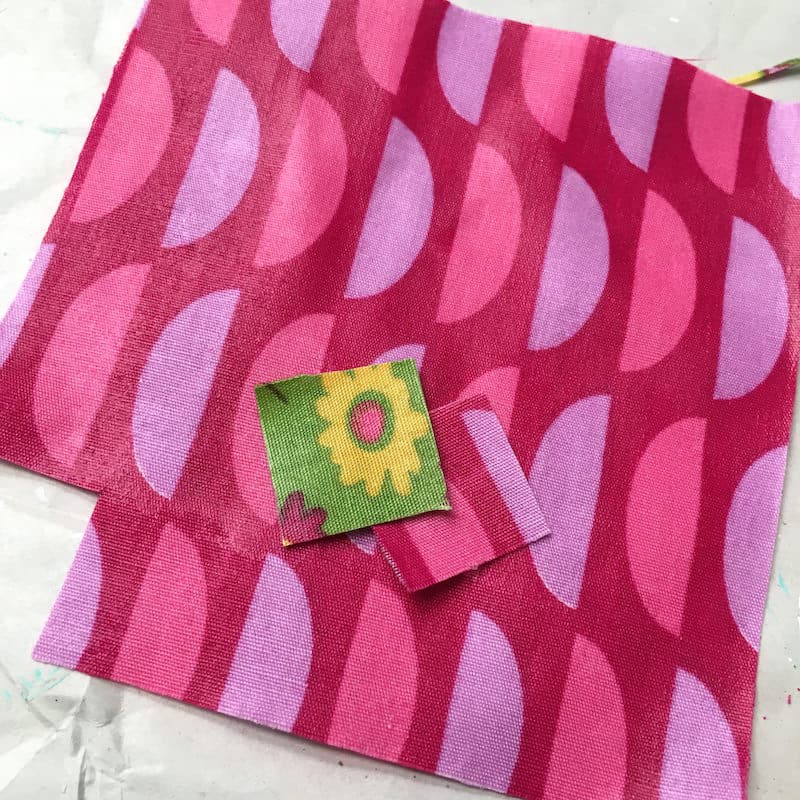
Use the scissors to cut your fabric into small (1/2” or so) squares.
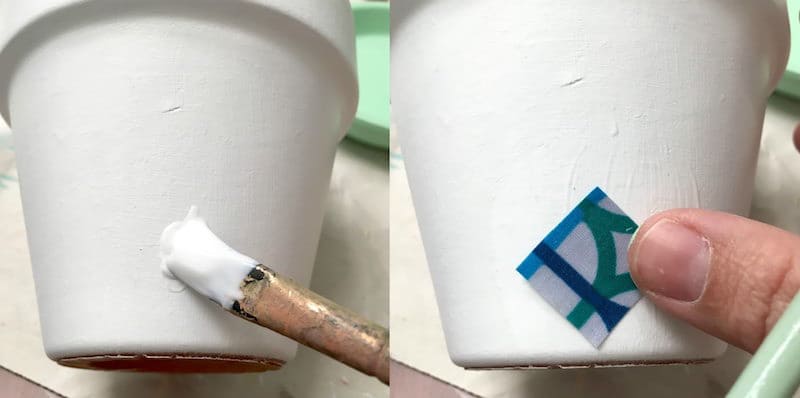
Place a layer of Mod Podge down on your pot; place a fabric square on top and smooth with your fingers. Mod Podge over the top.
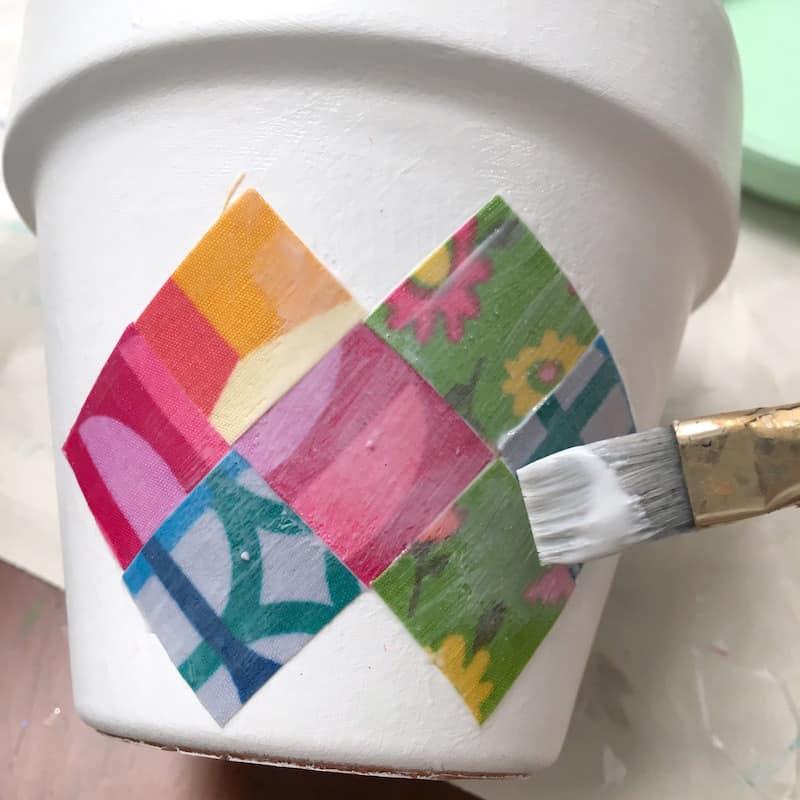
Continue adding squares in a random, patchwork fashion and Mod Podging over the top. The pattern is up to you! Have a little fun with it. You can even go up over the lip of the pot. Let dry before planting.
The second option for decorating pots is with washi tape. It’s a paper tape that you can apply on a lot of surfaces. And I have an interesting way to show you how to use it!
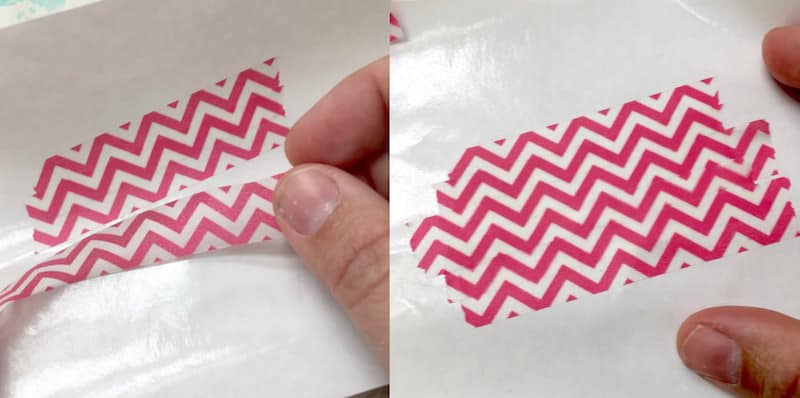
You’re going to turn your washi tape into stickers. To do this, you’ll tear off a piece of freezer paper and lay down washi tape on the shiny side (matching up the pattern if you like). Overlap the washi tape slightly.
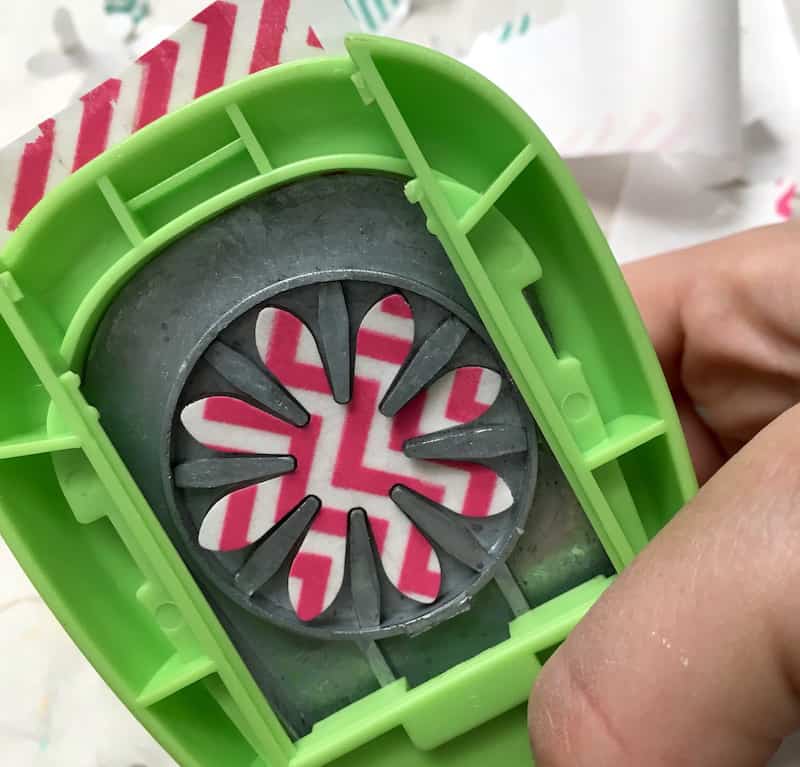
Trim your washi taped freezer paper so that it can slide inside the punch. Then punch out the shape – the freezer paper is what makes this possible!
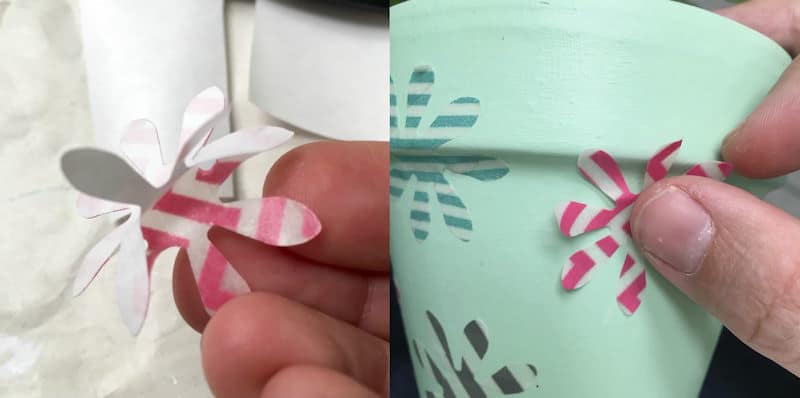
Use your fingernails to peel the washi tape off the freezer paper, making a sticker. If you overlapped the washi tape enough, the sticker won’t fall apart. Smooth down on your pot and repeat with several other colors of washi tape.
Depending on the type of paint you used on your pot, the stickers will continue to adhere. But if for any reason you find them peeling up – use your Mod Podge to cover the entire pot and seal them down. So cute, right?

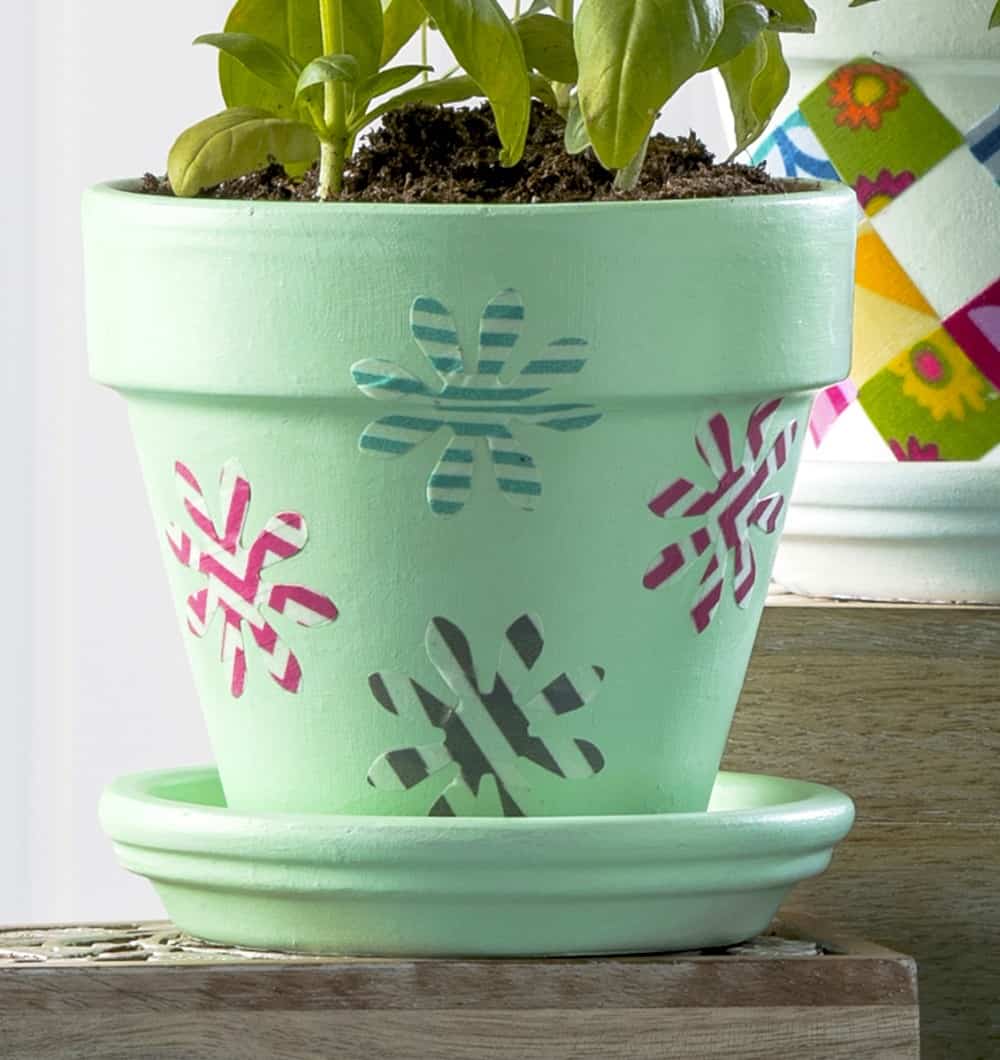
Your final method for decorating is with a set of adhesive stencils and some craft paint.
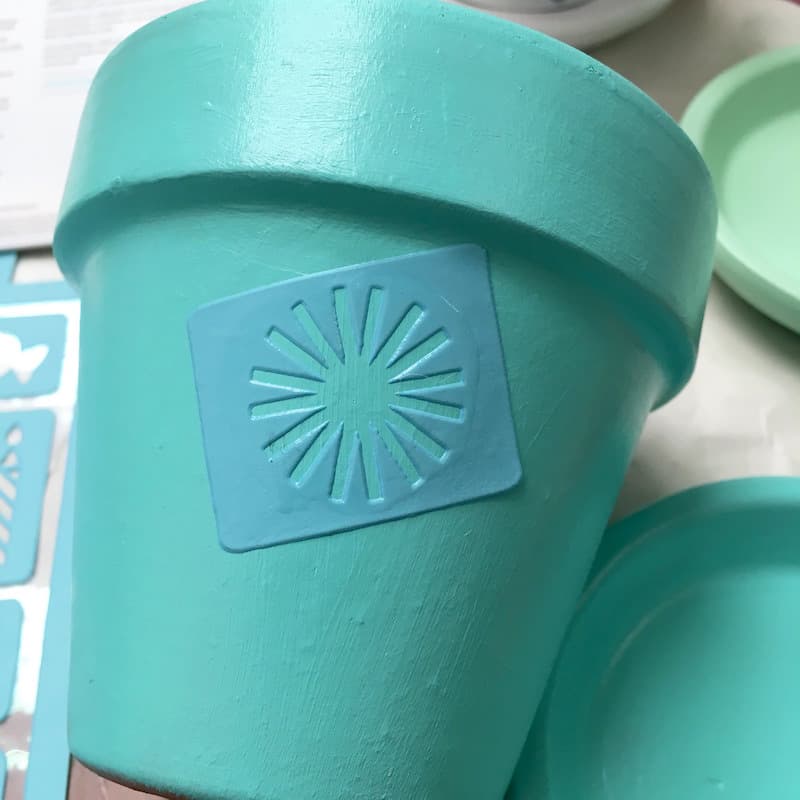
Using adhesive stencils is very easy. Place a stencil down on your pot and smooth with your fingers.
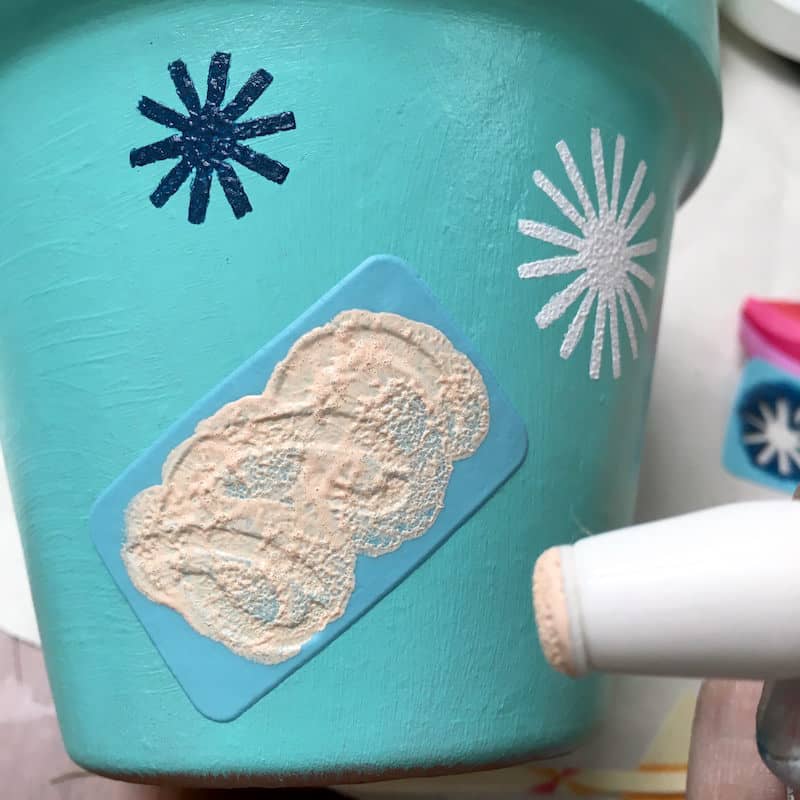
Use a small spouncer or dauber to apply the paint in the stencil area, then peel the stencil off immediately and let dry.
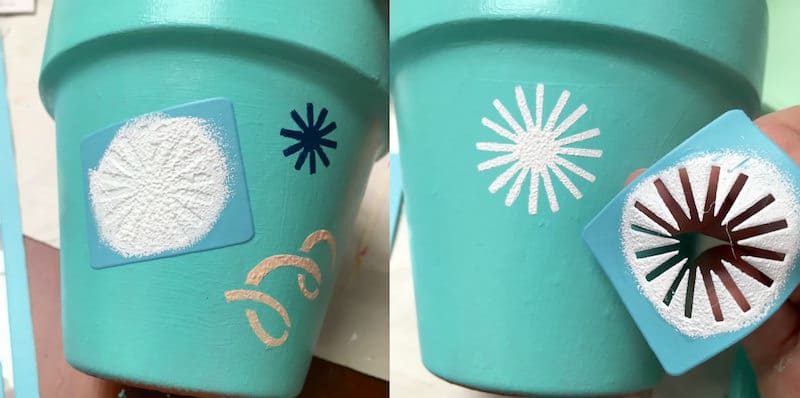
Repeat with other designs and paint colors. You’ll want to wash and dry your stencils between each paint application so you can make sure to get clean lines. The nice thing about adhesive stencils is that you can wash and dry them several times; they are reusable!
Display your pots anywhere, like in a kitchen window, office, or porch. Get the printable how to for this project below!

Pot Decoration
Equipment
- Spouncers or daubers
Materials
- Terra cotta pots and saucers
- Multisurface craft paint
- Mod Podge Outdoor
- Washi tape
- Adhesive stencils
- Fabric scraps
- Freezer paper
- Decorative punch
Video
Instructions
- Paint all of the pots and saucers with multisurface paint in the colors of your choice. Let dry.
- For the Mod Podge and fabric pot, cut the fabric into small squares.
- Place a layer of Mod Podge down on your pot; place a fabric square on top and smooth with your fingers. Mod Podge over the top.
- Continue adding squares in a random, patchwork fashion and Mod Podging over the top. Let dry before planting.
- For the washi tape pot, tear off a piece of freezer paper and lay down washi tape on the shiny side. Overlap the tape slightly.
- Trim your washi taped freezer paper so that it can slide inside the punch. Punch out the shape.
- Use your fingernails to peel the washi tape off the freezer paper, making a sticker. Repeat and place the stickers on the pot.
- If the stickers don’t stick naturally (this depends on the washi tape), place a layer of Mod Podge over the top and let dry.
- For the paint and stencils pot, place a stencil down on the pot and smooth with your fingers.
- Use a small spouncer or dauber to apply the paint in the stencil area, then peel the stencil off immediately and let dry.
- Repeat with other designs and paint colors. You’ll want to wash and dry your stencils between each paint application so you can make sure to get clean lines.
- Let all pot decorations dry completely before planting.
Now that you’ve seen the steps, check out the quick video in this post that shows you how it’s done!
Is pot decoration in your crafty future this spring? Let me know in the comments! I’d also love for you to check out these other ideas:


I. Love. This. !!! I just opened my own little business and my main product is hand painted pots with succulents and arrangements and fast but classy is where it’s at thank you for this!!
Thank you so much!
Really great Article. Thanks for sharing information.
Loved the tips!
Hi, I know this was written many years ago, but I’m wondering if you can help me. I paint terracotta pots and saucers then seal them using a polyurethane varnish, but no matter how dry they are the pots always stick to the saucers ruining my paint job. Have you ever had this problem with your varnish? And could you suggest something l could do or use so this doesn’t happen? Thank you, Dianne.
Hi Dianne! My best advice to you is to either let them dry out in the sun or let them cure for longer (maybe like 28 days) without putting them together. I know that’s inconvenient but the dry time and cure time are different. It takes a lot longer for acrylic or poly varnishes to fully cure and not stick versus drying.
Amy, what kind of paint did you use to stick to the clay pot? I want to do this on a large scale for our living room. Thanks!
These are so colorful and easy to do. I love these ideas for planters at home. Doesn’t seem like a complicated DIY. Will be sharing this one. 🙂 Thanks.