
Learn to make a super cool confetti bowl in three easy steps! You don’t need any crafting skills for this, and the results are SO fun!
Skills Required: None. You don’t need any prior crafting experience to complete this project. You do need to know how to inflate a balloon, however.

Have you ever worked with confetti in your crafts before? We’ve tried a tray, candle holders, and even shoes (I know; they’re so fun!).
If there’s one project that a crafter needs to try in their lifetime, it’s a confetti bowl. Let me give you three reasons why:
- Easy to make
- Fun to make
- Cute
Which is pretty much the criteria for any project I try. Not that I don’t want an advanced craft every now and again, but with limited time available, easy crafts are usually the most appealing.
Is it fun to make? Are the results cute? Those are other questions I ask about what I make, and I’m sure (even without knowing) you ask yourself the same thing.
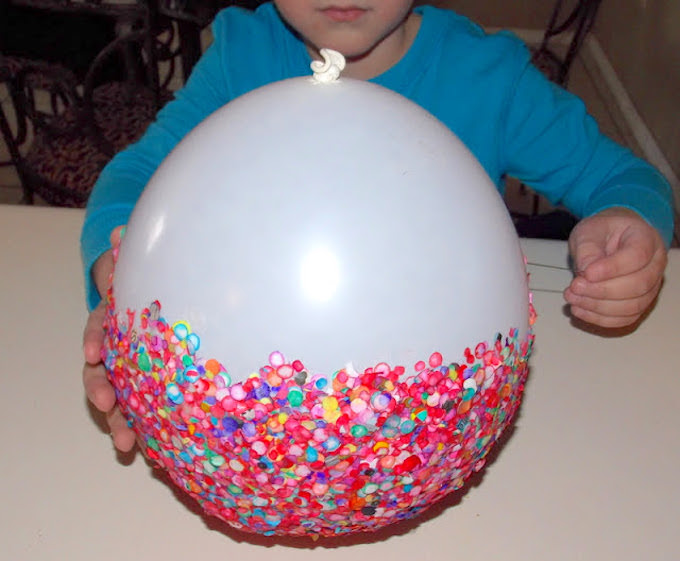
Like I said, this confetti bowl meets all the criteria! Anyone can make it, and I mean anyone. It’s an easy craft for kids or for adults. V Juliet made this bowl with her kids, and they even popped the balloon for her.
Which I totally respect because I too would like someone to pop the balloon for me. And open the Pillsbury dough container. You know?? I’m scared of loud noises. 😮
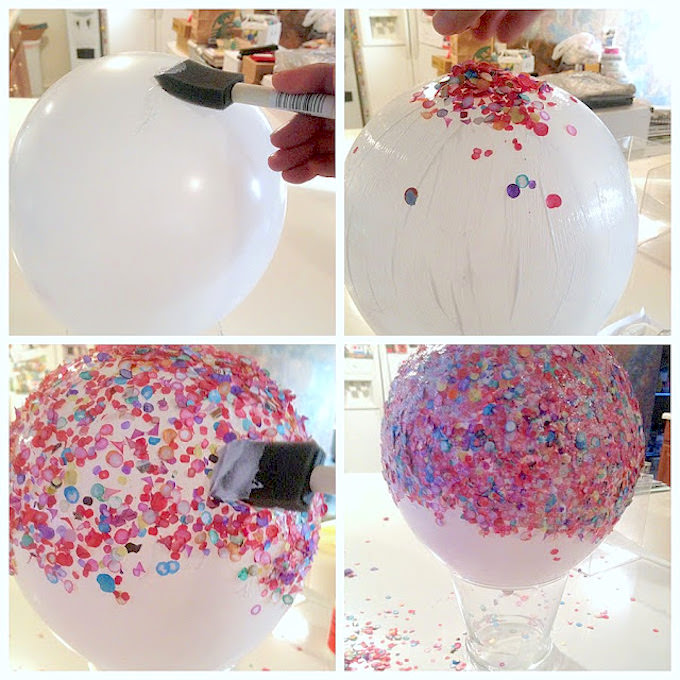
There are three easy steps to this DIY confetti balloon bowl, and let me share them with you now. You’re going to: 1) Inflate a balloon; 2) Mod Podge the confetti on the bowl and let dry; 3) Pop the balloon and trim.
Oh, plus you can customize it with any color of confetti. What about black and orange for Halloween? Green and red for Christmas?? Did I mention that you can also purchase the supplies from Dollar Tree?
I think you’re convinced by now, so let’s jump into this balloon bowl DIY. I know you’re ready for this fabulous party craft. Keep reading!
Gather These Supplies
- Confetti
- 1 balloon
- Mod Podge Gloss
- Sponge brush
- Scissors
- Vase, cup, or something else to hold the balloon while you work
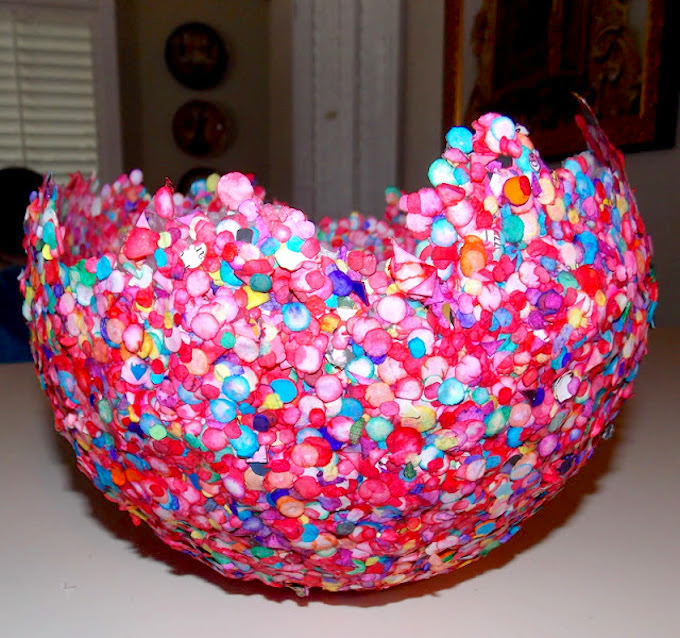
What do you think about this balloon bowl DIY? Easy, right? Now when someone asks if you made a bowl with confetti, you can say, yes!! They won’t believe it.
Get the printable how to below:

DIY Confetti Bowl
Equipment
- Vase, cup, or something else to hold the balloon while you work
- Needle
Materials
- Confetti
- 1 Balloon
- Mod Podge Gloss
Instructions
- Inflate the balloon, then set it onto a vase or cup (as a stand) so it's easier to work with.
- Add Mod Podge to the top half of the balloon with a sponge brush, then sprinkle confetti all over. Remove the balloon from the vase and hold it to add the confetti on the sides.

- Let dry and add another coat of glue and confetti. Repeat. When you feel like the confetti is thick enough, let dry for a final time.
- Add several coats of Mod Podge until you achieve a thick coat (about 3 – 4 coats; this is for stability). Let it dry for 8 – 10 hours.
- Turn your balloon and pop it with a needle, I couldn't do this because I've always been afraid of the noise. Get a little to help if you need.

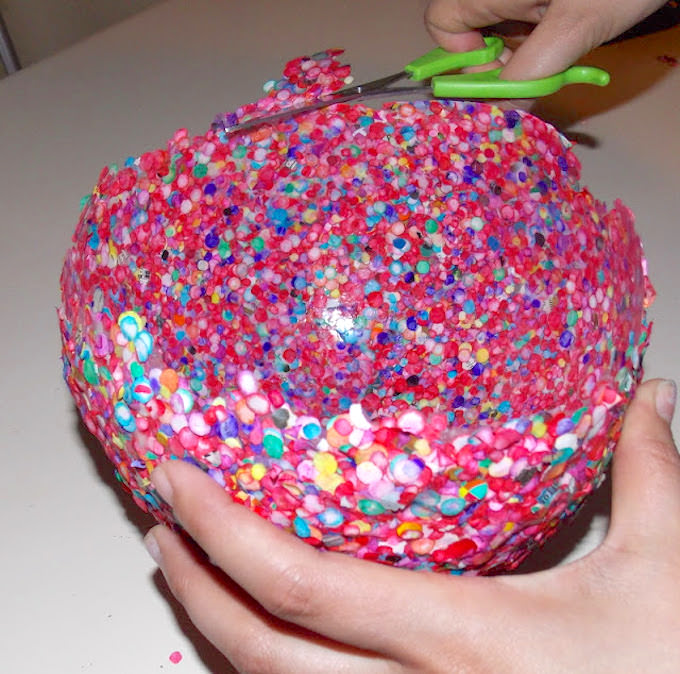
- Trim the edges with scissors to even out. If you need to touch up with Mod Podge, do it at this time and let dry.

Let me know if you try this bowl in the comments. I’d also love for you to check out these other projects:
Project courtesy of V Juliet!


Very awesome indeed!!! I am thinking M & M’s would go great in that bowl!
So cool. You can also use a balloon to make an edible chocolate bowl.
Too cool. my confetti will be my left over christmas wrapping paper put through my paper shredder that makes nice small pieces
Such a cute bowl, but how do you keep it from rolling around. Isn’t the bottom round? Or does it dry soft enough to press a flat spot on the bottom?
Hi Kristina! It’s weird – the bottom is round but it doesn’t really roll around. I don’t know how to describe it, but it’s just the right roundness. Having said that, it *could* roll around if you pushed it, so if you want it completely flat, you could probably push it somewhat or just use a flat bowl as a mold (put plastic wrap over it).
I can’t wait to try this with confetti that I make from old comic books!
Is the confetti tissue paper confetti? Or is it a thicker type paper?
It is a thicker type paper but you can use either! The bowl will be more flimsy with the tissue paper confetti.
I’m sure you could just add more layers if regular tissue paper
Fun idea that can expand to anythin… scraps of material, string, layers of paper …all of the above on one project …good kiddie project.
This seems like fun! What keeps the balloon from sticking to the confetti after its popped? I imagine balloon bits stuck all over the inside?
Hi Jenny! The Mod Podge doesn’t stick to the balloon! Just peel slowly. I’ve done a few balloon bowls with Mod Podge and no sticking.
Could you put a small enclosed candle in the bottom, one that could be lit for maybe an hour or so%???
Absolutely! Just don’t leave unattended. Mod Podge is not flammable, however, confetti is!
A few quedtions…..what type of paper or material is best for the confetti? Also after the first layer of modpodge and confetti you let dry……Then do you just keep adding layers of modpodge/confetti for several more times and don’t dry it each time till the last layer?
Thanks!
Hi Glenda! You’ll want to make sure to use paper confetti; there’s no type of paper that works better than others that I know of, as long as it’s paper. Larger confetti pieces probably work better and you would have to do less layers. As far as layering, yes, you’ll want it to get relatively dry between layers. This will happen pretty quickly. It doesn’t have to completely dry though. You’ll see when you do it – you just don’t want it falling off. You want it to set, and then continue layering, and then yes – let the whole thing dry for hours when you’re done.
Is Mod Podge water resistant? I have a beautiful drift wood stump that I wanted to make a custom fruit bowl for, but was worried w the humidity here in Louisiana the color from the confetti would transfer to.
Hi Christy! It is definitely water resistant. But it’s not waterproof. Learn more about that here: https://modpodgerocksblog.com/is-mod-podge-waterproof/
If due to very last minute craft and you have everything but the Mod Podge could you substitute a mixture of regular white glue and water?
Hi Jenny! I’ll be honest, not sure. You could try it. Do a test because I don’t know if the confetti would bleed?
@Amy, using regular Elmer’s glue does make the confetti bleed a little bit but it’s so pretty. Also, A layer of tissue paper in between the layers of confetti makes it sturdier
Hi! I’m super excited to try this with a group of ladies for our Pinterest Parties. I know it’s been a long time since this was posted, but do you have any idea how much confetti was needed to make a bowl? Thanks
Hi Jamie! So I’m not 100% sure. I didn’t do this original project, but I have 10 cups of confetti I’m planning on using to make one myself. It looks like it would be enough to make a medium sized bowl. Having said that, my suggestion since confetti is expensive and you want to do it with a group – make your own confetti. Either use a crosscut shredder or buy scissors like this: https://www.amazon.com/Miles-Kimball-Shredder-Scissors/dp/B01HDRUIIG
Then not only can you make a bunch before you start, if you don’t have enough you can use those tools to make more. Just grab packs of colorful paper from Michaels and you’ll be good to go!
I’m a sucker for color, so of course this caught my eye. One thing that I’ve always wondered though about these mod podge bowl projects, is can you use something other than a balloon? Possibly a mixing bowl wrapped in cellophane? Your advice would be greatly appreciated! Thx
🎉🍚🎈
Hi Katie! You can definitely use a mixing bowl wrapped in plastic wrap. It’s way easy!
How in the world am I just now seeing this? I’m a long time Mod Podge Rocks fan. Super cool & goes on my things to make list!