Learn how to make colored mason jars with Mod Podge! These tinted mason jars are such an easy craft idea – you don’t need experience to do it.
Skills Required: None. Even if you’ve never crafted before, you can make these tinted mason jars. You’re simply adding food coloring to Mod Podge and pouring in the jars.
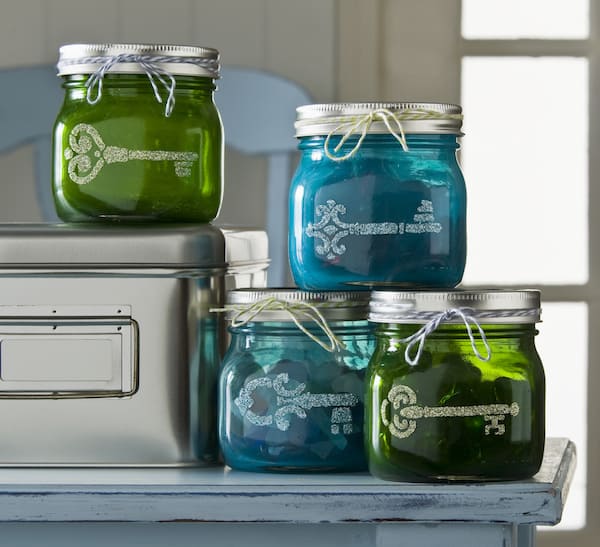
It’s something I’ve always wanted to try and finally did: colored mason jars! Have you heard about this cool technique? You can easily dye glass using Mod Podge and food coloring. If you love mason jar crafts, this is one you’re going to have to try.
How to Tint Mod Podge
It’s really easy to tint Mod Podge and turn it into any color you like. You can do it with food coloring or paint (we did it with paint here).
The only difference is how translucent (semi-transparent) the Podge remains after you dye it. As you know, Mod Podge dries clear.
Adding food coloring or acrylic paint is going to make it somewhat translucent as opposed to completely clear. Food coloring keeps the Mod Podge pretty close to clear.
Acrylic paint is a little different in that it has more pigment and isn’t as watery, so it makes the Podge even less clear (more translucent). Just something to think about as you decide on your project.
Here’s how you tint Mod Podge:
- Add some Mod Podge to a small container (a piece of Tupperware works great).
- Put a couple of drops of food coloring or paint into the Podge. Stir.
- Apply with a soft bristled brush, spouncers, or foam brush to a clean surface. You can also swirl it around on the inside of jars as well. Let dry.
That’s it! You can play with the combination of color and Mod Podge a bit before you decide on your final tint. Just remember: you can always add more, but you can’t take it away. So start with just a few drops!
Colored Mason Jars
I wanted to try making some tinted mason jars for storage with these pint sized (mini) mason jars I found at Jo-Ann.
I coupled the colored Mod Podge with my peel n’ stick stencils (the keys) and some baker’s twine. Then I added a chalkboard sticker after that. You’ll find a lot of ways to customize this project.
You can have cute storage in minutes. Here’s how I easily decorated the Mod Podge mason jars above.
Mason Jar Storage
Gather These Supplies
- Mason jars – pint sized, you can get glass containers from Dollar Tree
- Mod Podge Gloss
- Food coloring
- Adhesive stencils
- Mod Podge Spouncer Applicators Set
- Glitter – colors of your choice
- Baker’s twine – colors of your choice
- Scissors
- Paintbrush
- Chalkboard stickers – small round (optional)
Start by washing your mason jars with mild soap to clean them, and then let dry. Trust me on this one. I didn’t wash a jar and added the colored Mod Podge, and it didn’t cling as well (my bad).

Start by adding about two tablespoons of the Sheer Color of your choice into a jar and rolling it around to coat. This can take several minutes.
If you find that you need to add more, add about one tablespoon at a time and continue rolling the jar around until the entire inside is coated.
Tip: shaking the jar over a trash bin can help remove excess Mod Podge and also help coat the inside. Just be sure you don’t shake too hard and explode the Mod Podge everywhere (um, haha).
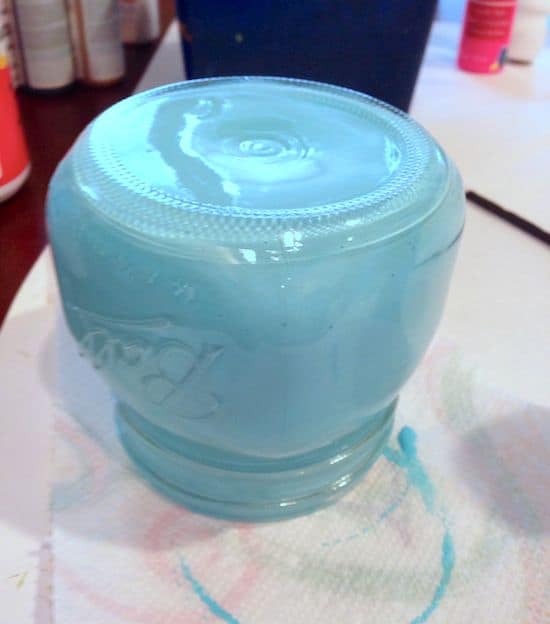
Repeat with the remaining jars. When you are done coating them all, place them face down on a paper towel for several hours to let the excess Mod Podge drain out.
When the jars have completely drained, turn them right side up to let the jars dry completely – this will take overnight. I kept moving the jars around on the paper towel as well, just to make sure they didn’t stick.
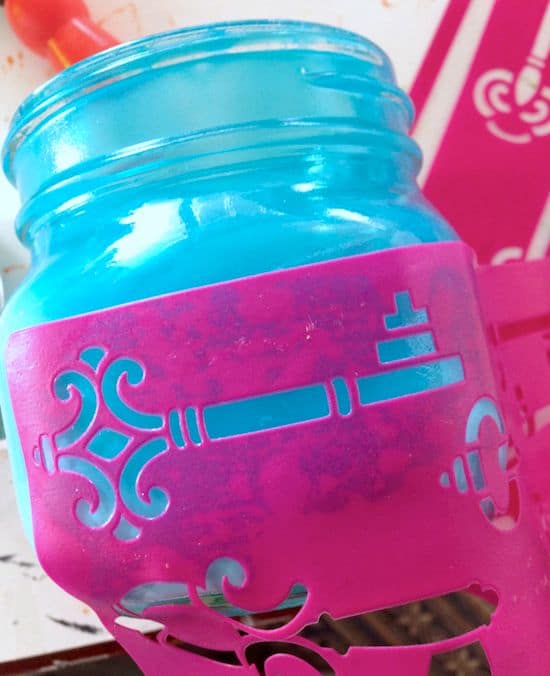
Choose your design to place on the fronts of the mason jars. I put a different key on the front of each jar. Carefully peel the stencil from the backer sheet and smooth down flat on the jar surface, making sure to center your design.
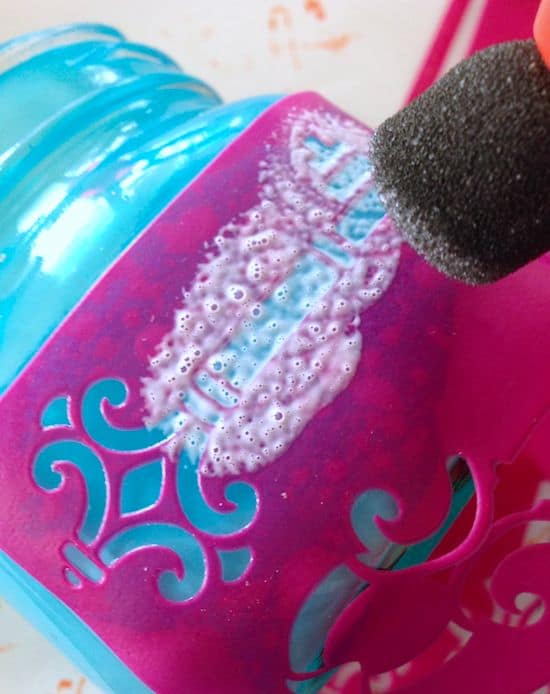
Use the spouncer to add Mod Podge to the stencil. Use a medium layer of Mod Podge and work quickly, since Mod Podge dries quickly. Completely cover the key.
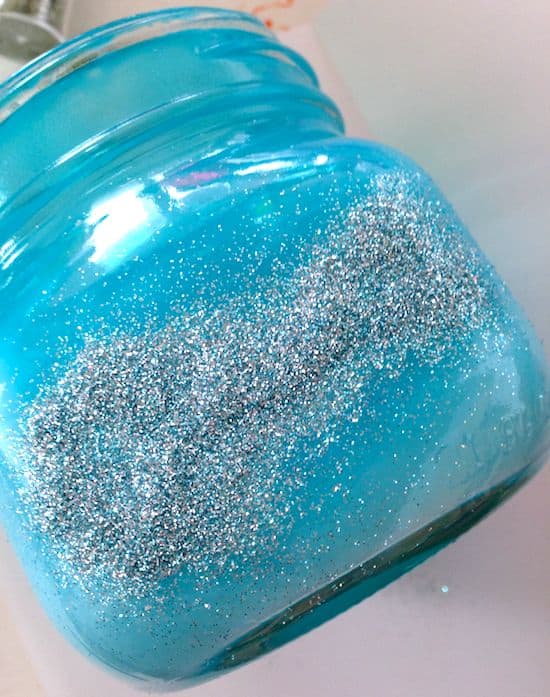
Peel up the stencil and pour the glitter on top right away.
Tip: pour the glitter onto the jar over a piece of paper so that you can pour the excess back into the original container.
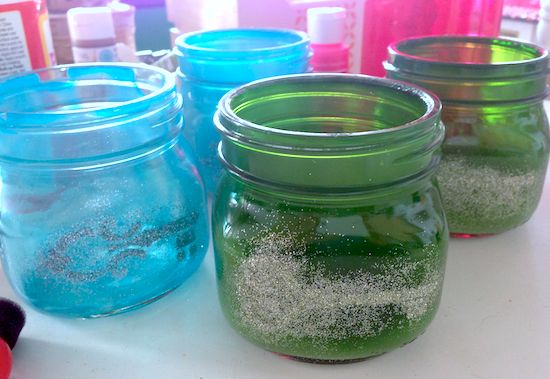
Repeat with all the jars, then let dry. Remove excess glitter using the paintbrush (lightly brush it away).
Replace the lids on your jars and cut baker’s twine to wrap around each lid. Tie in a bow.
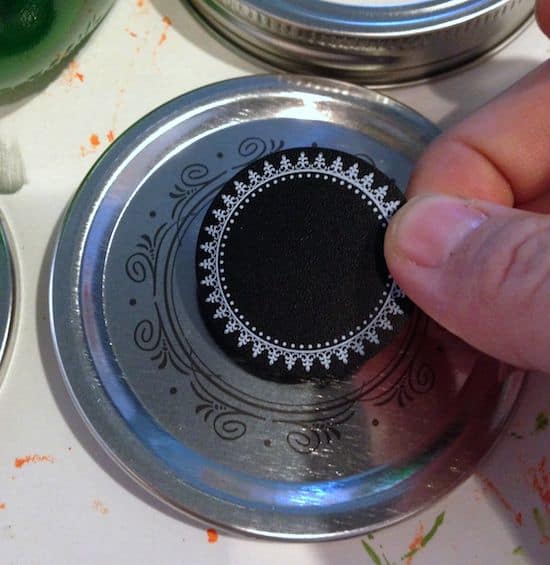
Place a chalkboard circle on top of each jar in the center so that you can write the contents on the lid. Can you believe these stickers? I love them.

If you exclude dry time, these colored mason jars took just a few minutes to decorate. I love them and I want a whole rainbow!
Colored Mason Jars
Equipment
- Adhesive stencil(s)
- Spouncer(s) optional
Materials
- Mason jar(s) any size
- Mod Podge Gloss
- Food coloring
- Glitter colors of your choice, optional
- Baker’s twine colors of your choice, optional
- Chalkboard stickers small round, optional
Instructions
- Start by washing the mason jars with mild soap to clean – let dry.
- Add some Mod Podge to a small container (a piece of Tupperware works great).
- Put a couple of drops of food coloring or paint into the Mod Podge. Stir.
- Apply the Mod Podge in one of two ways: 1) use a soft bristled brush, spouncers, or foam brush to apply to the outsides of the jars; 2) swirl the Mod Podge around the inside of the jars and drain.
- Regardless of the process you choose to apply the Mod Podge, let dry for 24 hours before using the jars.
Video
Notes
Looking for more Mod Podge mason jar crafts? We’ve got a ton here on the blog! I’d also love for you to check out our easy crafts for adults and our guide on how to paint mason jars. I think you’ll like both of these posts so take a peek!




Amy,
Did I miss something??? Where does the mod podge gloss come in to this project?
Thank you, I love your blog, and I totally love this project!
Hi Julia! I used that with my stencils to attach the glitter!
Hi Amy,
Being new to Mod Podge, I’m guessing you cannot put anything eatable in the jars after coating the insides with MP, right? Love your project & can’t wait to try it!
Hi Dee! Correct. If you want to do that, you can coat the outsides in a similar fashion. Though you wouldn’t swirl it around – you’d drip it down the sides. OR you can brush it on!
Is it durable? If you put something inside would the color chip off?
I am loving these!!
Gina, so far, after about a month, the color has not chipped off. However if you are concerned about that, you can paint the outside with the Sheer Colors OR drip it on the outside. 😀
I love mod podging on glass and I am always looking for new ideas. My mind is racing with all the cool ways I can work with this and the different effects I can achieve. Absolutely love this article and can’t wait to try it!
Neat idea for decorating and gifts.
Love it! Easy Peasy!
I have lots of left over mason jars , this will be a great way to re-cycle
I love the look of these.
This is adorable!
I have used spray paint for making mason jars before. This looks to be easier and less messy. I can’t wait to try this method.
I used to pour poster paint inside old jam jars and roll them around until the insides were covered. Long before Modge Podge
Those are really cool….I lov’m
well done.
Love this look – can’t wait to try it
I tried the food color and could never get the color dark enough. Will need to try the paint this time
Great idea. Can’t wait to try it!
Love this one. What a great idea, easy love gift idea. Love up cycling! Xx
Looks like a fun, easy project. I am definitely going to try it. There are so many possibilities!
Great way to personalize jars!
I’ve done this project with mason jars and jars that were in my recycling bin. It’s amazing what you can create with Mod Podge – it’s my favorite craft supply!
Thanks for showing howw tintedmas jars ere done…great idea
I’ve used this for painting bottle and jars. Works amazing and so easy to make the perfect color
This is a clever project and so easy to personalize. Thank you.
These are so cute! Anxious to try in different colors!
wow they look like sea glass!
Very pretty, these would make wonderful holiday gifts
I like this idea also I live in the country and Mason jars just give it that old down country feeling a rustic feeling to the home mason jars I use for everything between storage for sugar flower decoration but they’re playing glass they’re not like an update they’re not beautiful
I have some of these jars and I have been wanting to give it a try. Thanks for ideas.
No struggle project. Just the way I like them.
I want to try this love how they turned out.
Excellent!! Thank you!
oh I have to try this for sure. good to know about the food coloring. I like this for sure.
Would enjoy doing this activity with different age groups
Can’t wait to try these
These can be “dressed” to fit any decor. Love the project and tutorial.
Love these. I plan to do this because they’re beautiful and practical.
Another great project that is different
Love this idea! I want to do this asap!
These make great gifts for the holidays or any special occasion
I am making some spring colored jars with glitter bunnies and flowers to fill with Easter candy. Im sure my coworkers will love them
I love that I can use a few recycled jars and create something beautiful to hold trinkets. Thanks for the easy to follow tutorial on this project.
This looks so easy and it’s so pretty. It could work on any jars, with any theme. I can’t wait to try it!
I have a room set aside just for doing my art and the Mason jar technique is very useful for storing items. Also, I am considering using them in my kitchen.
I always wanted to know how to do this. So many possibilities
Great idea for personalizing these jars. Picking the colors and designs for wherever you want to put them.
I like the transparency, but afraid the glitter may rub off eventually, so I’d leave them plain
These are gorgeous!
I have tried this technique on mason jars, so easy, and turns out so pretty! I will try using paint next time, as I have used food coloring before and would like a little more solid of a color to the jars.
I LOVE the look of these. I think they’d be adorable with electric tea lights!
Great idea, will looks for mason jars at yardsales and give it a go,
I am always looking for storage containers. I love to make my projects, but I have to make extras because my daughters try to acquire mine. We all love the crafty, smart projects that can be made with Modge Podge!
This is a great way to ‘customize’ any space with the perfect color. Just just for jars, use on any glass surface.
I can not wait to try this now
You can make so many things using mason jars and ModPog
what a wonderful idea
This was so easy to do! Looks great and very useful jars…did a set in pretty pastel colours for the bedroom ?
Love love love – so easy! Thank you!! My desktop looks lovely so organized with little colored jars.
Cannot wait to try!
I love different colors of jars and bottles, and always talk myself out of buying them because it adds up. This will make it much more cost effective and I can have all the different colors I want. TFS
A different twist on decorating jars
colored mason jars
Thank you for the tutorial, video is easy to follow.
These jars are SO beautiful!! and really easy to do!!
4stars
I have done this but I used for altered art. It works great. I love this particular idea for my craft room counter. Affordable way to add pops of color everywhere in the room.
What a fun idea for Spring! Love that I can choose my favorite colors!
Cool idea!
I am going to try to replicate the grey glass I have on my wall sconces & coffee table to tie in accent pieces. Crafty brain is firing!!
I didn’t know there is colored M. P.
These look so easy to make, and yet are so pretty. l’m thinking they will make wonderful “gift holders” … becoming part of the gift itself!
Beautifully explained. I love the step by step photos.
Awesome project. Added tiny LED lights in my jars. Looks so sweet.
Really neat ideas on difference between using paint or food coloring to color the jars.
I’ve wanted to try this, thanks for the info.
I am doing this one!
It brightens up whatever room you put them in.
Looks great . Fun project
These jars are really cool looking!
Usually I think of these as Xmas decor. But I just saw yours here and thought what a great little Easter decorations put little tea lights in. So pretty.
Really a cool craft, how you can color clear glass almost any color w/ the formula instructions. One thing that was omitted that really should be included, is that you color these jars on the inside, so it is advised not to fill them with any wet contents, which could affect the finish inside.
Often wondered how this was done!
Like project! Just curious if color will fade if you use food coloring rather than acrylic paint.
what a great way to give a special gift. thank you!
I’ve tried this before and love the result
What a great idea. Can’t wait to give it a try. Thank you
I will paint them in the kids H.School colors, roll up some dollar bills, stuff the jar, filling in with wrapped candy. Add school colors ribbons and give to graduates. ??
Can’t wait to try this on wine bottles.. Never thought to dye the Mod Podge..
Yes, you can just buy colored jars at the craft stores but this is so much more fun – and relaxing
I love this new use for the many jars I have! Thank you!
Super easy craft. Great instructions.
who knew you could color the glass !!!!
Love that you can get colored Modge Podge for this easy, but oh so pretty mason jar project. This is right up my alley, Love it. Thank you so much 🙂
I made some with red and green for Christmas! SO Pretty!
Didn’t know this was possible. Going to try
Love the sea glass effects with the mod podge, definitely going to try this!
Wonderful project! Mason jars have so many uses. Loved learning how to ting ModPodge. Loved the Chalkboard Stickers.
Wow, I didn’t know Mod Podge could be colored like this and am going to try this soon.
What a clever idea.
I tried tinting a bottle with plain acrylic paint months ago but it was a complete fail. I cannot wait to try this!
Love these!
This I will definitely try
Thank you, I can’t wait to try this !!
Excellent, we did this for our home grown herbs. However, we paint on the outside and it works
I had no idea you could color Mod Podge!! I am so excited to try this.
Love this idea. Printed the directions and will be using this for daughter’s upcoming bridal shower. Thanks for sharing.
Looks very easy to do will try in the near future
Your explanations and tutorage are great! They are easy to follow and the videos are great too!
I have got to try this! It looks so simple but very elegant.
These look so pretty!
So thorough and easy instructions for making a regular mason jar your favorite color. And thanks for the extra tips to ensure the project turns out right.
Thanks for this one – one question tho’ – how durable is this – can it be washed safely afterwards? I am a glass freak and will be trying this with some glorious water based inks I have in order to get a ‘stained glass’ effect. Fingers crossed!!
Terrific gift item
Such a great idea for storage. Now I know what to do with my Mason jar collection. Thank you!
Coloured Mason Jars
I cannot wait to get started on these …
doing these after my window 🙂
I found this easy and informative. Would like to try. Thanks.
So creative whatever your color scheme endless possibilities.
I absolutely love these colorful jars!!!
Amy, you are an amazing crafter. LOVE these, they remind me so much of the glass painting I used to do many moons back.
Thank you.
I am totally addicted to trying out all sorts of Mod Podge projects….this is a lovely way to color code
This is a quick and easy project anyone can do. They are so pretty
These are cool! I TOTALLY like colored glass!
I’ve done this and it works great. Sea glass blue and green are my favorite colors to use.
Loved loved loved doing this. I added some pretty stickers and crystals. They came out lovely. Easy steps. And lovely colors!
It is exciting to know how to color jars. I will be having fun doing this.
Now I have colorful jars for all my rooms
Oh my goodness I’ve always wanted to do this you’ve made it so easy, It’s like you said before even if you’ve never done crafts before you could do this
think I will try this weekend…
Nice gift!
I enjoy all the articles about mod podge because the instructions are easy to follow and materials are usually something I have on hand. I love colored glass items.
I love doing this to jars that I save from just about anything. I have a set for about every season and or holiday.
Loved how easy & fun this project was. My granddaughter loved helping.
These make a wonderfully easy to make gift.
I have some clear vases I’m going to try this on as well as my mason jars. I’ve used paint in the past but this seems much prettier color wise….I love the added touch too
nice idea. thanks for the heads up on the chalkboard stickers as well!
I Love the colors you chose on these jars. I also love the size of them. Can’t wait to make myself some and see how they turn out.
makes it look simple and good imformation
Colored Mason Jars
A variety of ideas, themes & methods to embellish Mason Jars.
Thank you I’ve always wanted to make some too.!
Going to try this. I’ve made these before but mine never turned out this cute…thanks!!
Beautiful mason jars. I want to try this.
What an easy way to upgrade a glass jar for a beautiful display!
These look so beautiful and sooooo easy too. Can’t wait to make some for my kitchen remodel.
Needs decorative jars for my new bathroom so going to try these!
With a tea light inside these would make amazing centerpieces…
Nicely written, clear instructions.
Now I know what to do with all those jars I’ve been hoarding! Thank you!!
I have made candle holders using this blog. They turned out so well. I have come up with other ways to do this and love how this is so inspirational.
Very pretty.
I’ve done something similar to this but did it on the outside and then sprayed it with a couple coats of Mod Podge Matt Clear Acrylic Sealer. I put jewelry findings, safety pins, beads etc in them!
I use mason jars for lots of crafts & this will be added to my list of things to make. Love this
I love this idea. They look like a perfect craft for gifts. Excellent!
The instructions are clear and easy to understand
Handmade gifts are always special and these are so pretty!!
this is a great idea for a outdoors wedding – led lite in the bottom & flowers in the top – thank you
If I had known it was this easy I would have done it a long time ago. TY so much
I would have never thought to add color Mod Podge
Love this idea.
love these painted jars.looks easy! can’t wait to try!
Very good, instructions make it easy fail proof
What fun gifts. Be sure and click on the link for “18 more ideas for mason jars”
Love this
Your jars turned out so pretty. The colors are great and the stenciling just sets them off!. Thanks for posting this tutorial, I hadn’t thought of using a stencil on my tinted jars
good colours easy to do they work a treat
These look great, I love Mason jars and use them for all-sorts. I would love to have a go at making some of these
Nice and easy – instead of key design I shall try to write names to make personalized jars.
I’ve been wanting to do this for a while now. I finally have easy directions!
huge fan of this, end result is awesome
*****
Wow!!! These is just beautiful. Just think of all the wonderful jars you can do.
I love making projects out of glass jars for home or party decorations. So pretty can also put a fake candle inside and shells or even little keys.
These are so beautiful and simple to make. I want to try it by swirling to make a swirly pattern instead of completely coloring the jar.
I love how they look such pretty colors. Easy enough to do and not expensive. They make nice centrepiece for your table or wherever you choose to use them! They also make great gifts for the mason jar lovers on your list??
I can’t wait to use these helpful instructions so that I can create my own decorative, very unique, fun & easy, colorful mason jars using Mod Podge.
Great decorating and/or gift idea. Thanks.
I love this idea. I have one tinted Mason jar and have been wanting to learn how to do this. Now I know. Thanks.
I am completely intrigued that you can make tinted mason jars in this way.
These are so easy and great to make for anytime of the year. The colors you make are endless!
these are adorable…love anything that is glittery
I absolutely love how these jars turned out! I would definitely love to create some for our patio. They would look great reflecting the sun and adding color to our patio area.
What a wonderful idea. And SO easy. These are gorgeous! I have a ton of jars I’ve been cutting (with bottle cutter) and this will really make them beautiful.
Beautifully done
I plan to use this idea for a baby shower that I am having in 3 weeks! The gender is female. I did play with this idea last night and I made one in the pink. Instead of the key design, I used a baby pacifier! This is ADORABLE! Thank you for the ideas! I’m going to use these as centerpieces for the tables. I also used larger jars but adorable! I’m going to give them to my friend to use in decorating the new babies room! Love, Love, Love!
5 Stars
Lovely idea for gifts
I have some glass panels I have been wanting to turn into art.
I love doing these jars and have tons of the qt jars I need to do. Lovely for gift-giving.
Okay, this is brilliant (no pun intended, ha ha)
I have some stencils I use for fabric decoration and this will give them something else to do. And since I”m a sucker for colored glass, this is perfect for some lantern ideas that I have. Thanks for posting this!
?
This is great. I have always wanted to learn how to color glass jars.
I love Mason Jars! This is definitely a winner, and so beautiful.
These colored mason jars (with my own twist)would be perfect for Valentine treats that I love to hand out…usually fudge! I’d probably place them in a tiny ziplock bag. Then the recipient would have a snack and something to keep! Thanks!
amazing. looks so nice.will be trying this
Easy way to create professional-looking kitchen decor.
Fun and easy!! I may do this on the outside to add some spark to my jars. Its a great idea. I have a clear vase im useing for a scrubber holder but you can see leftover soap real well. a little color would hide that.
WOW – didn’t know it would dry clear! very helpful tip.
Loved this n so easy!
So cute!
These are so very pretty
Can you apply a napkin and mod podge over the colored jar?
Yes Kathy, but you want to make sure the color is on the inside of the jar rather than the outside. You don’t want to reactivate the Mod Podge already on the jar with more Mod Podge (although you could be very gentle and try it that way).
Like your ideas I am in charge of making table decorations for my ladies group so I am always looking for new diy projects which I always give my own twist to the end project
Glad you like them! Thank you for the kind comment! 😀
I love this project. Thank you for sharing.
Hi! These are adorable and I will be making some immediately! Can you wash them? Or would that ruin it? Thank so much!
Hi Rhianna! You could hand wash the outside but you don’t want to wash them.
The color fades/disappears if the jars are in direct sunlight… I colored a bunch and put solar lids with lights inside and put them outside in the garden. All lost the color…
Hi MPC! Yes, acrylic products will fade in the direct sunlight without UV protection. It’s like a framed poster that hangs on the wall in direct sunlight and if it doesn’t have UV glass, it will fade too. The Outdoor formula features a UV protection.
Hi this is the first time I’m painting mason jars with chalk paint. I’ve painted them all and dried over a day ago. I used sand paper but the paint is coming off and it is not easy to sand. What am I doing wrong? I really don’t know if my sand paper is good. Do I need to repaint them please help
Hi Ellen! I wrote a post about it here: https://modpodgerocksblog.com/how-to-paint-mason-jars/
So it looks like they dry clear? Is that correct?
Mostly. They aren’t completely transparent. But yes mostly 🙂
Hi Amy,
I actually used non toxic mica dyes but I cannot remove the scent of the mod podge for my spice jars. I made them a couple of weeks ago and they still smell. Any ideas other than putting my spiced in small zip lock bags inside the jars?
Thank you!
I just read some of the comments, oh boy, I should have put the color on the outside. Yikes!
Amazing tutorial!
I love the green colour you made, what was the combo/ratio you added to the MP for those jars?