
Did you know you can decorate a ceiling fan with scrapbook paper and Mod Podge? It’s way easier than you think! Here’s how it’s done.
Skills Required: Intermediate. I recommend having some prior crafting skills for this project. You’ll have to remove the fan blades, cut fabric or paper to fit, and then apply with Mod Podge (avoiding wrinkles).

Hi Podgers! Lynette from Get Your Craft On came up with this wonderful way to decorate a ceiling fan, and I wanted to let her tell you about it in her own words. I really think this decoupage idea is fabulous. So here she is!
I can honestly say that, as far as I know, I came up with this idea to decorate a ceiling fan all on my own! That really is a lot to be said since most of the time I can’t take complete credit for anything!
Usually I see a cute idea and copy it and make it my own. But, THIS FAN!! I think maybe I might have, could have, hopefully did really come up with this all by myself (notice my still lacking confidence).
So, when we were finishing our basement and finishing up projects in my favorite room in the house, my hubby was installing a ceiling fan. As he was about to put the blades on the hole fan base part, a light bulb went off in my head!
I asked him “would it hurt the fan or start it on fire if I added some fabric or paper or something to those blades?”. He thought I was crazy, but couldn’t think of a reason why it should mess anything up.
So, I delayed him from finishing his installation so I could snazzy-up those fan blades. Here’s what I did.
DIY Ceiling Fan
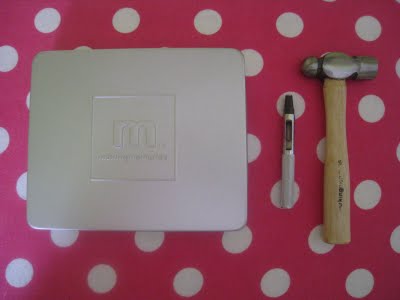
Gather These Supplies
- Paper (I used scrapbook paper and needed one 12″x12″ piece for each fan blade)
- Mod Podge Gloss
- Hole punch
- Sponge brush (the cheap-o ones at Michaels)
- X-Acto knife
1.) If you are using scrapbook paper (12″x12″), cut in half and tape it together end to make it long enough. Make sure whatever the print on the paper is, that you are able to match it up pretty good so you can’t see the line. Wrapping paper may work well b/c you won’t have to piece it together.
2.) Lay fan blade face-down on back of paper.
3.) Trace around fan blade and also trace inside the holes where it will be attached to the rest of the fan later.
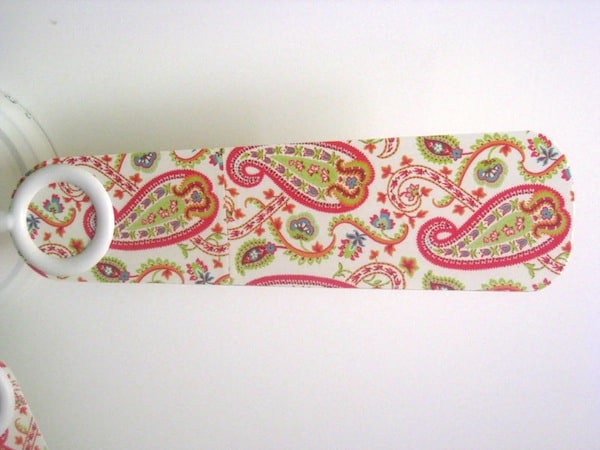
4.) Cut out fan blade shape from paper. Check your ceiling fan and see if the edge is curved a little; if so, cut out shape a bit inside the lines.
5.) With paper punch, punch out holes that will be used to screw blades onto fan. I used this scrapbooking punch:
6.) Wipe down surface of fan blade and spread on a thin layer of Mod Podge.
7.) Lay down paper on fan blade making sure to line up all edges and punched holes just right. Smooth out all bubbles or wrinkles (I did not do this well, you can learn from my mistake!) Let dry 20-30 mins.
8.) If needed, trim excess paper from around fan blade with X-Acto knife.
9.) Coat the top of the blade with the paper on it with decoupage. Make sure to do the edges and holes too.
10.) Let dry.
11.) Do a few more coats of Mod Podge, making sure to let dry thoroughly in between coats.
12.) Once they’re all dry, go attach the blades to your ceiling fan and see how it livens up the room…so fun!
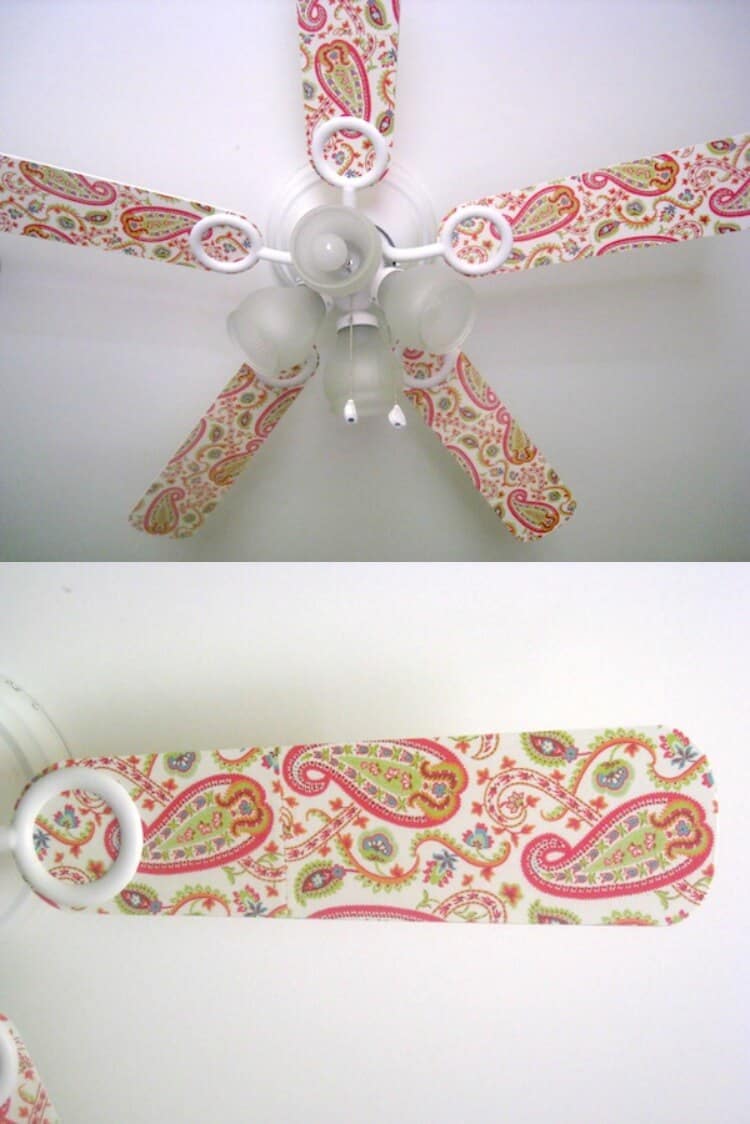
I can only imagine how fun this could be to tie in your ceiling fan with the room decor! It could be spunky or subdued, sparkly or subtle . . . so many possibilities!

Decorate a Ceiling Fan
Equipment
- Screwdriver
- Pen or pencil
Materials
- Ceiling fan
- Paper one sheet per blade
- Mod Podge Matte
- Scotch tape
Instructions
- Remove the fan blades with a screwdriver. Clean thoroughly with mild soap and water and dry off.
- Cut each sheet of scrapbook paper in half and tape together at one end (to cover the blade).
- Lay one fan blade face down on the back of the paper and trace with a pencil. Also trace the holes.
- Cut the fan blade shape from the paper using scissors or a craft knife. Use the hole punch to create the holes where the screws attach.
- Add a medium layer of Mod Podge to the fan blade and smooth down the paper, matching up the holes. Smooth thoroughly and wipe away any Mod Podge that comes out the side with the brush. Let dry for 20 minutes.
- Trim the excess paper from around the fan blade with the craft knife or scissors.
- Coat the top of the paper with Mod Podge and let dry. Repeat once more and let dry. Repeat with all the blades.
- Reattach the blades to the ceiling fan to complete.
Notes
Did you enjoy this craft idea? I hope you’ll check out these other great ideas to make at home:


👍
I’m going to do this and I am going to try the iron on method,,,,,do you think it would work just as well?
Hi Elsie! Yes, the iron on method works on wood. Having said that, I don’t know what the ceiling fan is made out of, so be careful with the iron. Sometimes irons warp some wood.
I have been thinking about doing this with love letters from my Grandprants they date back to 1899- to early 1900 done in old hand writing.
That’s awesome! Definitely make laserjet copies and save the originals 🙂
These is a awesome ideal thank you
I can’t wait to try this!!
I’m seriously impressed! If only we weren’t renting…
You’re so clever! We have a plain white fan in the livingroom that could totally use some livening up. Thanks for posting this! I think I may have to attempt this project. 🙂
I love this. I wonder if my husband would let me do this in our bedroom. I’m not holding my breath.