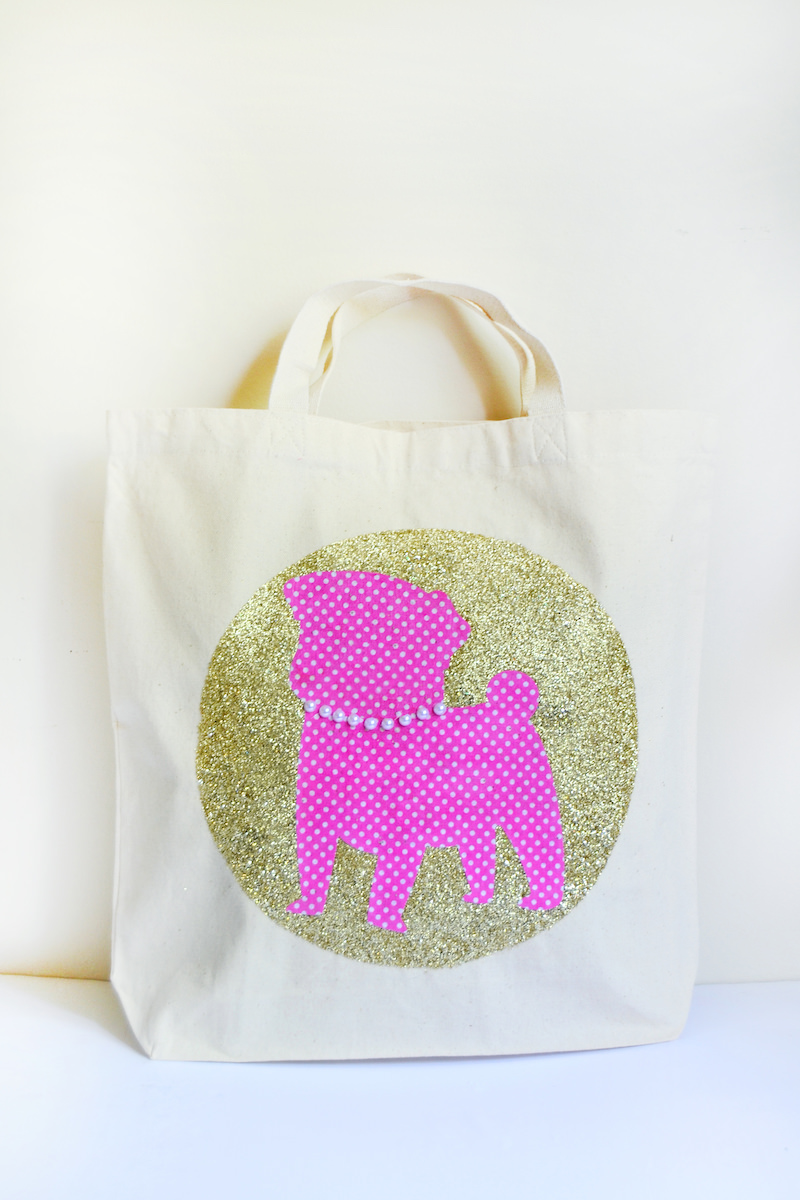
Skip to Content

Decorating Tote Bags with Mod Podge

Decorating tote bags is SO easy with this tutorial! You don’t need a sewing machine, and you’ll have pretty canvas tote bags in minutes.

Skills Required: Beginner. You don’t need prior crafting skills to make this project. You’ll be adding glitter with Mod Podge and then cutting out a design, and ironing.

Decorating Tote Bags with Mod Podge

If you open my pantry door, you might be concerned – I have enough canvas tote bags hanging on hooks to supply a small village. I don’t know what it is . . . I just love always having a cute tote at my disposal!

A lot of them are blinged out, because I love decorating tote bags, especially with Mod Podge.

And that’s what I’m about to show you today. I’m convinced you’re going to fall in love with decorating tote bags too.

Decorate a Tote Bag

I keep canvas tote bags of all sizes at my disposal, and this method for decorating tote bags is so versatile that it’s easily adaptable depending on the size of the bag you buy.

You can also use any color of tote bag as well. There’s no limit to the number of bag and glitter color combinations!

Before I show you how to decorate tote bags with Mod Podge, I’d like to address a few common questions and techniques you should know to complete this project. I want to make sure you can achieve success.

Decorating tote bags with Mod Podge

Applying the Glitter

Before you apply glitter on your tote, make sure to use a medium layer of Mod Podge. You don’t want to miss any areas when you sprinkle any glitter, and Mod Podge typically begins to dry rather quickly.

After you sprinkle on your glitter, remove the template immediately, then let dry. Tap off the excess, then shake the tote to remove the remaining unattached glitter (you might want to go outside).

If you see any areas that need touching up, that’s fine to do. You can go over the top of your previous glitter and add more glitter.

Just be careful not to make the Mod Podge too thick for your second time around or it will get clumpy. You’ll need to go thinner.

Another option is to use Glitter Mod Podge or Sparkle Mod Podge if you don’t want to fuss with loose glitter. You’ll want to use a spouncer instead of a brush to apply (see what one is here).

You will probably end up applying several layers (on top of each other) to achieve the look you like.

Mod Podge vs. Heat n’ Bond

You might be wondering why we used Heat n’ Bond on this project as opposed to just slapping Fabric Mod Podge on the back and slapping it down.

The reason is because cotton fabric becomes somewhat transparent when you add Mod Podge, which would cause the glitter (and the tote color) to show through the patch.

If you use a thicker fabric, you can simply paint Mod Podge on the back before adhering your appliques to your canvas tote bags.

Decorating canvas tote bags

Where to Buy Canvas Tote Bags

I’m a fan of purchasing the thicker canvas totes that you can find at Michaels or JoAnn. I feel like they last longer and are just generally more durable, and from my experience they are able to hold larger/heavier items without tearing.

Amazon and Oriental Trading Company also have great options, and you can get higher quality bags or more thin, cheaper bags (if you need something inexpensive for a kids’ summer craft camp, for example).

Pay attention to the reviews when you buy totes online, and look closely at pictures so that you aren’t disappointed when the bags arrive.

The last places you can check (especially if you’re looking for inexpensive canvas tote bags) are Dollar Tree, Wal-Mart, and the Target Dollar Spot.

Those stores are hit-or-miss when it comes to totes, but you typically get a good deal if they happen to have them.

Are you ready to see a fun method for decorating canvas totes? Keep reading!

Decorating Canvas Tote Bags

Gather These Supplies

  • Canvas Tote Bag
  • Fabric Mod Podge
  • Fabric quarter
  • Heat and Bond Ultra-Hold
  • Iron
  • Glitter
  • Painter’s tape
  • Scissors
  • Cardboard square
  • Sponge brush
  • Hot glue gun
  • Heat gun or hair dryer
  • Embellishments (like pearls, optional)
  • Electronic die cutter (optional)
Tape your template onto your bag

Step 1. Cut a template for the circle on your cardboard square. I cut it using my Silhouette Cameo to make it a lot easier, but you can definitely cut it with scissors. Tape it down on the tote with painter’s tape, making sure it’s centered.

Apply Fabric Mod Podge to your tote

Step 2. Spread Fabric Mod Podge onto the tote, making sure to go inward from the edges so no glue gets under the template. You don’t necessarily have to glitter the entire middle given that the applique is going to go there.

Sprinkle glitter onto the wet Mod Podge

Step 3. Sprinkle glitter onto your wet Mod Podge and then remove the template. Wait for that to dry.

Back fabric with heat and Bond

Step 4. While the glitter is drying, back the fabric quarter with Heat and Bond.

Cut your fabric piece shape

Step 5. Cut your animal using an electronic die cutter or scissors – I chose a pug for mine.

Attach your applique with a hot glue gun

Step 6. Adhere your dog onto the glitter circle. I used a hot glue gun and then went over it with an iron.

Add embellishments to your canvas tote bags

Step 7. Finally, add your final embellishments. I added a pearl collar for mine using a hot glue gun and tweezers, as the pearls were tiny.

decorating tote bags with glitter and a pug applique

Let your canvas tote bag cool/completely dry before using.

Yield: 1 tote

Decorate a Tote Bag

Decorating Tote Bags with Mod Podge

Learn how to decorate canvas bags with Mod Podge and glitter! Makes such a great gift idea.

Prep Time 15 minutes
Active Time 1 hour 15 minutes
Total Time 1 hour 30 minutes
Difficulty Easy

Materials

  • Canvas tote bag
  • Fabric Mod Podge
  • Fabric quarter
  • Heat and Bond Ultra-Hold
  • Glitter
  • Painter’s tape
  • Cardboard square
  • Embellishments (like pearls, optional)

Tools

  • Iron
  • Scissors
  • Sponge brush
  • Hot glue gun
  • Heat gun or hair dryer
  • Electronic die cutter (optional)

Instructions

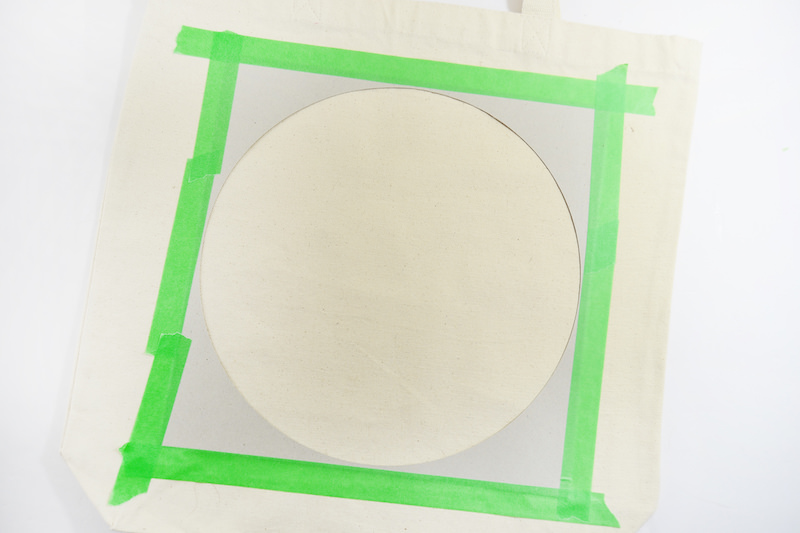
  1. Cut a template for the circle on the cardboard square using either a die cutter or scissors. Tape it down on the tote with painter’s tape, making sure it’s centered.
  2. Spread Fabric Mod Podge onto the tote within the circle template.
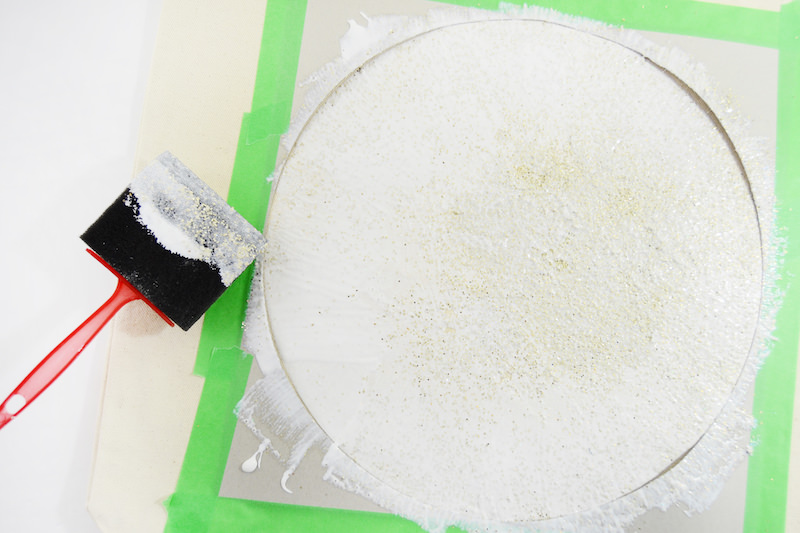
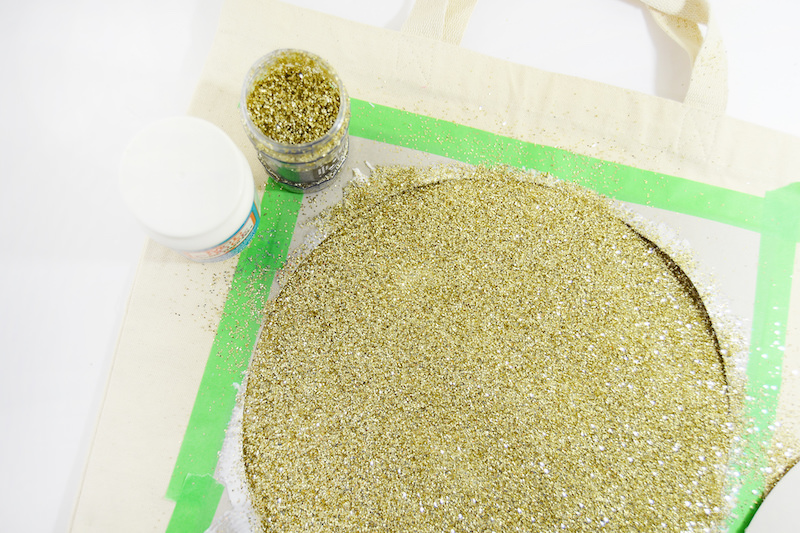
  3. Sprinkle glitter onto the wet Mod Podge and then remove the template. Let dry.
  4. While the glitter is drying, back the fabric quarter with Heat and Bond.
  5. Cut a design out of the fabric using an electronic die cutter or scissors.
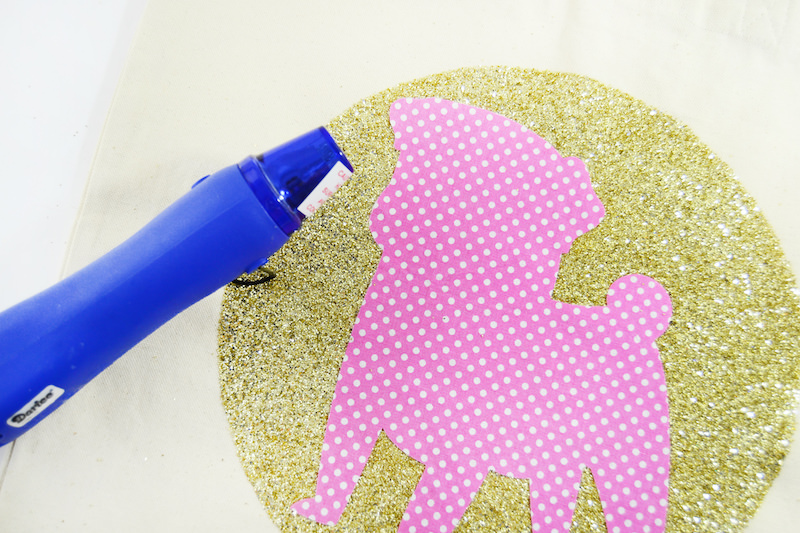
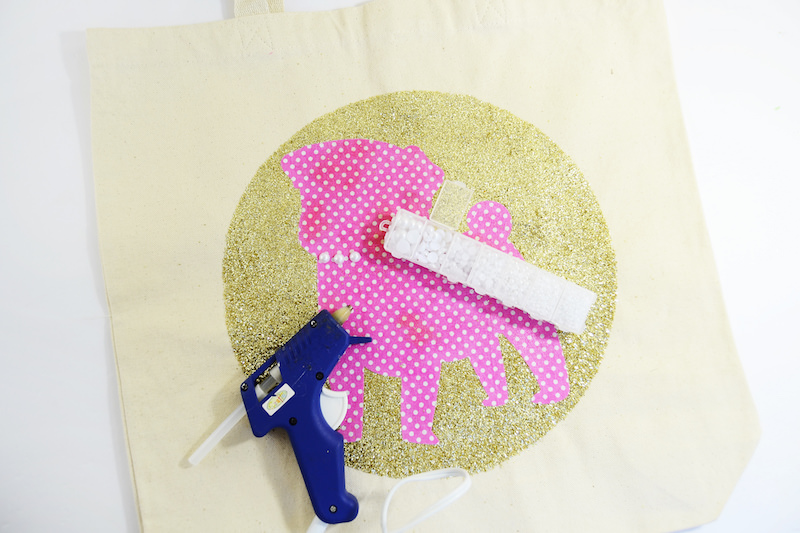
  6. Adhere the design onto the glitter circle using a hot glue gun - then go over lightly with an iron.
  7. Add embellishments using a hot glue gun and tweezers (if necessary).
  8. Let the canvas tote bag cool/completely dry before using.

Notes

Tip: you can use parchment paper between the iron and design if you are worrying about melting the Mod Podge or glitter.

Did You Make This Project?

Please leave a rating or share a photo on Pinterest!


Decorating tote bags is easy, no? I didn’t even have to break out the sewing machine. Love it! If you love decorating totes, here are some other projects you’re going to love:

Evelisa

Friday 27th of April 2012

This looks cute. This would be great craft for my daughter.

Lisa's Scrap Site

Friday 27th of April 2012

Great idea,and Mod Podge Rocks.

Skip to Instructions