
I needed something small to reach the tops of my kitchen shelves – so I decorated this DIY step stool in my favorite fabric colors!
Skills Required: Beginner. It helps to have some experience with Mod Podge and cutting things in ovals (which isn’t as easy as it looks necessarily). You’ll be painting and attaching fabric to the stool.
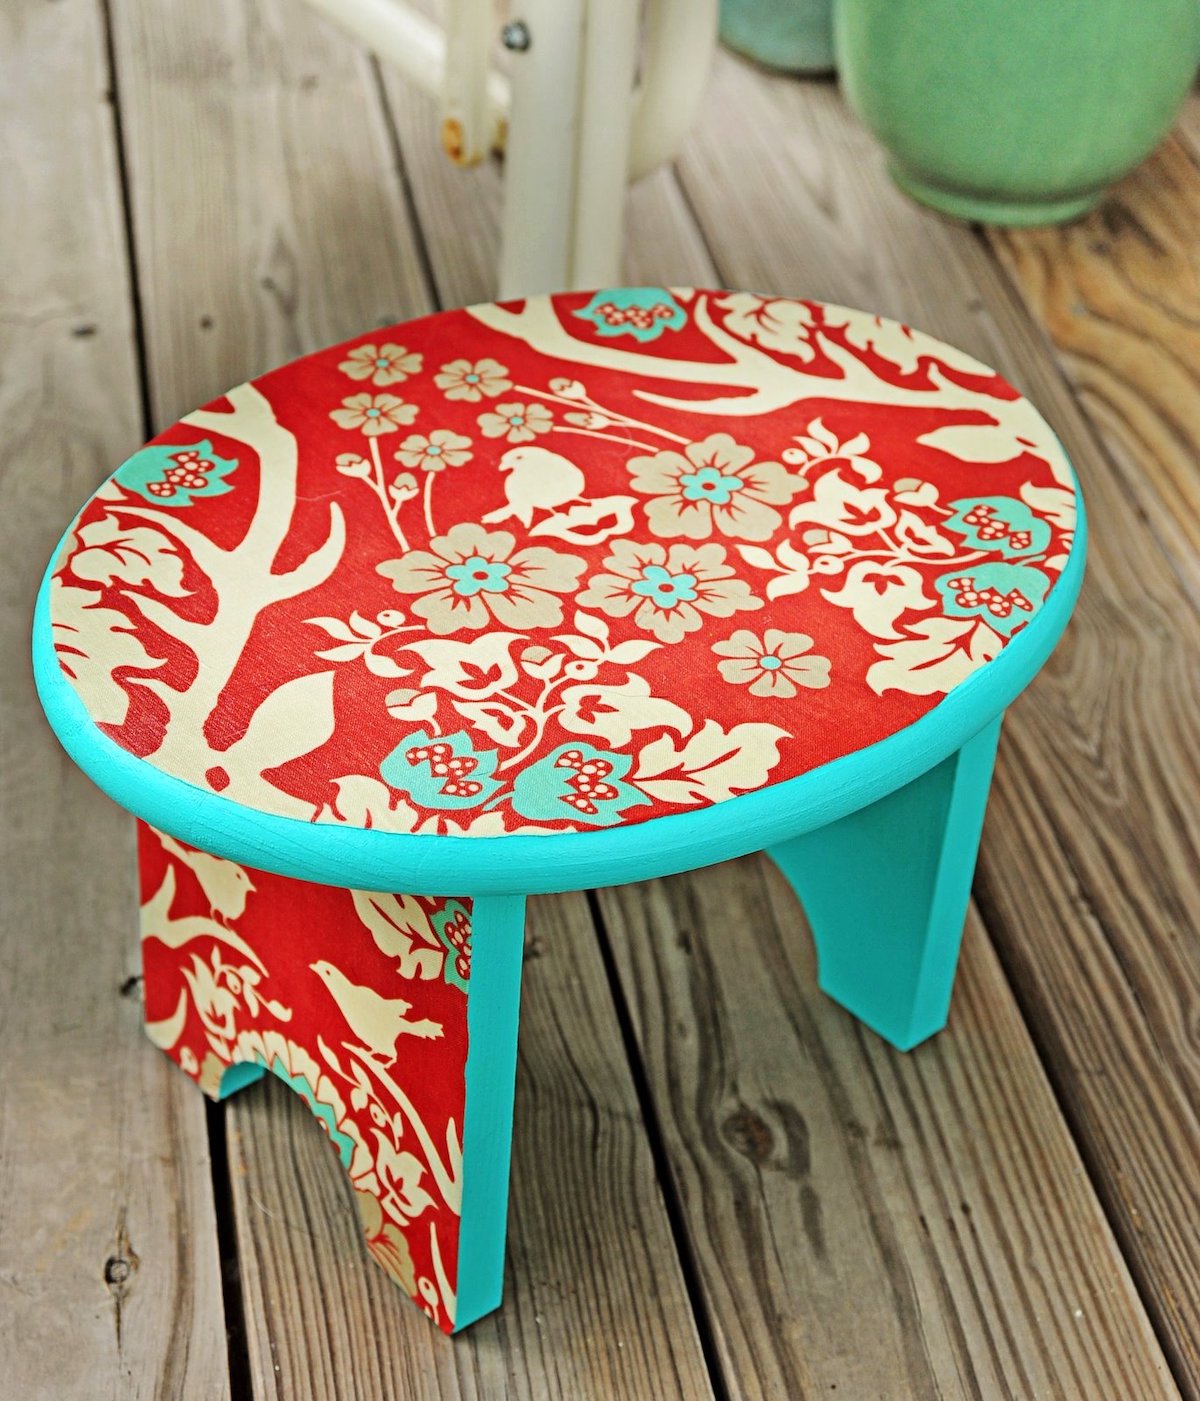
I love my new DIY step stool! How did it come about? Mod Podge Command Central was not designed with me in mind. The nerve, right?
You see, in the kitchen I can’t reach the top cabinets (even though I’m 5′ 6″) and I have nowhere to keep a step stool unless I want to ditch some craft supplies.
Not going to happen. When presented with a problem such as this, I’m sure you can guess that I always turn to Mod Podge. I also turn to my fabric stash, which had another colorway of the Joel Dewberry fabric I used in this project.
The instructions for my DIY step stool are below – this is how I solved the problem with the help of my good friend Mod Podge. You’ll be pleased to know I’m now reaching the upper cabinets with ease, and all is right with the world again.
Gather These Supplies
- FolkArt Acrylic Paint – Patina, Parchment (optional)
- Mod Podge Fabric and Mod Podge Gloss
- Small Wood Stool
- Joel Dewberry “Deer Valley Antler” Fabric, Terra Cotta – 1/2 yard
- 1” Flat Paint Brush
- Craft Knife
- Pencil
- Ruler
- Scissors
- Wax paper
- Acrylic Sealer (optional)
- You will first want to prepare the fabric before painting. To do this, wash and dry the fabric (do not use fabric softener). Iron and then lay out on a covered work surface. Wax paper is preferable for covering your table. Using a brush, paint a light coat of Fabric Mod Podge onto your fabric. Allow to dry. This will allow you to cut the fabric like paper without frayed edges.
- Time to cut out your fabric pieces. Lay the stool top down onto the fabric and trace. Cut out using the scissors. Do the same thing with both of the stool sides. Set aside.
- My stool came unassembled, so I painted it before I put it together. I basecoated the sides and top with Patina. You can paint the whole thing with Patina, but I painted the crossbar (which you can’t see in the photo) with Parchment. Depends on how many paint colors you want to buy. Allow these pieces to dry.
- Assemble the stool following the included instructions. Touch up any paint as needed.
- This is my favorite part! Adhere the top and side fabric using the Gloss Mod Podge. Completely smooth out all air bubbles and allow to dry for 15 – 20 minutes.
- Coat the entire stool with at least two coats of Gloss Mod Podge. Allow to dry.
- Go back to the top and trim any excess fabric around the edge with a craft knife.
- Allow the stool to dry for at least 24 hours before using. I recommend spraying with several coats of acrylic sealer to completely finish your project and add durability.

DIY Step Stool
Materials
- Wooden stool
- Mod Podge Fabric
- Mod Podge Gloss
- 1/2 yard Fabric
- Wax paper
- Clear acrylic spray sealer optional
Instructions
- Wash and dry the fabric (don’t use fabric softener). Lay the fabric out on a piece of wax paper. Using a brush, paint a light coat of Fabric Mod Podge onto your fabric. Allow to dry.
- Lay the stool top down onto the back of the fabric and trace. Cut out the pieces using the scissors. Do the same thing with both of the stool sides. Set aside.
- Paint the stool with acrylic paint and let dry.
- Adhere the top and side fabric using the Gloss Mod Podge. Smooth out all air bubbles and allow to dry for 15 – 20 minutes.
- Coat the entire stool with at least two coats of Gloss Mod Podge. Allow to dry.
- Trim any excess fabric around the edge with a craft knife.
- Allow the stool to dry for at least 24 hours before using. Spray with several coats of acrylic sealer to completely finish your project and add durability.
If you enjoyed this decoupage furniture project, I’d love for you to check out these related ideas:


Fabric. Huh. I never knew you could mod podge fabric. Oh man, there is a world of possibility now!
I love reading your blog. It inspires me…to at least think about doing something cute like this.
I am bound and determined to do more MP this year…now that I have kids in school all day~
Happy Thursday 🙂
VERY cute!
I LOVE Joel Dewberrys fabrics! I feel an need to go fabric shopping now 🙂
I love that stool and those colours!!
Suzie. 🙂
Wow those colors are awesome together! so pretty! Oh and I thought of you when I was at the craft store and there was this GIANT Mod Podge jar lol -it was huge!!!
i love the bright colors, so cute!
Where did you get the stool? I’ve been looking for one like that, but haven’t found an unfinished one.
This is adorable – love the colors!!!
So cute! You have great taste in colors!
LOVE the stool!!!!!!
Thanks everyone! Fabric Mod Podge is mi favorito!!
Jana – you can get this stool from Hobby Lobby I know. But Michaels has some too. Check it out!
Thanks, Amy!
A new Hobby Lobby just opened near a friend of mine.
Time to take a road trip!
How cool is this? Love the stool.
~ ~Ahrisha~ ~
It looks great! I love the colors! Thanks for linking up!
Love the colors!!!
I LOVE this! The colors you chose make it so cute!
I am in serious love with that gorgeous fabric. The stool is perfecto!
~Amanda
I love those colors too! What a fantastic project Amy!
OK, so I’ve seen this before, and probably have this post starred in google reader. But it wasn’t until today that I realized how perfectly this stool would match my kitchen colors that I am going to be doing in my kitchen.
So I might totally have to buy this fabric, and find a stool, and get this color paint and make myself one that is 100% identical to yours, because it is perfect! :o)
i have never podged before, but after seeing this happy little stool, darn it, i just might have to start…
kelly
Your mod podge links have been inspiring! 🙂 So much so that I linked to you on my blog today, I hope you don’t mind.
-Shelby
I love the stool idea. My daughter is in need of one & you just gave me some awesome inspiration!! I will share when I get mine complete 🙂
Super cute and simple! I have never used Mod Podge…think I may have to invest in some now!
Thanks for linking up to the Mad Skills party this week!
So cute!
Wow what a cute stool! Love it!
that fabric is gorgeous!
love the color choice of the fabric & the paint together.
awesome.
LOVE the colors!!! Just popping over from Today’s Creative blog 🙂
@Paisley Passions
@Laughter & Memories
Love, love, love this color combo!
That’s really darling!! I LOVE the color choices, red on blue is awesome!
Visiting from justsewsassy.com
Come by and check out my fun giveaway going on right now!!
http://justsewsassy.com/2010/08/10/tuesday-tutorial-anthro-inspired-headband/
very cute! I’m pretty tall and our apartment is very short. BUT my kids need lot’s of stools! Very pretty! Thanks for linking up to Topsy Turvy Tuesday’s!
Great site. A lot of useful information here. I’m sending it to some friends!
Why is it necessary to pre-wash the fabric? I bought some last weekend and was planning on “podging” it soon.
Love that fabric! Ellen
How dirt resistant does MP & acrylic sealer make the stool? I’d like to do this to a stool I bought my toddler for the bathroom, but I’m nervous about him ruining it five seconds after it is made. Is it easy to clean? Thanks for the tutorial, btw. It’s adorable!
Hi Red Monkey! It will make it somewhat dirt resistant, but not water safe. I would seal it with an outdoor sealer if you are going to be really rough and tough with it. If there’s a major spill it could ruin the stool, but regular wear and tear should be fine.
This is super adorable. I am going to have to try it out. I have a throw pillow made out of moda fabric that match this paint color perfectly. I can’t wait to try this project out myself.
I have a question.. where I live I can’t get mod podge for fabric I was wondering could I use any other mod podge ( all I can get is glossy and matte).
Hi there! Yes, you can use Glossy or Matte – just be sure to put an added sealer over it for extra durability. Regular Mod Podge is tough for the Hard Coat and Fabric formulas are specially formulated for furniture wear and tear.
Hi. I just recently got introduced to Mod Podge and am saying “where have you been all my life!’ I love your tutorial and am looking forward to doing this with an IKEA stool I just got. It comes pre painted and I just wanted to add a nice print on it. Do you suggest I sand and prime the sections first or can go directly to applying the fabric? Also, when you painted your stool, did you paint below the area where you were going to podge? is it necessary? Thank you very much for your time!
Hi there! I’ve actually done IKEA stools and recommend just lightly sanding so that the Mod Podge grips better. The painting part is up to you. I find that Mod Podge makes fabric slightly translucent, so I always paint a light color below the fabric so that it really pops. But you don’t have to!