
DIY screen printing doesn’t have to be expensive! Do it with Mod Podge – you won’t believe how easy it is and how good it looks. Scroll down to see a video of the process in action . . . with two bonus techniques as well!
Skills Required: Beginner. If you’re doing a simple design, you don’t really need any prior crafting skills. Just work slowly if you haven’t crafted before.
I finally did it! I tried DIY screen printing with Mod Podge. I’ve talked about this before, always wanted to do it, and I finally did. Let’s not talk about the fact that I want to use wallpaper with Mod Podge too and haven’t done it yet – no, let’s not even go there.
Homemade Screen Printing
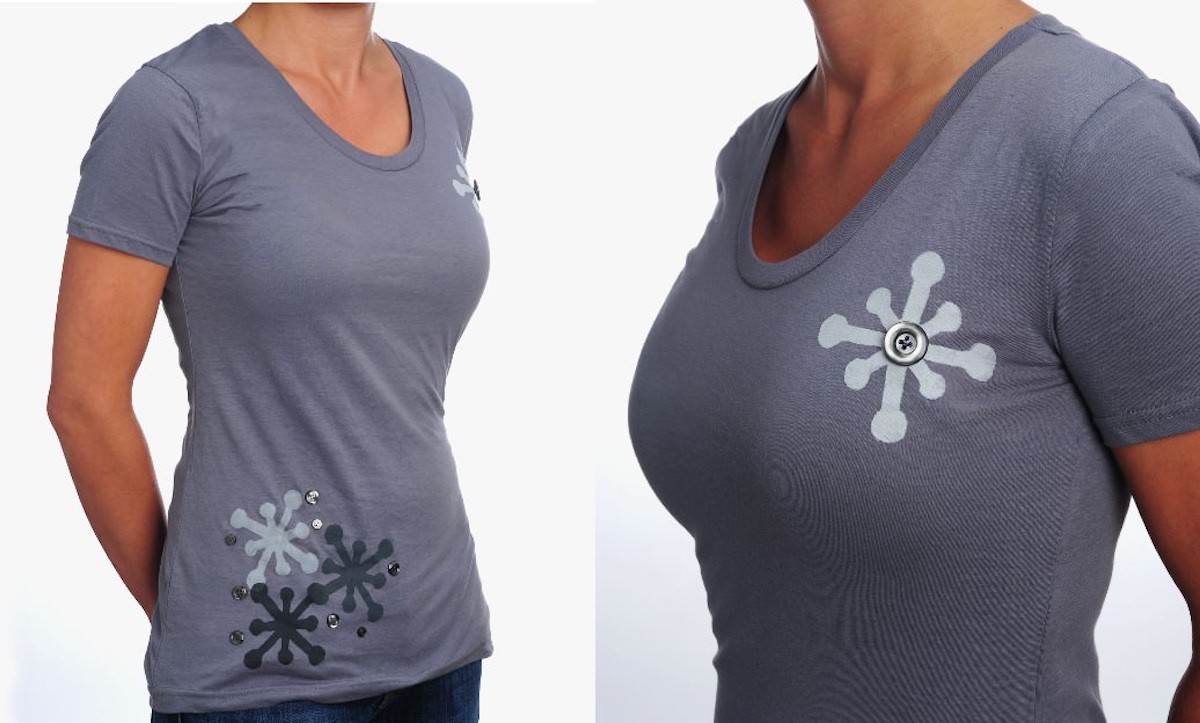
I’m so pleased with the results of my fashion craft that I bring you this DIY screen printing tutorial. I’ll start with something easy and then tell you about my shirt above.
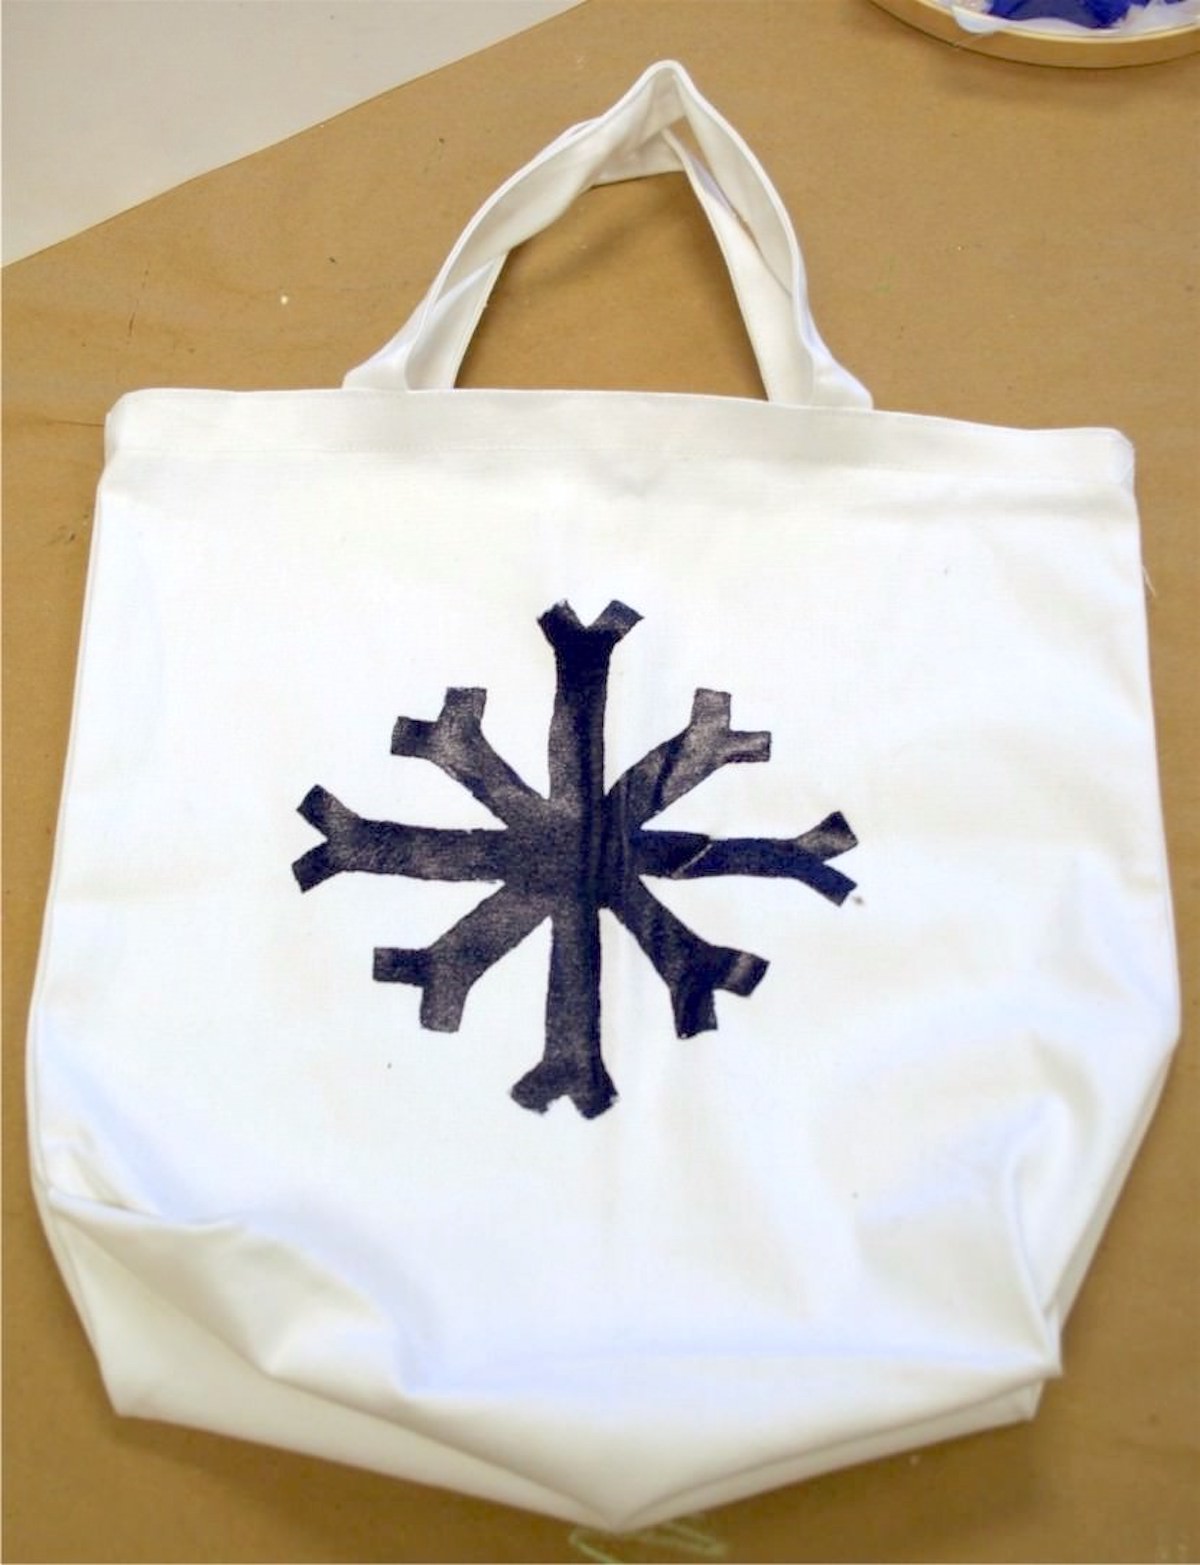
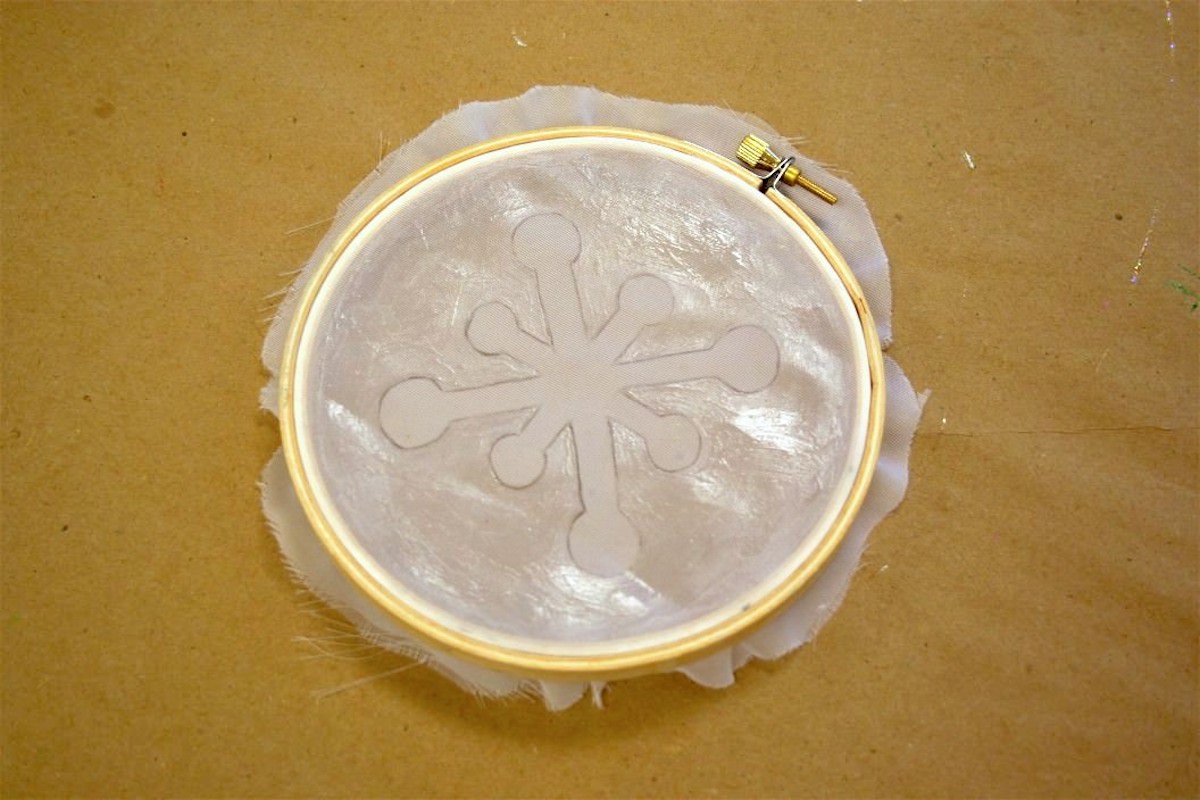
Here’s my first try, the snowflake tote:
Before I show you how it’s done, I wanted to go over a few commonly asked questions I’ve gotten about this project. It’s a really easy craft, but there are some things to know.
DIY Screen Print vs. DIY Silk Screen
Essentially the two techniques are the same. “Silk screen” is traditionally called that because silk is used in the process. The panel I used in this process is polyester, but you might be able to use silk.
I was just looking for something with fine holes that seemed reasonable for a DIY silk screen or screen print and the panel I found worked well.
NO Emulsion, NO Sensitizer
The awesome thing about this tutorial is that you don’t need any emulsion or any sensitizer. I love that you don’t need any chemicals! You still get the crisp lines as well. It’s pretty awesome.
Mass Production
You can do several t-shirts with this method – you can reuse the screen. You might have to touch up the Mod Podge in some places depending on how many times you used it/how thick you applied it.
But if you are making shirts for a summer vacation (for example), you’ll be able to produce your t-shirts using one screen just fine. If you’re planning on mass-producing t-shirts, I’d go with a different method.
Are you ready to learn how to print on shirts and other goodies with my technique? Here’s what I pulled together.
- Embroidery hoop – doesn’t matter if it’s wood or plastic
- Sheer curtain panel – I got mine for $1 at the dollar store (I’ve also heard IKEA is good source)
- Screen printing ink – any kind or colors, Speedball is great
- Fabric Mod Podge
- Flat paint brush
- Sheet of paper, any kind
- Pencil
- Cotton bag
- Scissors
Once I did the bag I was more confident, so I created this mini snowflake screen in the same way that I did the large snowflake one for the bag.
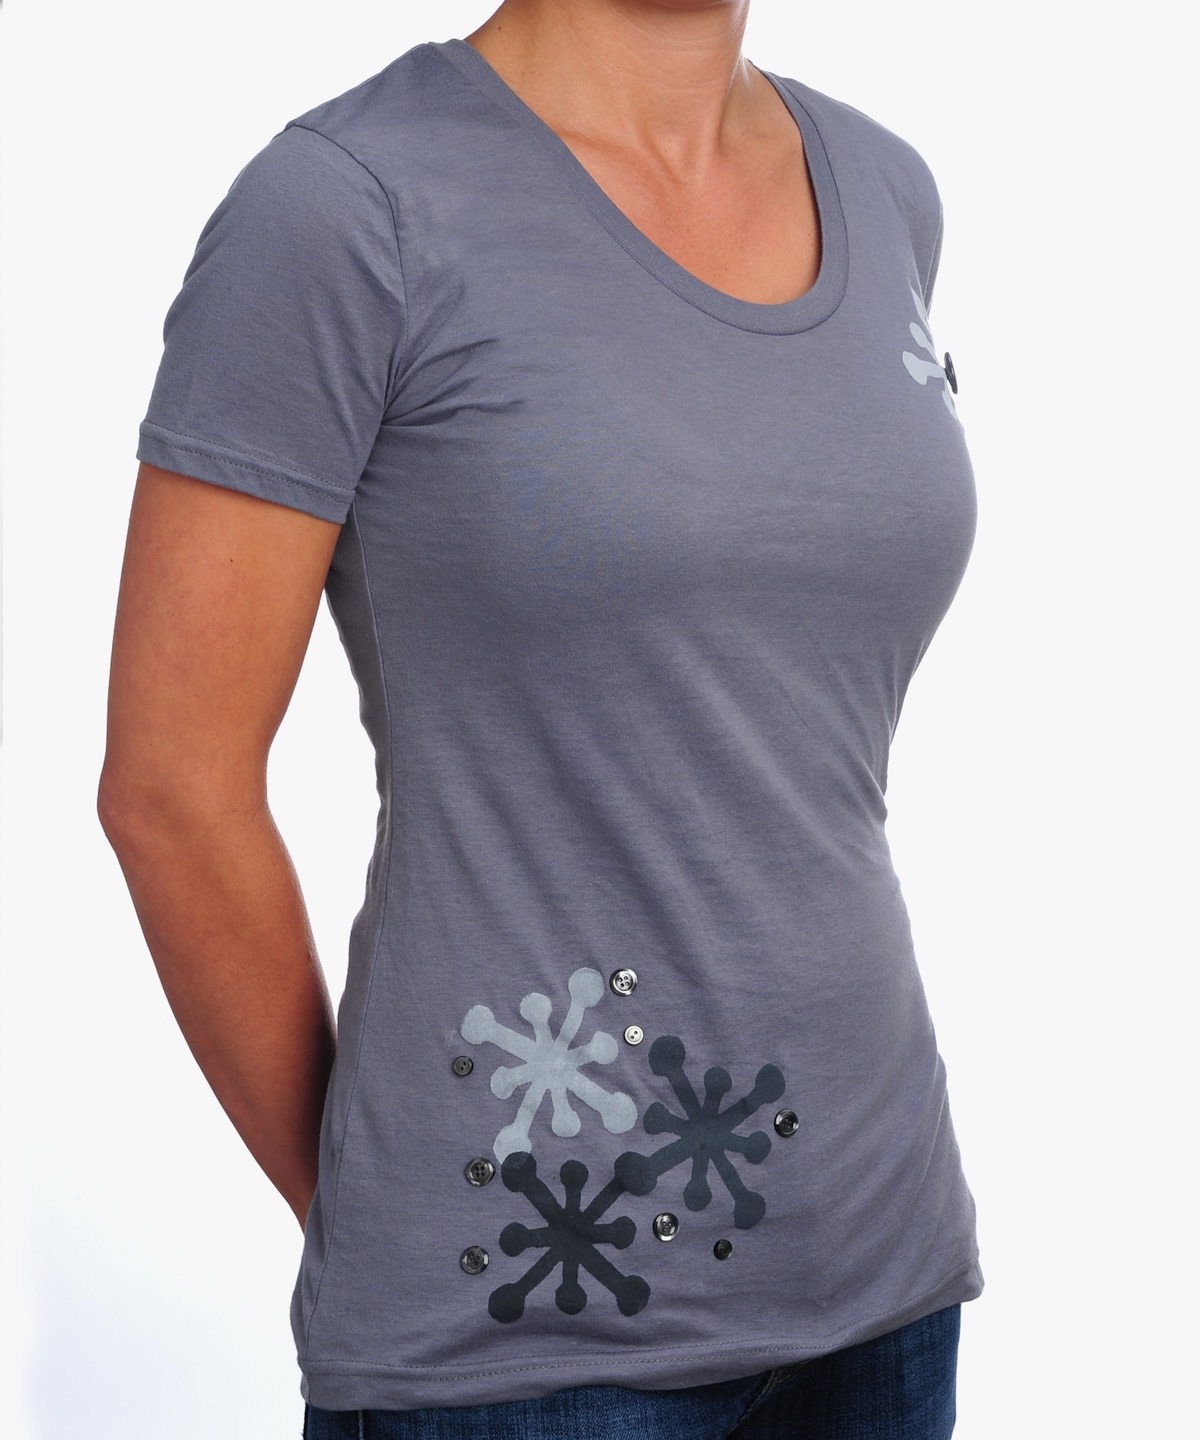
I grabbed a gray t-shirt and mixed together some black and white screen printing ink, then followed the steps I listed above. You’ll notice I did several shades on the t-shirt.
Gray tonal makes me happy, so printed one snowflake, then added more white. Then did it again. And again. And one more time. Finished t-shirt!
Get the printable how to and try this yourself below:

How to Screen Print at Home
Equipment
- Paintbrush(es) flat
Materials
- Embroidery hoop
- Sheer curtain panel
- Surface – t-shirt or cotton bag
- Screen printing ink
- Mod Podge Fabric
- Sheet of paper any kind
Instructions
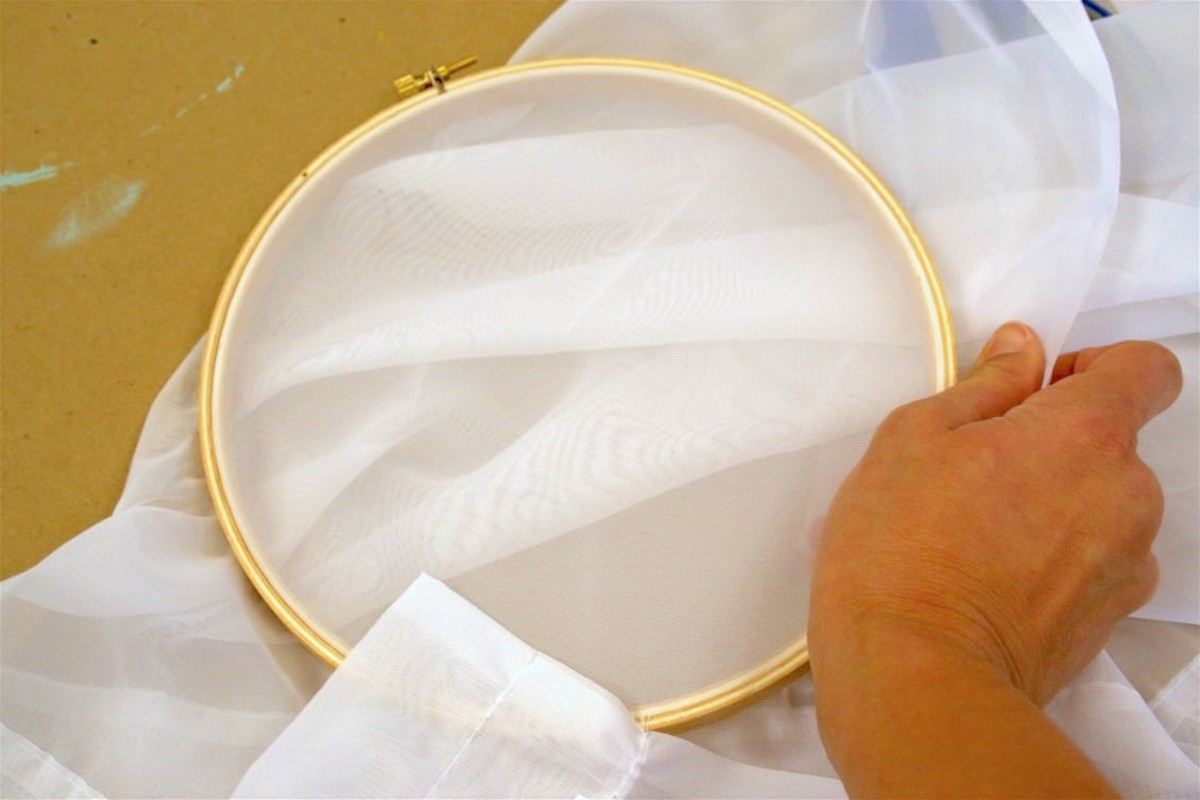
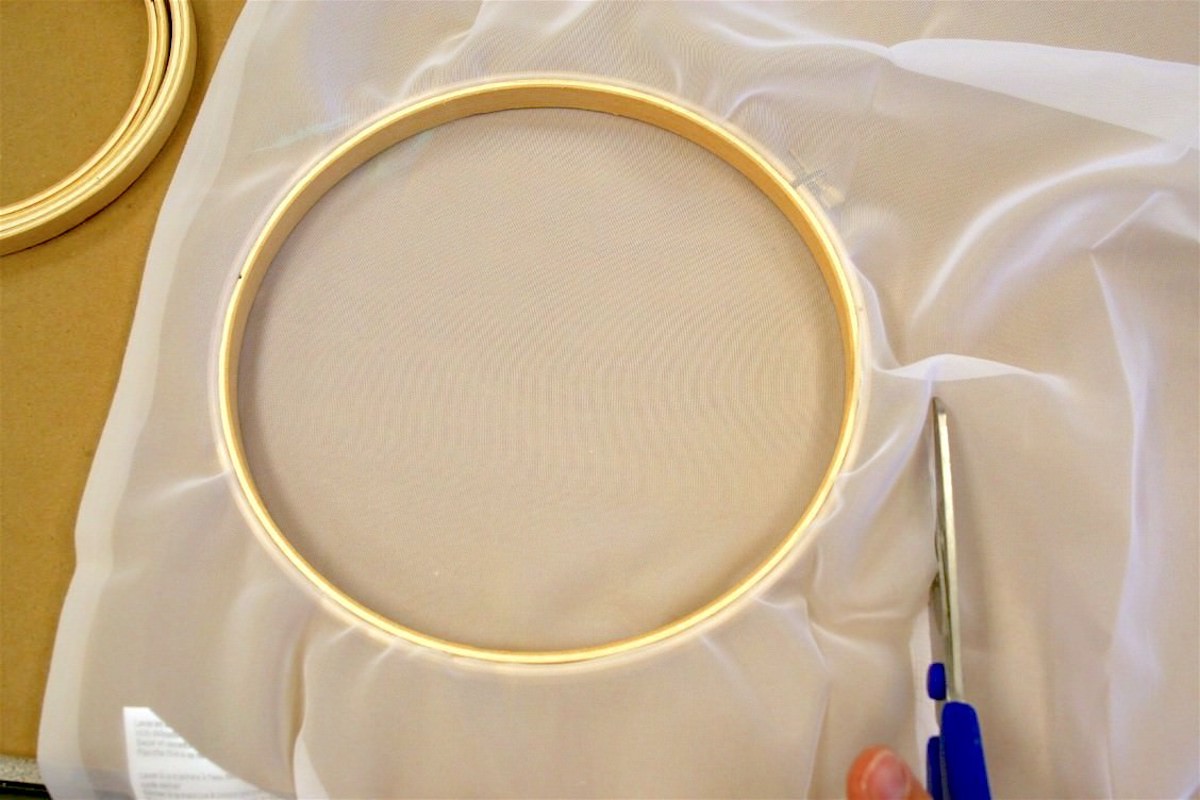
- Fasten the curtain panel into the embroidery hoop. Screw the hoop closed and pull the curtain tight, tight, tight.

- Turn the hoop over and cut the excess curtain material around the frame. Put the extra curtain aside and pull the screen taut again.
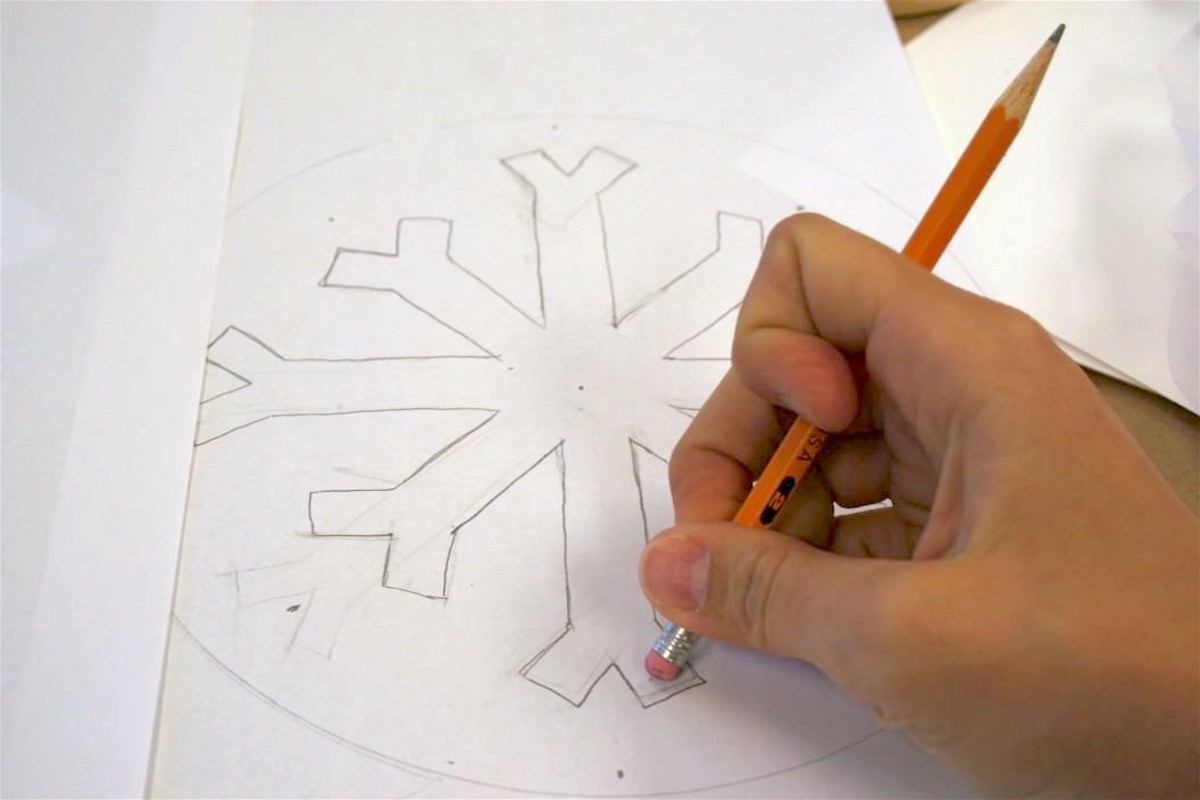
- Print out or hand draw an image that you will screen print. Keep it relatively simple for your first design.
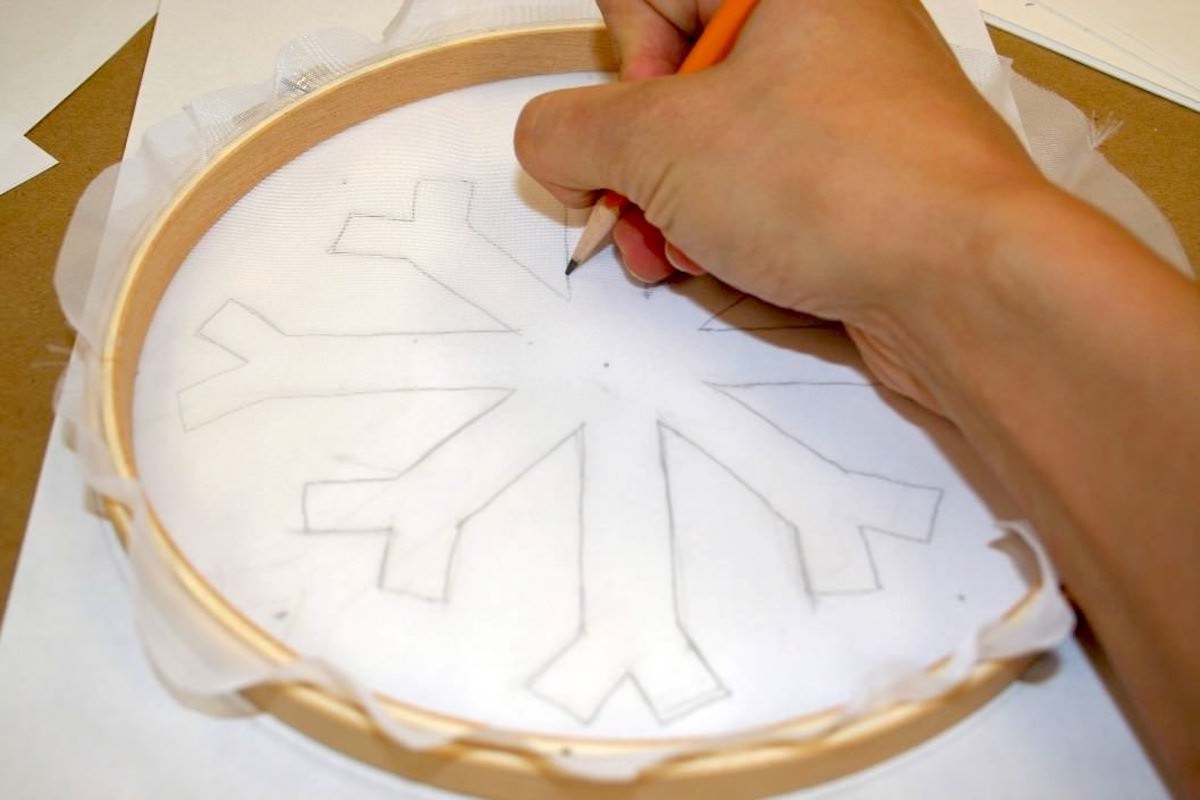
- Place the screen down onto the design. Trace directly onto the screen with a pencil.
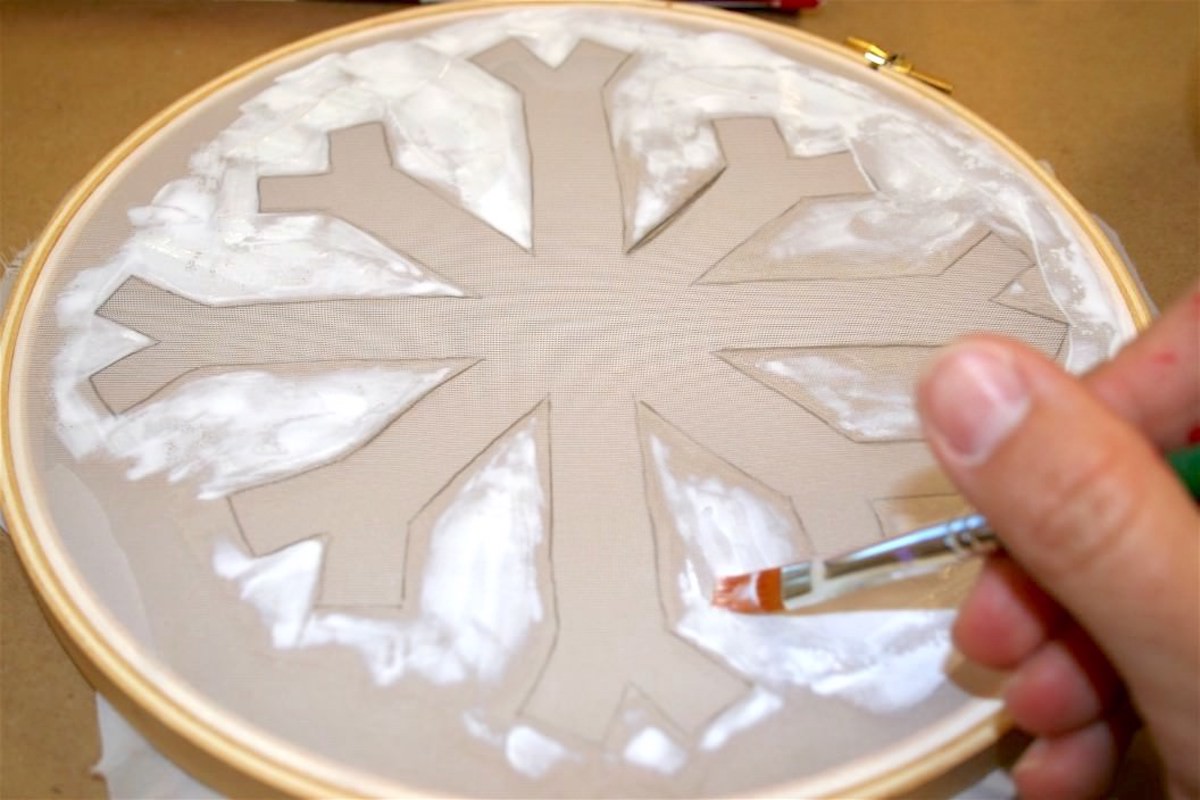
- Using a paintbrush, paint Mod Podge on the screen where you DON’T want the ink to go through. This is called the “resist” because it resists the ink coming through the screen.
- Let the screen dry for a few hours until it’s completely clear. Apply an additional layer of Mod Podge and let dry.
- Place the screen down on the surface and paint. Tip: place something between the layers of fabric, so that the ink doesn’t bleed through. Be sure to get the corners well.
- Pull the screen off. Touch up any areas that need it with ink and a detail brush. Allow to dry for 24 hours. Follow the directions on the packaging of your screen print ink to finish your project (wash or heat seal, etc.).

Video
Notes
If you enjoyed this project, let me know in the comments. I’d also love for you to check out the following projects:


Woo hoo, that’s great. I love me some inexpensive craft hacks!!
Wow, your prints turned out great! I have been wanting to try this forever too, do you know if you can squeegee the ink like you would with regular screen printing or is it best to just brush it on? I was thinking of trying to use an old credit card to push the ink through the screen.
Those shirt prints are very nice! You should write a book in addition to your blog.
OMG what a CUTE idea!! I LOVE it!
~TidyMom
Brilliant!!! I can’t wait to try this!
what did you use for the screen???
THis is one of the coolest things I have seen! Love it!
LOVE this technique and tutorial!
Thanks so much for sharing, this is now on my must do list for sure!
I can see my kids and I coming up with all kinds ways to play with this!
B-
This is amazing! I can’t wait to try this myself……so what do you do to reuse the screen? Just rinse under warm water?
love it… looks simple enough… we could make some cool holiday shirts!
Oh Wow! I Love this! I am going to try this on one of my 7 year old sons designs!
This is very cool. I have never seen anything like this – thanks for the photos.
I am TOTALLY trying this! Thanks Amy!! =)
Wow! Modge Podge SCREEN PRINTING!?! I never knew you could do this…
I think I will have to try!
What a great, simple, elegant idea. So many ways to use this and it’d make a great personalized gifts! Thanks.
Whoa! This project totally ROCKS! I love the way the shirt turned out… No it’s time for me to be brave… Thanks for sharing.
WOW! Very impressive! 🙂
Brilliant! I can’t wait to try this out.
Holy Moly, that’s glorious! My mind reels with possibilities. Thank you so much for this excellent tutorial – I love that it renders screen-printing so accessible and affordable!
This is so cool! Amazing! Now I have to give it a try!
So clever! Love it! So wait… if Fabric MP will wash out, can you skip the screen step? Hmmmm….
That shirt is sooo cute! I love it! You’ve inspired me to try a new project!
That is awesome!!! What a great inexpensive way to screen print, I will have to try it!
Your shirt looks awesome! Too bad I’m not brave enough to try this…yet :).
Absolutely fabulous! Another addition to my gotta try list.
ooo this is just like bubzy’s tutorial! ever since i saw that i’ve really been meaning to try it but i don’t know what i would screen print. a snowflake tshirt is a really cute idea though~ n_n
Thanks Amy, I can totally see myself doing this with the kids at school….we already have class sets of embroidery hoops..Great idea!
Wow Amy! Love it!
Very Nice tutorial! I’ve been playing with the idea of screen printing for some time and I think you may have just solved a problem I was thinking through for a 12×12 challenge quilt. The think I like best about your tutorial is that I have everything but the curtain (easy to get) and the paint – but I know exactly where to buy it AND I have a coupon! Wahoo! It’s nice to know I don’t have to buy a fancy frame or a fancy rubber smoothing thingy. Thanks!
Love this! Just dropping in to say I linked to this post in my Friday Favorites. ~Lanie
This is fantastic! First time I actually think I could really do screen printing. 🙂 Thank you.
Wonder if you could use multiple colors on one design? or would the ink all run together and ruin everything????
That looks awesome! What a great idea! Can’t wait to see a wallpaper application.
Thanks everyone!! And yes, you could do more than one color on one design. Just let the screen printing ink/paint dry before you do the second color (then the third and so on).
Hey everyone!
Tresa – Fabric Mod Podge doesn’t wash out, it’s washable. So it sticks around after you wash it, which is good if you want to rinse the screen out and use multiple colors!
To reuse the screen, simply run under warm water and the ink washes out. I ran my hand lightly over it – no need to scrub. If you do use the screen several times, best to touch up the Mod Podge as it will wear down over time.
Yeah for trying something new!!! Have a cute Mod Podge project posted on the blog today!
Awesome! I have been wanting to get into screenprinting but it seemed so complicated. Your tutorial just cleared things up. Thanks.
I. M.U.S.T. D.O.
soon…love it and you are great model by the way…skinny little thang.
Whoa..this is way cool! Thanks so much for this, I’ll be linking.
Very cool! I did a few last year and was amazed!
Absolutely wonderful! I can’t wait to try this!
Who knew? Not me! I will feature this at somedaycrafts.blogspot.com Great tutorial!
I would try this… I wanted to print in clothes since I saw that many people uses frezzer paper, but… In México I can’t find this… so… I will try this!!!… great tutorial… thank you so much!!!!
OMG!! This is GREAT!!! I’ve been dying to try screenprinting, but if I buy one more large tool……I might find myself a swingin’ single again (hubby’s not too fond of all my crafting stuff taking over the office 🙂 Thanks!
What a cool idea. The shirt with the flakes on the side/ bottom is very nice.
@cheapchichome.blogspot.com
You can also use pantyhose, if you have any spare lying around or you can get some for like a quarter at WalMart (boo!!) Just take a leg and cut off the toe. Cut up the side and you have more than enough screen to print!
Amy, this is SUCH a great project…Thanks for posting it!
I totally love these, and more of the projects done with the cure-all Mod podge..i have a question though..we do not seem to have it in India..can you tell me if any other company is marketing Mod Podge in India, so that I and several other crafters here can lay our hands on it, too? It will turn in so many new possibilities for crafting, if available here….
Love it! I am going to try it! Very Cool! All I need is the fabric mod podge! Thanks Sew much!
This is awesome. I love screen printing, but have only been able to do one color. I am not very good at creating mutiple screens and over lapping the colors to make a complete picture. I could with this method. You can see through the Mod Podge to line things up. I am excited to try it!
so cool, Amy! You rock! I’m gonna try this at some point!
This is a cool idea but I am wondering how this is beneficial to just making a stencil? I make stencils with flattened out cereal boxes and paint on the fabric paint using the stencil. Does doing it through a “screen” make it looks better somehow?
this is so cool! I wonder if you could put your design on a sheet of sticker paper, cut it out and stick it to the screen and then place the glue around that & peel the sticker off. I’m definitely going to have to try this out!
This sounds awesome! I am trying to figure out how many washes the shirt can go through after screen printing.. I saw that you can cure it with heat after it’s dry.. Have you read anything about it?
This tutrial was brilliant. i just made my nephew an easter shirt using three screens. He loved it thank you
TOO cool for school! Love this madly, you genius you!
great!!! I’m so going to try this!
That is very cool, and call me lame but I didn’t even know there was ‘fabric’ mod podge.
This is too cool…I have all of the stuff for it, as I was going to make party tees for one of my son’s b-days, but ran out of time/chickened out. You’ve inspired me to give it a whirl!!
Thanks for sharing!
Smiles!!
So fun! What a great idea. I had no idea!
I can not WAIT to try this! Thanks for joining us for Anything Related #14!! ~Bridgette
Okay – brace yourself.
I’ve never used mod podge before.
Ever.
I think I may now, cause this is totally awesome! Thanks so much!!
I JUST DISCOVERED YOUR BLOG AND I ALREADY LOVE IT!! I TOO LOVE MOD PODGE AND HAVE BEEN WANTING TO USE IT WITH WALLPAPER, I JUST HAVEN’T CAME UP WITH THE PERFECT PROJECT. NOW I WANT TO TRY THE TOTE AND T-SHIRT 🙂 THANKS FOR THE GREAT IDEA!!
I think you can also use pantyhose for the screen as well. I don’t think would be reusable though.
😉
Love, Love, LOVE this!! I have been waiting to try this and finally got some time to sit down and give it a shot. Booo hoo! I think i spent wayyy to much on my shower curtain because i had a ton of bubbles 🙁 guess i’ll have to find a new screen material and try again. Thanks so much for sharing this. Great tutorial!
This is so cool! I’ve been interested in screen printing but its always looked like such a lot of work! haha I have too many hobbies!! thanks for the simple method 🙂
Super Cool. Thanks for sharing Amy. I love it. I have always wanting to try some screen printing.
Cheri
Amy, this is excellent!! I have done printing with freezer paper before, but it only lasts a short time (one or two prints). Thank you for this great tutorial! I had to share it as my “Make it Monday” theme on my Etsy shop fan page. http://www.facebook.com/eljahb I invite you to stop by and also stop by my shop, Eljah*B. http://www.eljahb.etsy.com
Blessings to you!
Your DIY screen printing is fabulous! It was not only easy to understand and follow, but your fun personality shone through. I thoroughly enjoyed it!
From Leigh.
i tried this, and it worked great! i ended up using fabric paint instead of screen printing ink because it was easier to get a hold of, but it worked wonderfully. Thanks for the tutorial! https://www.tumblr.com/login_required/justbeccaz/59203744750
Can you clean and reuse this screen print in the future?
Hi G – Yes, you can! Though you might have to touch up the Mod Podge in some places depending on how many times you used it/how thick you applied it.
Interesting ideas i used in 1988 through year 2000
Legend thankyou for this post! Its exactly what I’ve been looking for! My brain had been looking for a simpler and less expensive way to do it! Thankyou!
Pleasure!
Used this hack to make a checkerboard pattern on a screen. I taped off the pattern with painters tape and dabbed the glue on the negative spaces. The results were crisp lines and a screen I can use forever! Thank so much for the tip!!
WOOT! Glad it worked!
You’re using normal midge lodge I. The photo…
You can use normal Mod Podge too. The Fabric Mod Podge lasts longer on the screen though. Thanks for pointing that out b/c you can definitely use the original as well!