
Create a vibrant DIY split pea wreath for summer! This simple and affordable craft adds a fresh, rustic touch to your seasonal decor.
Skills Required: Beginner. You don’t need prior crafting experience to make this wreath. It’s so simple that even a kid could do it.
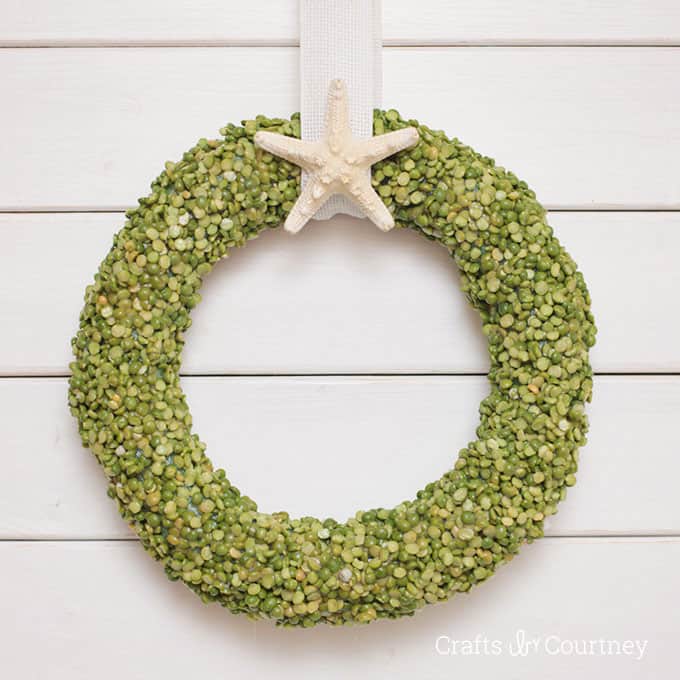
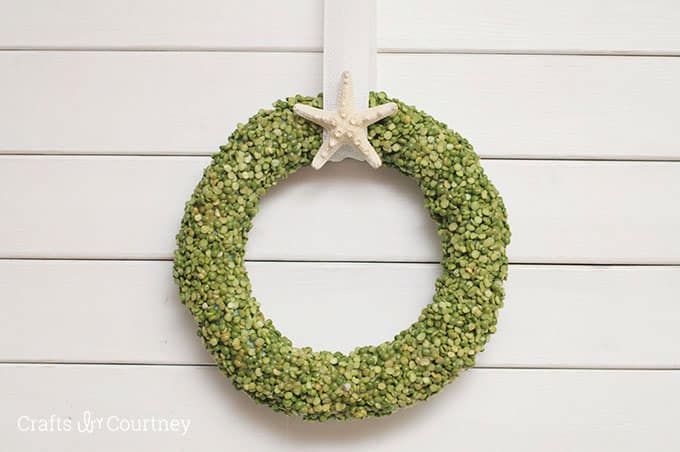
I’m really excited to share today’s DIY decor with all of you. I made a split pea wreath for my back door and I’m LOVING it – so much so that I plan to make a few more for around the house.
This style of wreath goes really well with my coastal/beach theme, but are neutral enough to go with other styles of decor as well.
This was a pretty easy project to make, and I feel that it makes a big impact on my decor without being too overwhelming. To be honest . . . it’s a great summer or spring craft too. You can keep this on your door six months out of the year!
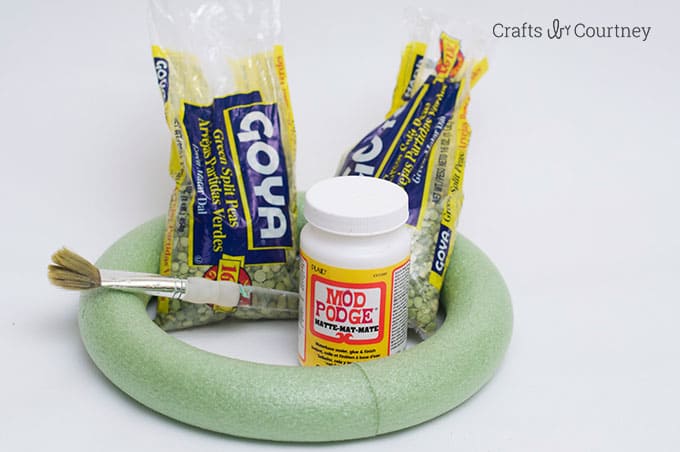
Before I get into the details of the wreath, I wanted to talk a little bit about the supplies. You’re going to want a smooth wreath form, also called an “extruded” wreath form. My form was purchased at Dollar Tree for (shocker) $1. It’s 10″ and is green.
What I love about the green wreath form is that if you miss some spots when you are adhering the split peas, it won’t really be noticeable. Michaels also has green wreath forms, as well as some of the other craft stores.
In addition to the wreath form, I got two bags of split peas for $1 each at the grocery store. I already had the Mod Podge and decorative accessories on hand, so if you’re into math you can quickly calculate that I spent $3 on this project.
If you need to purchase ribbon and accessories (like the starfish), it shouldn’t cost you much more. I highly recommend digging into your stash.
What I love about this wreath is that it goes with a variety of themes – farmhouse, rustic, vintage, etc. The natural look of the split peas compliments a lot.
It’s absolutely fine to apply paint over the split peas (and Mod Podge). Changing the color could be a good idea depending on the color of your decor. It will have a cool texture.
Are you ready to start? Here’s what you’re going to need.
Gather These Supplies
- Craft foam wreath form (size of your choice)
- Mod Podge Matte
- Split Peas – 2 bags is perfect for a 10″ wreath form
- Paint Brush
- Ribbon
- Starfish – or other decorative accents
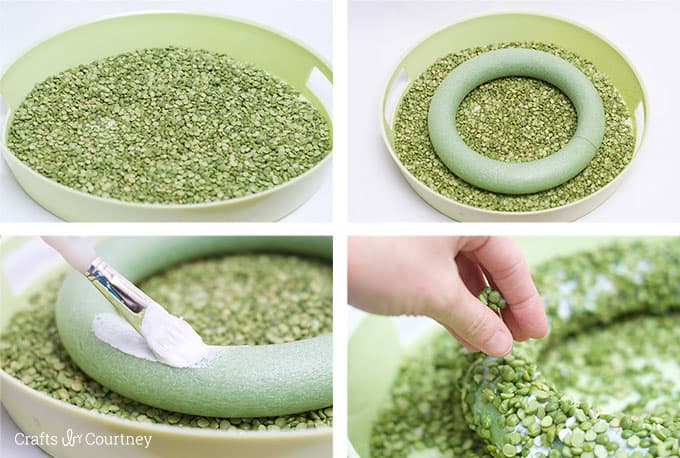
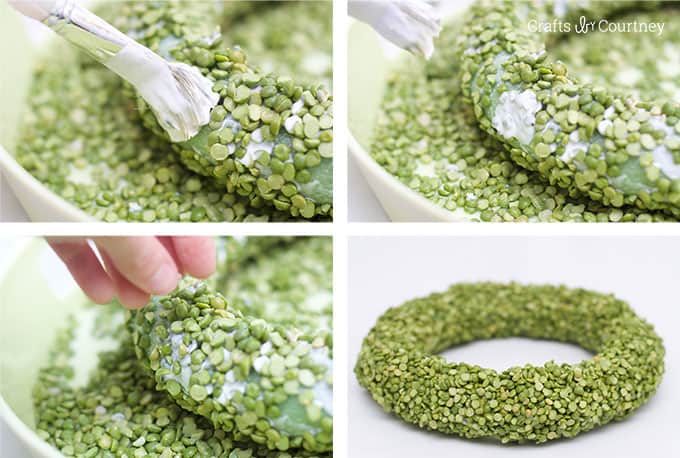
I found at perfect container to put my split peas in, which was a bowl I already had. This bowl makes the project quite a bit easier!
If you don’t have a bowl like this one, you can also use a cookie sheet with wax paper on the bottom (so the Mod Podge doesn’t touch it). Simply spread the peas out as shown.
Get the printable how to card below:

Decorate a Wreath with Split Peas
Equipment
- Bowl or wax paper
Materials
- 1 Craft foam wreath form size of your choice (I used 10")
- Mod Podge Matte
- 2 bags Split peas
- Ribbon
- Starfish or other decorative accent, optional
Video
Instructions
- Place the split peas in a bowl large enough to fit your wreath. If you don’t have a bowl, put wax paper down on the surface and spread the peas around.
- Set the wreath down in the peas and paint on the Mod Podge. Paint a section and sprinkle peas on that area. Keep going until the entire wreath is covered. Let dry for 30 minutes.
- Fill in the bare spots by adding Mod Podge and peas in those areas. You might need to go on thicker with the Mod Podge to get the peas to stick. Just don’t add too much – otherwise you’ll get clumping.
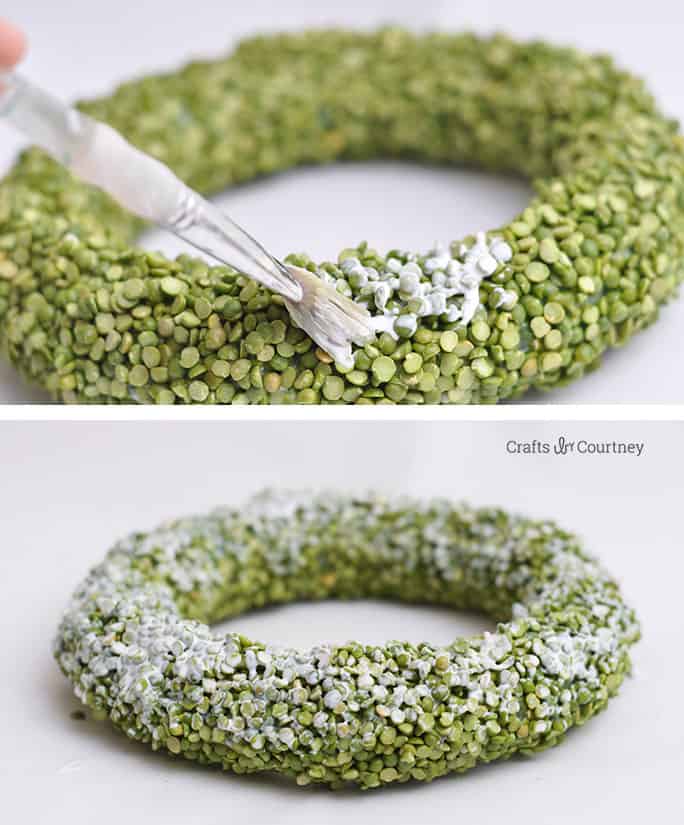
- Add two final coats of Mod Podge to seal the split peas to the wreath.
- Add ribbon and an embellishment to the top to finish, and to hang.
I decided on some white burlap ribbon and, of course, also had to add some coastal feel with a shell. I think the shell looks perfect at the center of the top. Very simple and clean.
I will be making another summer wreath and adding it to my french doors in the kitchen. Or maybe two wreaths. Don’t you think they’d look perfect there? Let me know what you think in the comments!
Please also check out these other posts:

Do you think if you covered the foam with Mod Podge, then turned it upside down in the bowl of split peas and pressed it in, wouldn’t that have made it go faster?
Wow, split peas, so creative and it looks so great!! I used to use split peas as stuffing for little knitted creatures that I made. But when I moved to Malaysia I found there are multiple kinds of little bugs that eat them. Gross! So no peas in my crafts until I move back to the US.
The wreath is beautiful, but IMHO food shouldn’t be wasted. There are so many hungry people in the world. Again, the wreath is lovely.