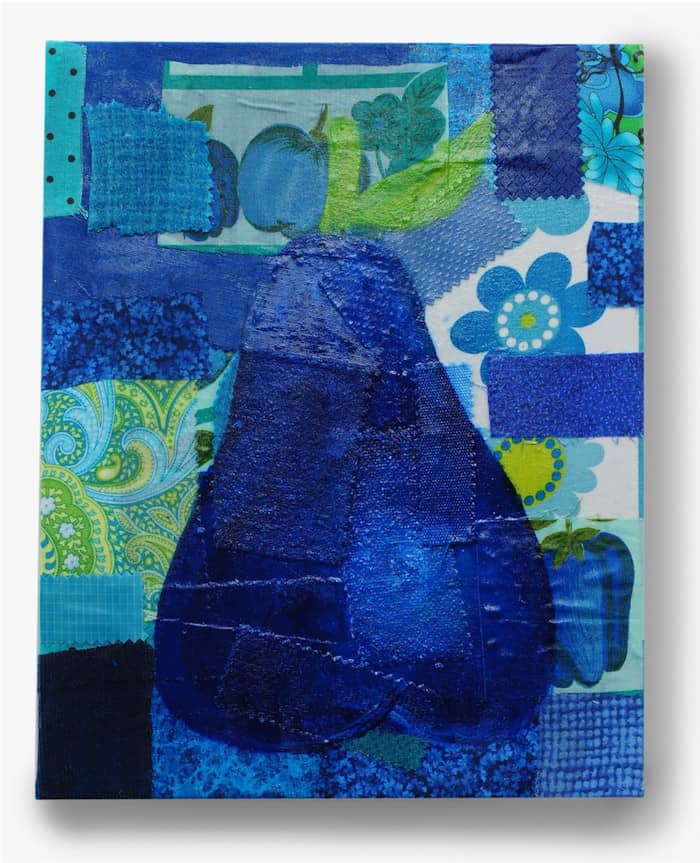
I made this canvas at Brave Girls Camp, and I wanted to share it with you – share my pear, if you will allow me to. I can and will try to describe Brave Girls Camp at some point, but it takes awhile to absorb the experience and talk about it. I will soon.
I can tell you that one of the big things I focused on while I was at BGC was completing the projects I WANTED to do. I don’t mean to sound selfish at all . . . I know that as women (the few men who read this blog too!), you can definitely relate to the pressure of meeting everyone else’s expectations.
And believe it or not, I have gone through periods with this blog of feeling like I was drowning, not posting projects of my own because I thought you would hate what I did.
I didn’t put the time or effort into those projects that I should have, for a million reasons. I accepted guest postings that I shouldn’t have, not because I didn’t want to, but because I over committed myself and that wasn’t responsible.
Brave Girls Camp is about discovering truth. The nice part (and scary part) about truth is that it’s there no matter what you do. I came to terms with a lot of things, good and bad, about my work.
I accepted the fact that I can’t do everything and that I owe people some apologies for the poor job I have done in the past. So to those people who I have let down, I’m sorry.
On the positive side I became more appreciative of you, the readers of this blog. I have the most amazing blog community in the world (in my humble opinion), and you are the nicest, most amazing people I’ve ever met. Thank you.
So how did I make this collage pear? Gather these supplies:
- 16″ x 20″ canvas
- Fabric bits – all that you can find in coordinating colors
- Mod Podge Gloss
- FolkArt Acrylic colors – Brilliant Blue, Cobalt, Wicker White, Citrus Green, Lime Green
- Flat paint brushes – two
- Begin by layering your fabric pieces on top of your canvas with the Mod Podge. This is so fun and SO messy – I love it! Layer, layer, layer until every exposed part of the canvas is covered. Coat the entire canvas with Mod Podge and allow to dry.
- Paint your pear shape (or the shape of your choice) with the Brilliant Blue. This is so loosey-goosey. I just eyeballed it, because it didn’t matter that it was exact. Fill in the pear shape (it will take a couple of coats) and allow to dry.
- Paint the shape of the stem with Lime Green. Fill in and allow to dry.
- Go back with your Cobalt and Wicker White and add some accents to the pear. I actually used the Cobalt first and then used the Cobalt mixed with some Wicker White to create the main highlight. Play around. You can always go back over it until you are happy – trust me, I did! Allow to dry.
- Accent the stem with Citrus Green. Allow to dry.
- Allow the canvas to dry for 24 hours before hanging.
Let me tell you, after this first one I was ready to do a series! I love mixing fabric, Mod Podge and paint. It’s one of life’s little pleasures.
If you enjoyed this DIY canvas idea, let me know in the comments!


This is so beautiful! I love pears and my favorite color is blue – so this is just perfect!!! Great job!
It’s absolutely beautiful. 🙂 I’m so glad you enjoyed your time at camp. It sounds like it was a positive experience all the way around!
Great post! Beautiful pear, and thank you for giving a little peek at your process and creative angst. I could echo so many of those feelings. (Not with my baby blog, YET, but definitely in other areas of my life.) I hope you keep posting more of your own art, come on, we want to see! Love the effect of the blue paint over the fabric scraps – when I first saw it I thought it was a collage with blue denim!
Good for you for making something you enjoy! My husband is also an artist, and he recently had to learn not to say “yes” to everyone’s requests (free ones, of course!).
That is beautiful! No not just saying that either … it really is! How brave and wonderful of you to share YOUR work … keep it coming! I love the idea of fabric, paint and MP.
Nice post Amy…I love your blue pear project…
It’s lovely! Brave Girl’s camp sounds like something I want to do. I’m always making stuff for everyone else and never for myself. I’m glad you were able to go and do it for you.
I just wanted to say that I love your blog. I just recently found it and I’m just discovering the wonderful magic of Mod Podge.I’m working on a Spider man comic book chair and school desk for my son. It’s turning out so good!
I also wanted to say that I love your projects and I also like when you post about other’s projects too. I don’t think I would ever be able to find them without this site. You are doing a great job!
You are Amy-zing…I have never thought anything less and you should not either 🙂
I am saving for Brave Girls Camp..it’s definitely on my short list! xo
Hey, I love this so much! I am going to try it out. I’ll send you a picture of the final result.
You are the only person who loves Mod Podge as much as I do!
Very cool! Love that even I could do this project.
Love the colors, and the mix of different mediums. I agree, you should definitely post your own work more often!
I really love your blue pear collage! It was a lot prettier in person!!!
I have shared a few of my truth cards and a little bit about camp on my blog. I really want to do a post of the more internal process at BGC but also have had a hard time putting it in words.
All of your artwork was beautiful at BGC and you should do more. If I remember right, your fave color is purple. How about doing a plum (my fave fruit) next time. Then I’d love to see a green apple!!!
Blessings,
Christine
oh, just GORGEOUS. loving the cobalt, and so different for a pear! this definitely answers my question about using the Podge to stick fabric to canvas and such! thanks for the fabby inspiration!
Oh MY!! I love the Pear!! It is great!! The colors seem so bright and vibrant too!! Great work!!
I absolutely love that! Those colors are fabulous!
I love this project! It is beautiful! And I also think it is beautiful for you to share your personal thoughts and feelings with us! Sounds like you have taken an emotional journey here lately! (Hugs!)
This is such beautiful… you should post more of your beautiful work.. 😉 We do love it.. and you do such gorgeous projects! 🙂 I think you are a little hard on yourself. And i can relate to so many things said here.. I can only say this… you are note alone! 🙂 Hugs xx
I look forward to your post….it’s the first thing I look at…..because you have never fail me with creativity….just remember “you can please some of the people most of the time but not everyone all the time”….so glad you have let go and become free……I love coming here everyday!!!!!!!!!thank you so much for that…..
And I LOVE this…..I have so many little scraps that I believe I could make something like this….
LOVE your pear! What a great way to make use of old fabric scraps, I can’t wait to try this out!!
Hi Amy! I love the pear!
I am not a crafty person at all, but I saw a cool luminary at a gift shop when I was on vacation, now I realize this is the process they must have used to make it!
Very cool!
Bernice
https://bernicewood.wordpress.com/2010/08/10/crisis-prevention-101/
LOve it an d want to be a brave girl camper someday too!
SO cool!
Very cute idea! I’m a new follower from Just Something I Whipped Up.
Charity
http://humboldtcherry.blogspot.com/
Hi Amy! It’s beautiful! Thanks for linking to the DIY Project Parade! I needed a reminder to get over here and catch up on all of your amazing projects! 😉 Glad to see you’re as creative as usual!
Take care!
Roeshel
Wow, that turned out beautiful – I love it!
I love it — so simple, and yet so pretty. I feel a new project coming on!
very cool 🙂 come on over and link up to MMM!!
very adorable! It reminds me of a hydrangea painting I saw this weekend in the gift shop at the beach. She used torn magazine pages: https://www.prettyhandygirl.com/painted-cottage-tour-of-my-favoriteBrittany http://www.prettyhandygirl.com
Love this! The colors, the texture, the mod podge, the fabric! Oh what ideas you’ve given me now, thank you.
You had me at Pear!
Don’t forget to link to me. 🙂
Ooh that brilliant blue is gorgeous! Brave Girls Camp sounds like it was such a great experience. =) Thanks for the project, I’ll be linking.
Beautiful colors! Beautiful concept! I’ve bookmarked this and would really like to give it a try!
Thanks so much for sharing and the tutorial!
Love it Amy! So glad you got to go to camp and dropped by to share a project, great to see you on Craft Schooling sunday! xoxoxo Sara
Love love love! You ROCK! : )I featured you here:https://mommylikewhoa.com/