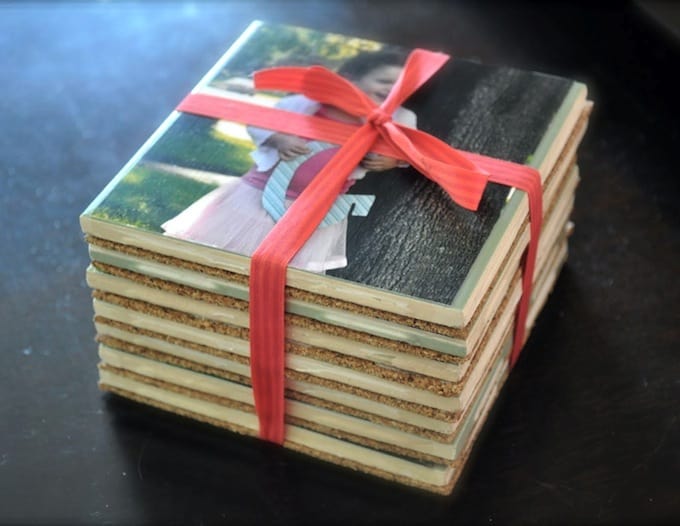
Create a unique DIY photo album using recycled cereal boxes and Mod Podge! Easy, eco-friendly, and perfect for storing cherished memories.
Skills Required: None. You’ll be cutting, applying Mod Podge to paper, and cutting and applying Duck Tape. This is perfect for someone who has never crafted before (and even children).

Do you have a stack of empty cereal boxes and a need for a new craft idea? You’re in the right place! Today, we’re tackling a fun and eco-friendly project: making a DIY photo album out of recycled cereal boxes.
Not only will you have a blast making it, but you’ll also end up with a unique album perfect for storing your favorite memories, notes, and more.
What will you need for this adventure? Just gather some empty cereal or cracker boxes, Mod Podge (of course!), scrapbook paper, Duck tape, a craft knife, and a few other basic supplies.

Trust me, you’ll be amazed at how these simple materials come together to create something so delightful. Whether you’re looking to make a gratitude journal, a goal-setting book, or a memory album to pass among friends, this project you covered.
The beauty of this project is in its simplicity and versatility. You can keep it straightforward as I’ve shown, or get fancy with rounded corners and cute button closures. It’s all about making something that reflects your style and creativity.
So, grab those cereal boxes, gather your supplies, and let’s get crafting! Scroll down for the step-by-step tutorial and discover how easy and fun it is to create your own DIY photo album.

Let’s turn those everyday items into something extraordinary and make some beautiful memories along the way! To put in our albums, of course. Here’s what you’re going to need.
Gather These Supplies
- Cereal boxes or cracker boxes
- Mod Podge
- Scrapbook paper, cardstock, paper bags, or other thicker paper
- Duct tape
- Craft knife
- Mat
- Scissors
- Paintbrush
- Brayer (optional)
Tips and Thoughts for This Project
It doesn’t matter which Mod Podge formula you use for this project – it won’t be seen. Gloss, Matte, or Satin is fine.
You’ll want to use thicker paper to cover your cereal box pages. If you use thinner papers, you may be able to see the design of the packaging through them when the glue is applied. Cardstock works great for this.
Note: You can also paint over the box design in white and let dry.
Get the printable how to card below!

DIY Photo Album
Materials
- Cereal boxes or cracker boxes
- Mod Podge
- Scrapbook paper cardstock, paper bags, or other thicker paper
- Duck tape
Instructions
- Gather the boxes and unfold them completely flat on your work surface. You will need multiple boxes with 6 inches by 8 inches panels to create the pages.

- Cut your boxes and scrapbook paper. For this project, six 6 inches by 8 inches panels were used for an album with ten pages inside (plus a front and back cover).

- From the scrapbook paper, cut out 12 pieces that measure 6 inches by 8 inches each. These will go on the front and back of your box panels.
- Apply a thin to medium layer of Mod Podge to one of the panels.

- Smooth the paper down on top. Optionally, you can use a brayer to smooth and really get the air bubbles out.

- Repeat the previous step with the front and back of all of the panels. You should end up with 12 complete panels measuring 6 inches by 8 inches that are covered on the front and back with scrapbook paper.
- Tear off a piece of duct tape to edge the album pages. Typically, a piece of duct tape is 2 inches wide. Place on your work surface and cut the piece in half. Use these 1-inch pieces to fold over both short edges and one long edge of all pages.

- Pick a contrasting color of duct tape to bind the pages together. Tear off a piece, place on your work surface, and cut in half (1-inch pieces). Place two pages next to each other and attach with duct tape to secure. Repeat with all the pages.

- Add a piece around the outside to act as your final binding.
Did you enjoy this craft idea? Let me know in the comments what you thought, or if you have questions! I’d also love for you to visit these other ideas: