
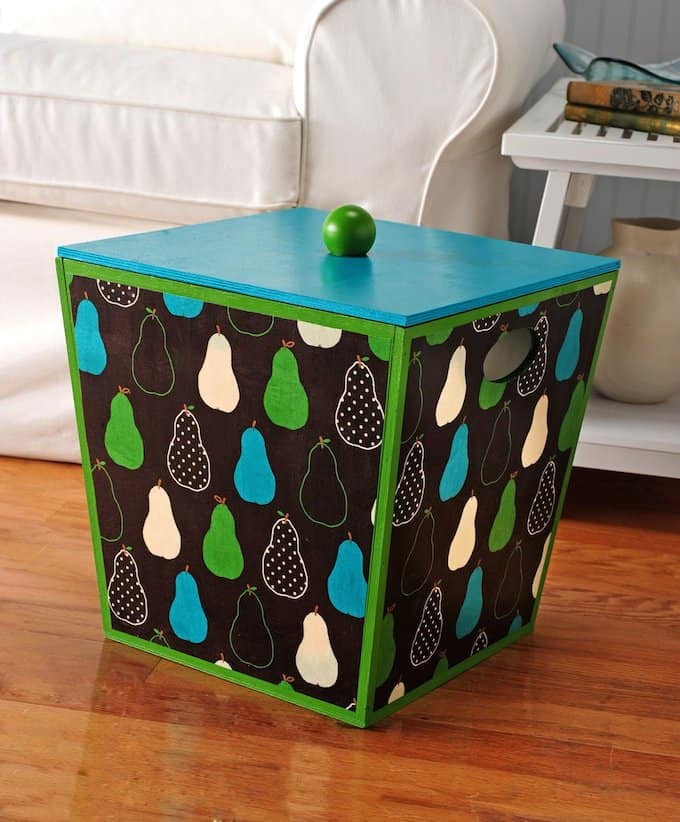
I wanted a unique storage solution for my yarn, so I made this fabric covered box with a fun pear print and Mod Podge! It’s easy to do.
Hello, my name is Amy. (Hello Amy.) I’m writing this because I have a yarn addiction. You see, one of my other loves besides decoupage is knitting.
Unfortunately my knitting ability is not quite as quick as my spending money ability, so I’ve built up quite a stash. With nothing very special to hold it.
After several years of juggling everything around in canvas totes, I finally have plastic bins in the closet. Still though, some yarn for current projects must be left out, in the open, but yet still stored in something.
Enter this pear fabric covered box. I provide to you below the instructions, and I hope you consider it for any craft thing that you have an addiction to, and that you need to store.
Fabric Covered Box
Gather These Supplies
- FolkArt Acrylic Paint – Grass Green, Teal (I’d get 3 of each)
- Mod Podge Fabric and Mod Podge Gloss
- Wood Storage Box
- 3” Wooden Ball
- Robert Kaufman “Fruit Basket” Fabric, Pear Brown – 1 yard
- 1” Flat Paint Brush
- Craft Glue
- Craft Knife and Mat
- Pencil
- Ruler
- Scissors
- Wax paper
- Acrylic sealer (optional)
You will first want to prepare the fabric before painting. To do this, wash and dry the fabric (do not use fabric softener). Iron and then lay out on a covered work surface. Wax paper is preferable for covering your table.
Using a brush, paint a light coat of Fabric Mod Podge onto your fabric. Allow to dry. This will allow you to cut the fabric like paper without frayed edges.
While the fabric is drying, begin painting. Basecoat the inside of the bin and the lid with Teal. Allow to dry.
Basecoat the outside of the bin and the wooden ball with Grass Green. Allow to dry.
You are now going to cut the fabric. Lay the bin down on top of the fabric and trace one side four times. Cut these pieces out using the scissors.
Measure approximately ½” inside your cut line on all four pieces and trim them down using the craft knife.
Adhere these four pieces to the sides using the Gloss Mod Podge. Completely smooth out all air bubbles and allow to dry for 15 – 20 minutes.
Coat the entire bin with at least two coats of Gloss Mod Podge. Coat the lid and the wooden ball as well. Allow to dry.
Go back to the handles on the storage bin and trim the fabric out with a craft knife.
Glue the wooden ball to the center top of the lid with the craft glue.
Allow the storage bin to dry for at least 24 hours before using. I recommend spraying with several coats of acrylic sealer to completely finish your fabric covered box and add durability.
If you enjoyed this fabric project I hope you’ll check out these other ideas with Mod Podge!


Can you use the mod podge and fabric to cover a foot stool
Love it especially the fabric!!!
Hi Amy! I’ve put together a round up of great ways to organize your craft supplies on Craft Gossip today and included your post. 🙂 You can see it here
https://homeandgarden.craftgossip.com/6-ways-to-get-your-crafts-organized/
this is so nice! I really like that pattern… Thanks for sharing.
This is adorable! I love the fabric you chose! 🙂 M*