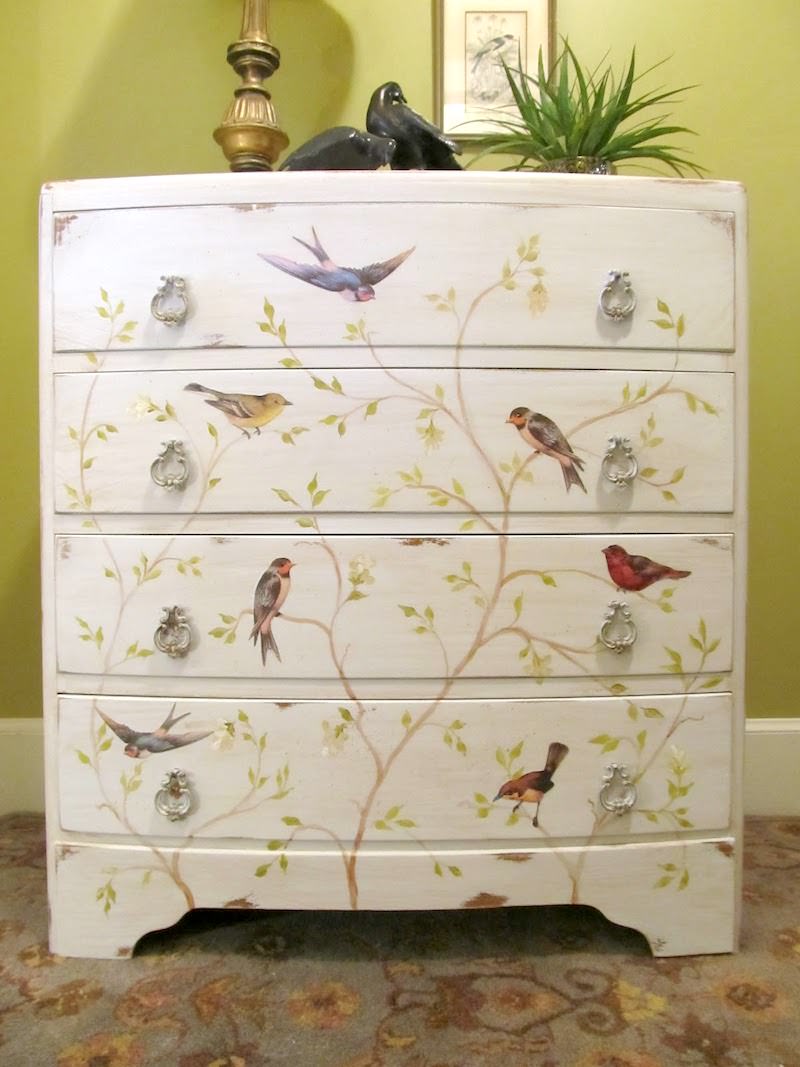
This decoupage chest of drawers uses vintage themed bird graphics along with some paint to make a show stopping piece of furniture!
Skills Required: Beginner. You won’t be decoupaging entire drawer fronts; you’ll be painting and then adding cutouts with Mod Podge. It’s perfect for someone who hasn’t re-done furniture before.

I’ve featured a few dresser re-dos on here (I think about 100), because if I had a bigger house or even a place to sell them, I would re-do dressers all the time. I love making old, cruddy furniture look good. There’s nothing like taking a shoddy piece and turning it into beautiful home decor.
I spotted this decoupage chest of drawers project on Cottage Hill, and I was impressed with Lindy’s dresser transformation. She used vintage bird themed images from Graphics Fairy and her own painting “skillz” to make this chest as pretty as it is.
Which honestly surprised me because at first glance I thought the entire thing was hand painted. I bet you did too! That’s how pretty and unique it is.
One thing I love about this project is that it is way more forgiving that you would think. Because of the distressing as well as the loose nature of the hand painting, it’s easily achievable.
You’re definitely going to want laserjet printed images for your chest of drawers so that the ink doesn’t bleed. Lindy got the cutouts printed on thicker paper, and that’s adds a cool bit of texture to the piece.
If you want to duplicate this look, see the process here, or get the how-to below.
Decoupage Chest of Drawers
Equipment
- Paintbrush(es) large and detail
- Sander
Materials
- Wood dresser
- Mod Podge
- Minwax polycrylic
- Spray primer
- Laserjet printed image(s) any design
- Multisurface craft paint brown, green
- Sandpaper
- Tack cloth
Instructions
- Begin by prepping the dresser. Remove the hardware, sand smooth, and remove all dust with the tack cloth.
- Paint the dresser with the Kilz, completely covering all parts including the front of the drawers. Let dry.
- While the dresser is drying, print and cut out your designs for the front of your drawers. Set aside.
- Once the dresser is dry, sand off areas at the edges of the dresser using sandpaper. Distress as much as desired.
- Use a detail brush and your acrylic paint colors to add details to the front of the dresser – I used branches and leaves. Let dry.
- Apply the cutouts to the front of the dresser with Mod Podge. Apply Mod Podge to the dresser, smooth down the paper cutout, and let dry 15 -20 minutes.
- Once dry, apply a top coat of Mod Podge over the top of each paper cutout. Let dry.
- Seal the entire dresser with a coat of Minwax polycrylic. Let dry and repeat.
- Let the dresser completely dry overnight and the replace the hardware.
Notes
Do you want to see some other decoupage furniture projects? Then you can make a decoupage chest of drawers of your very own! Check these out:
- Bird wallpaper dresser
- Lining dresser drawers (after your dresser is done!)


This is gorgeous, I have one of those old crappy dressers and a couple beds that are on the must do list but here no garage or place to try it until summer.
Happy Thanksgiving early!
Love this Amy. A wardrobe was one of my very first decoupage projects. I am some waiting for my touch right now. As soon as I get all the Christmas things done. Blessings to you.
QMM
I so often see these poor pathetic pieces of furniture in our thrift store travels. I always think that I could never make it look like anything other than a pathetic craft project gone wrong. Lindy’s go me thinking that maybe I could actually turn out something that I would be proud to call my own.
Wow this dresser is very lovely and beautiful.