Learn how to create stunning marbled rocks with acrylic paint and Mod Podge! This easy DIY project is perfect for adding a colorful, artistic touch to your home or garden.
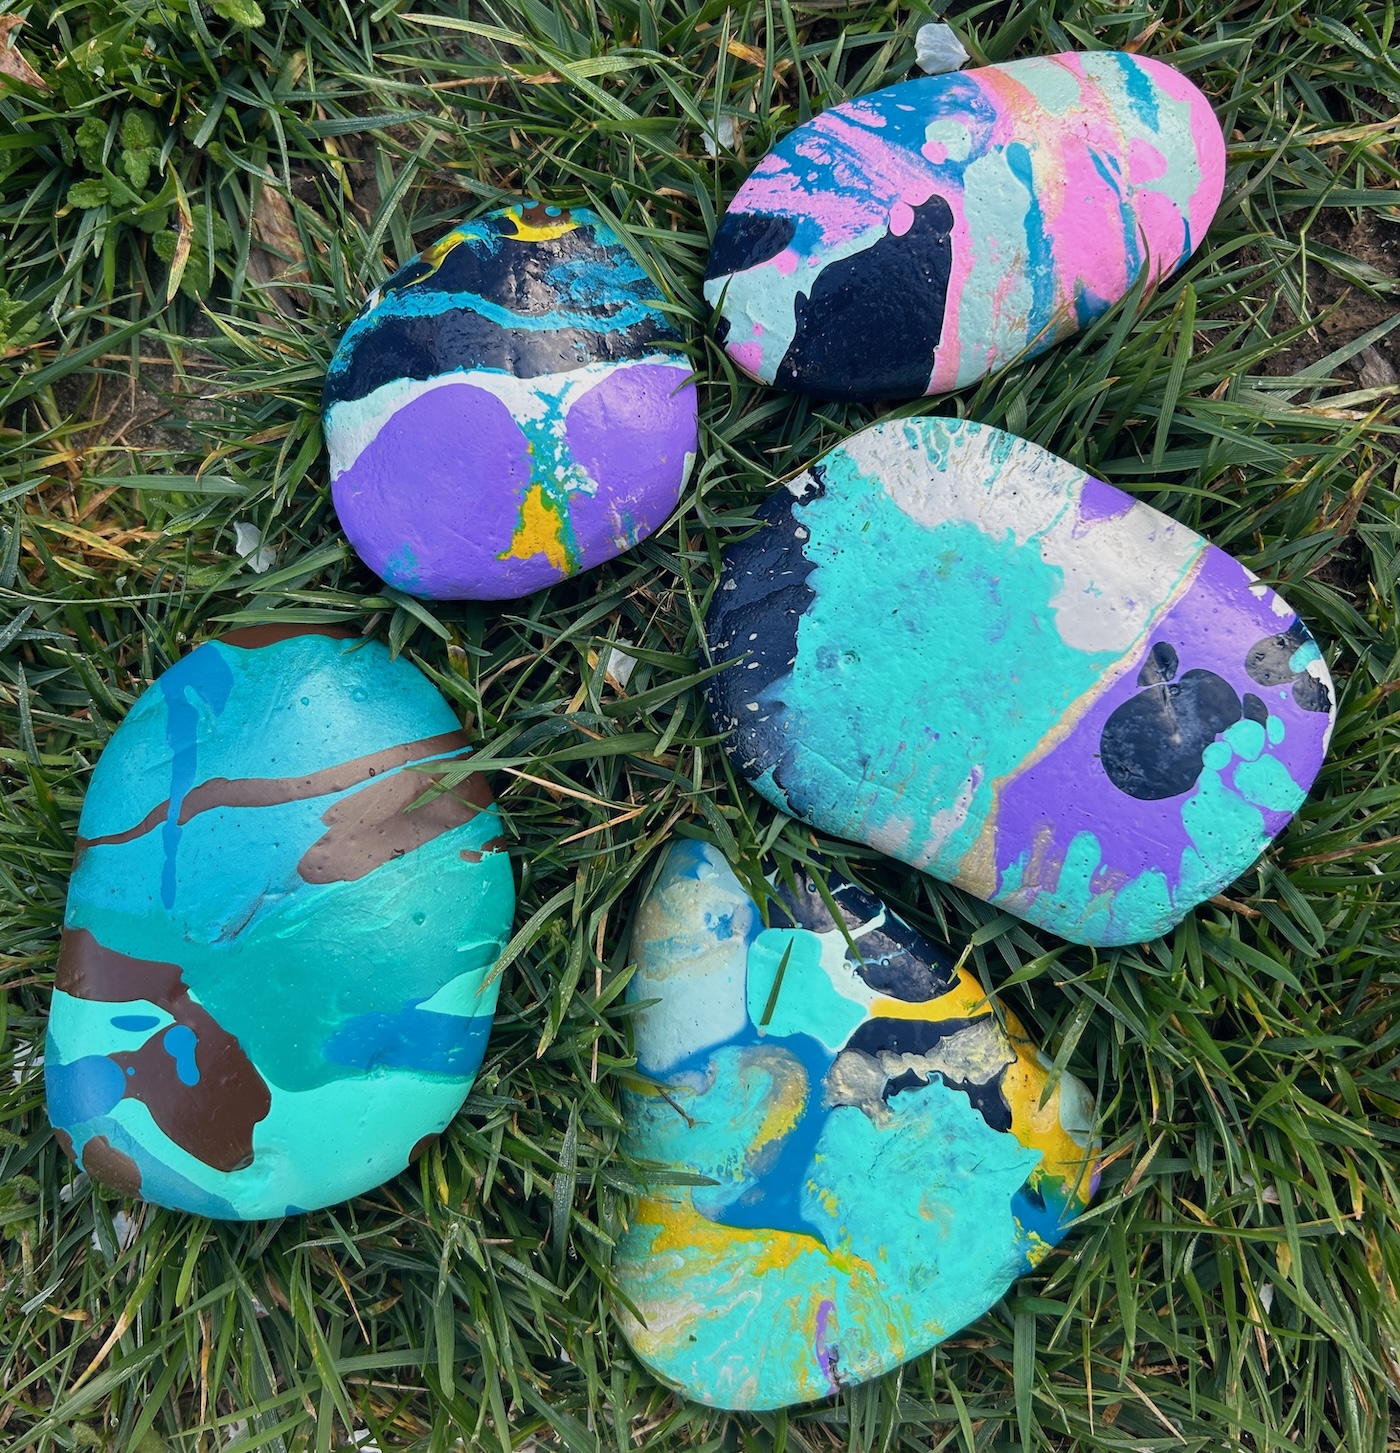
I’ve been into rock painting for quite awhile . . . it’s soothing. If you’re looking for a craft that keeps you mindful and puts you into a good headspace – grab some rocks from the yard and a few bottles of paint.
I promise you, it will change your life.
Recently I noticed that marbling painting techniques were getting more popular, and I thought to myself first, “I wonder if I can do this with Mod Podge.” You know, instead of the pouring medium that is typically used.
I decided that I would try it. And instead of using a wood surface (which I typically use to test everything), I would use rocks.
My thought process was that if it didn’t work, I would just throw the rocks in the yard. They would at least be colorful.
It turns out that these marbled rocks were a lot easier to make than you might think! Marbling always looks impressive but is surprisingly easy to do. And the Mod Podge WORKS as a pouring medium!!!

If you love experimenting with color and texture, you’re going to have a blast marbling rocks with acrylic paint and Mod Podge.
Whether you use them for home decor, garden accents, or even as paperweights, these rocks are going to stand out. Grab your favorite paint colors, and let’s get started on this fun and creative DIY!
To get started, you’re going to need rocks. Look for larger, smooth rocks that have a pourable type surface. You’ll see how the shapes of the rocks influence the results as you do this project.
Whether you live in the city or in the country, you should be able to find rocks (though ask before taking).

In addition to the rocks, you’re going to need the following:
- Mod Podge
- Acrylic paint (any colors) – you can use multisurface paint and they will last a long time outside
- Small containers for mixing (one per color)
- Paintbrushes
- Dish soap
- Paper towels
- Wire rack or BBQ skewers and tin dishes
You’re probably wondering what the wire rack/BBQ skewers are for. You need a rack to dry the rocks, and it needs grates. A regular wire rack works well, but you can also poke BBQ skewers into tin bread dishes from the grocery store to make your own rack.

Get the full, printable tutorial below:
Marble Painted Rocks
Equipment
- Wire rack optional
- BBQ skewers optional
- Tin dishes optional
Materials
- Mod Podge Gloss
- Rocks several, large
- Acrylic paint any colors
- Small containers for mixing one per color
- Dish soap
- Paper towels
Instructions
- Before beginning, wash your rocks with warm water and dish soap to remove the dirt. Let dry on paper towels.
- Use a wire rack or create your own pouring rack. Do this by inserting BBQ skewers lengthwise across an inexpensive baking pan from the grocery store. The BBQ skewers have a point on one end, and you can push them through the tin easily. Do this approximately ¾ inch to 1 inch across the top. Lay your rocks flat on the skewers.

- Place your small mixing containers out on your work surface. In each container, place about 2 tablespoons of decoupage medium, a little bit of water, and a squirt of paint. You want about 1 to 1.5 tablespoons of paint in each container with the decoupage medium and water.

- Shake or mix the container of decoupage medium, water, and paint until fully blended. Do this with each of the colors you would like to use.

- Start by choosing a color and carefully pouring it onto the rock. You don’t want to cover the entire rock because you are going to use other colors. Just pour it on one area and let it flow off the sides.

- Repeat this same process above with another color, letting it flow into the color you used before.

- Continue adding colors in various areas on the top of the rock, until the entire thing is covered. You can add drips and drops of color here and there at the end.

- Finish off the rock by painting the bottom (optional, if desired). Repeat with additional rocks. Let dry completely.
Notes
Have you tried marbling rocks before? Let me know in the comments!





Thank you for sharing this project!
This looks like it will be fun to try! There was a frustrating part of the instructions though…. I can’t be the only one that did not know that “mod podge” is a “decoupage medium”.
You have “mod podge gloss” listed as the first item in the list of materials needed… But you never mention it again through the entire set of instructions. You did mention decoupage medium multiple times and it wasn’t on the list of materials. I re read everything like 5 times then groaned and googled “decoupage medium” and the first picture was mod podge. Not sure why you didn’t just continue to call it mod podge instead of creating such confusion