
Mod Podge a DIY jewelry box using Joel Dewberry fabrics and Mod Podge. I chose bright fabrics and paints to make a statement with this wood craft idea!
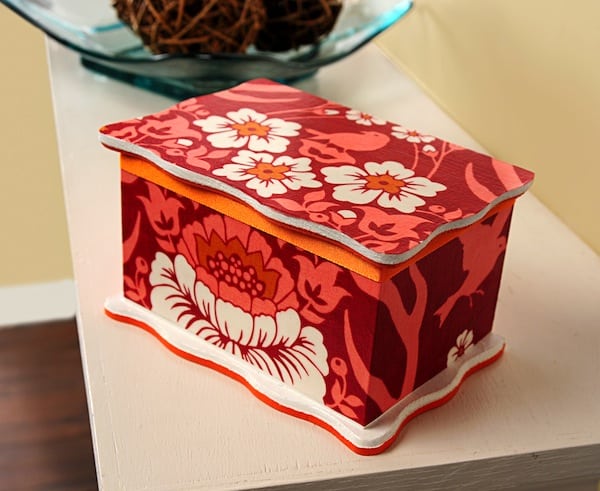
If you aren’t acquainted with Joel Dewberry fabrics, let me introduce you through this decoupage project. “Fabric?” I can hear you ask – why yes. . . this DIY jewelry box is covered in Joel’s Deer Valley Antler fabric in Peony.
How did I do it? Mod Podge, of course! What I love about fabric crafts is that, unlike paper, you can decoupage with BIG pieces that are very flexible around corners and sides. I was able to wrap the fabric around the entire box (seam in the back).
Can’t do that with scrapbook paper unless you want huge creases or to cut separate pieces for each side. Here are the DIY jewelry box instructions, and I thoroughly encourage you to try a fabric Mod Podge project! It’s a lot easier than you think.
DIY Jewelry Box
Gather These Supplies
- FolkArt Acrylic Paint – Bright Baby Pink (optional), Glazed Carrots, Wicker White
- Mod Podge Fabric and Mod Podge Gloss
- Small Wood Trinket Box
- Joel Dewberry “Deer Valley Antler” Fabric, Peony – 1/2 yard
- 1/2″ Orange Ribbon – enough to fit around your box
- 1” Flat paintbrush
- Craft Glue
- Craft Knife
- Pencil
- Ruler
- Scissors
- Wax paper
- Acrylic Sealer (optional)
You will first want to prepare the fabric before painting. To do this, wash and dry the fabric (do not use fabric softener). Iron and then lay out on a covered work surface. Wax paper is preferable for covering your table. Using a brush, paint a light coat of Fabric Mod Podge onto your fabric. Allow to dry. This will allow you to cut the fabric like paper without frayed edges.
Time to cut out your fabric pieces. Lay the lid top down onto the fabric and trace. Cut out using the scissors. Measure the rest of the box from top to bottom and side to side with the ruler. Add up the inches and cut one strip to completely go around the middle of the box – remember to leave 1/2″ extra for your seam in the back. Set aside.
Time to paint. I basecoated the inside with Bright Baby Pink, but if you only want to buy a few colors, just use Glazed Carrots. Allow to dry.
Basecoat the lid and the outside of the box with Wicker White. Allow to dry.
Around the bottom rim, paint Glazed Carrots as an accent. You can do this with the 1” brush, but you may also want to go smaller. Your choice. Allow to dry.
This is my favorite part! Adhere the lid and main body fabric using the Gloss Mod Podge. Completely smooth out all air bubbles and allow to dry for 15 – 20 minutes.
Coat the entire box (inside and out) with at least two coats of Gloss Mod Podge. Allow to dry.
Go back to the lid and trim any excess fabric around the edge with a craft knife.
Cut the ribbon and glue around the top with the craft glue. I cut out spaces to fit the hinges in the back.
Allow the trinket box to dry for at least 24 hours before using. I recommend spraying with several coats of acrylic sealer to completely finish your project and add durability.
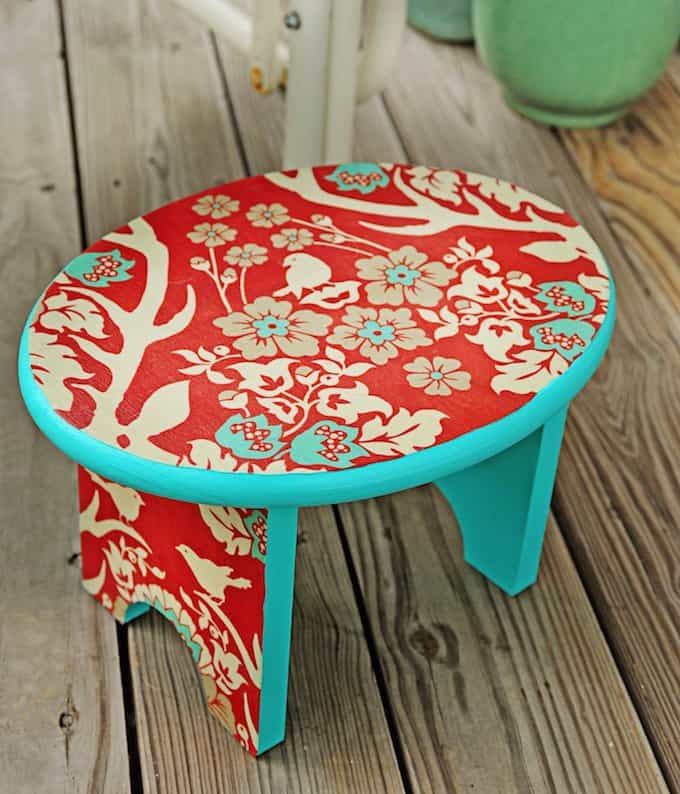
Do you like this jewelry organizer? You might also like this step stool makeover . . . which I did with the same fabric in a different colorway:


So bummed I cannot find that fabric in the same color! Anyone have any alternative to finding it??
I’d just keep your eyes on Etsy or eBay! I see some that are similar but not the same color. This is from over ten years ago :/
Oh that is delicious! I love everything about it!
I am a HUGE Joel Dewberry fan. This box it so cute. i featured it over at my blog tonight.
This is so cute! It came out great! I am visiting from Tatertots and Jello and I would LOVE if you could link up your awesome post to my very first crafty linky party! This is the first week of Delicately Constructed Fridays and I would really appreciate the link!
Hope you have a great weekend!
Michelle
http://www.delicateconstruction.blogspot.com
So CUTE!
Karas BACK! Come see me and LINK UP!
xoxokara
*ENTER LINKY PAR-TAY Here! *
xoxokara
love that fabric! what a fantastic idea. thanks for sharing.
kathryn
http://www.thedragonsfairytail.blogspot.com
LOVE this, have to head over & check out that fabric. And then I guess I’d better break out my mod podge, the sparkle is my favorite and I think it would look great on a little box for my daughter’s room! Found you over at Today’s Creative 🙂 Stop by when you get a chance http://juliechats.blogspot.com, I have a fun kids’ frame craft using the sparkle mod podge!
I’ve been breaking out my Mod podge lately! I have a project posted today you might like. Also, my linky party is up if you want to add something. Have a great day!
Thanks for the easy to follow steps! I’ll have to try using fabric for my next project!