Pallet Picture Frame
Learn how to make an 11" x 14" pallet picture frame and then add an image on top with photo transfer medium.
Yield: 1 frame
Cost: $5
Equipment
- Circular saw
- Miter saw
- Nail gun
- Tape measure
Materials
- Laserjet printed image(s)
- Mod Podge photo transfer medium
- Stain
- Rags
- Wood glue
- Sanding block optional
Instructions
- Find a pallet and use a circular saw to cut off planks in the size of your choice.
- Use a miter saw to cut your pallet wood planks to a 14” length. Cut back support pieces to a 10” length.
- Place the pallet wood planks next to each other. Use wood glue to attach the back support pieces. Use clamps or heavy books to secure and let dry.
- Use a nail gun to secure the back support pieces further.
- Proceed to stain your pallet wood picture frame using the stain colors of your choice and rags. Let dry.
- Print out laserjet images on regular printer paper sized to fit your frame.
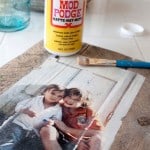
- Using a paintbrush, apply just enough photo transfer medium to completely cover your image, until you can no longer see it.
- Apply the photo, medium side down, to the frame. Press gently from the center out to remove any air bubbles. Let sit 24 hours to dry.
- It's time to remove the paper. Place a damp towel or sponge over the paper and let it sit for two minutes.
- Gently rub the paper away from your image, being careful not to press too hard and remove part of the image.
- Rub in a circular motion until all of the paper has been removed. Discard the paper. Repeat until all paper is removed.
- Use a sanding block to distress the edges of the photo transfer, where it meets the frame.
- If desired, seal the entire frame with regular Mod Podge. Let dry before displaying.