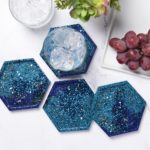
Glitter DIY Resin Coasters
These glitter coasters are the best beginner version because sparkle hides imperfections beautifully while still looking dramatic and colorful.And honestly? Glitter inside resin just looks cool.
Yield: 4 coasters
Cost: $12
Equipment
- Measuring cups
- Stir sticks
- Gloves and other protective equipment
- Heat gun or torch
Materials
- Epoxy resin
- Glitter in several colors
- Clear bumper feet
Video
Instructions
- Protect your workspace and prepare the coaster mold (this is for a single).
- Mix 2 oz of resin according to package instructions using the proper ratio of resin and hardener. Divide the epoxy resin evenly into disposable plastic cups.
- In one cup, add a pinch of a blue glitter, in the second, add a pinch of a different blue glitter, in the third, a pinch of another blue glitter. Stir each cup slowly until glitter is combined.
- Pour each resin mixture into the mold slowly, in a swirling motion, only pouring a little of each color at a time. Layer the colors and use a craft stick to gently swirl the colors together. Let set for two minutes.
- Use a straw, heat gun, or torch to carefully remove bubbles from the surface. Alternatively, you can exhale on the epoxy resin or blow through a straw. Leave for five more minutes, see if any additional bubbles appear, and repeat.
- Let the project cure for 24 hours before removing from the silicone mold. They will be fully cured in 7 days. At this time you can add clear bumper feet to them if you like.
Notes
Each mold takes about 2 oz. of resin. Keep that in mind depending on how many molds you have and how many coasters you would like to produce.
If you have four molds or a mold with four compartments, you can mix all 8 oz. of resin. If you only have one mold, you can use a UV dryer to speed up drying or do the project over four days.