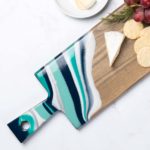
Resin Cutting Board
Learn how to make a resin cutting board with epoxy casting resin and acrylic paint! Makes a perfect gift idea.
Yield: 1 board
Cost: $25
Equipment
- Respirator
- Gloves
- Cups
- Pastry torch
Materials
- Wood cutting board
- Epoxy resin
- Alcohol ink silver
- Acrylic paint aqua, navy, white
- Painter's tape
Video
Instructions
- Begin by measuring out equal amounts of resin and hardener. Use a separate measuring cup for each part. Once equal amounts of both parts are measured, pour them into a mixing cup.
- Gently stir the two parts together for 3 minutes. When you start to stir, cloudy swirls will appear. Make sure to scrape the sides and bottom of the mixing cup to fully incorporate the two parts.
- Continue to mix until the cloudy swirls no longer appear and the mixture is clear..
- Divide the resin into four individual small cups. Mix the resin with paint in three of the cups, and silver ink in the fourth cup. Just add a few drops of paint and ink.
- Tape off the bottom of the cutting board along the edges or raise the board.
- Pour each color in the order shown. Continue to add stripes of various colors with the resin until you've covered the area desired.
- Use a pastry torch to remove any bubbles. Wait about five minutes and repeat.
- Allow 24 hours to harden.
