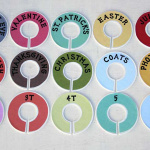
DIY Closet Dividers
Learn how to make custom closet dividers with a little bit of scrapbook paper and Mod Podge! These are so easy and will keep you organized. Great for kids' closets.
Yield: 20 dividers
Cost: $10
Equipment
- Copy machine
Materials
- Plastic closet dividers
- Mod Podge Hard Coat
- Cardboard
- Scrapbook paper
- Stickers
Video
Instructions
- Create a template by making a photocopy of one of the dividers. You can glue the photocopy to a piece of cardboard before cutting it out to make your template sturdier.
- Using the template and a pencil, trace onto scrapbook paper. You'll do this twice for each divider. Cut out.
- Apply Mod Podge to one side of the divider and to the back of the paper. Position the paper down and smooth with your fingers to remove any air bubbles. Apply a top-coat and allow to dry.
- Once dry, apply letter and number stickers to the divider for labeling. Apply a small amount of Mod Podge over the letters to secure them.
Notes
Tip: Try your hand a painting the letters and numbers instead of using stickers. Seal the paint with a small amount of Mod Podge.