Decorative Switch Plate Covers
Learn how to decorate light switch plates using Mod Podge and fabric! This project is easy, even for a beginner - and what a cute addition to your home decor.
Yield: 2 light switch plates
Cost: $2
Equipment
- Sharp scissors
Materials
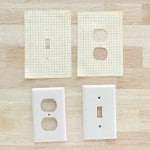
- Light plate & outlet covers
- Mod Podge Matte
- Fabric
- Water soluble pen
- Rubbing alcohol
- Wood clothespins optional
- Wax paper
Instructions
- Clean the light plate covers with rubbing alcohol and let dry.
- Trace the outlet and/or light switch cover onto the wrong side of your fabric.
- Cut out each tracing with an additional half inch of space between the outer edge of each tracing and the edge of your fabric piece. Also cut out tiny holes for the screws, switches and electrical outlets.
- Rinse off the pen lines in the sink and pat the fabric dry; don't wring it. The fabric should be as smooth and wrinkle free as possible. Leave the fabric damp for the next step.
- Paint a layer of Mod Podge on the covers. Line up the fabric cutouts, wrong side down, on the Podged light plate covers. Match the screw holes and smooth with your hands (or a brayer).
- Turn the covers over and add some Mod Podge along the edges of the back of each cover. Fold the edges over and let dry. Use clothespins if necessary to keep in place.
- Apply a generous layer of Mod Podge over the outside of the front of the plate cover and let dry. Repeat with another coat and let dry.
- Screw the plates back into place to finish.
Notes
Don't let the Mod Podge dry completely with the clothespins on because they'll be stuck to the plates. You can use a bit of wax paper if you want to leave them.