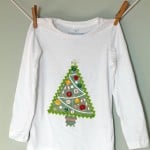
Christmas Shirt
Learn how to make kids Christmas shirts using photo transfer medium! Pick any design - this project can be customized for boys or for girls.
Yield: 1 shirt
Cost: $6
Equipment
- Sponge
- Towel
Materials
- T-shirt either old or new
- Mod Podge Photo Transfer Medium
- Graphic of your choice, printed on laserjet
- Wax paper
Instructions
- Print and cut your image to size.
- Generously apply a thick layer of Mod Podge Photo Transfer Medium to the FRONT of the image. Apply as much Mod Podge as it takes to make the image disappear.
- Place the image picture-side down onto the shirt. Gently but firmly secure it to the shirt by rubbing in small circles all over the paper. Make sure there are no wrinkles or bumps.
- Lay flat to dry for at least 24 hours.
- Grab a damp sponge or towel. Gently rub the paper off using the damp sponge using a small circular motion. You will then see the paper start to flake off and the image will start to show.
- Once all the paper has been removed, let the shirt hang dry (product cannot be washed for at least 72 hours and hang drying is always best). If you notice more paper that needs to be removed, repeat the step above.
- Add embellishments to the shirt with fabric glue. Alternatively, you can hand sew on the buttons and ric rac.
Notes
IMPORTANT: Make sure to print your image from a laser printer, not an ink jet printer. If you don't have one at home, print out your image and bring it to your local Staples or Kinkos to have them make a laserjet photocopy.