I love festive touches at holiday parties! David did just that with these Mod Podge DIY cake stands – they even come apart for storage!
Skills Required: Beginner. You’ll be Mod Podging on a flat surface, but you’ll also be painting and using a saw. It’s relatively simple if you have Mod Podge experience and have used basic tools.

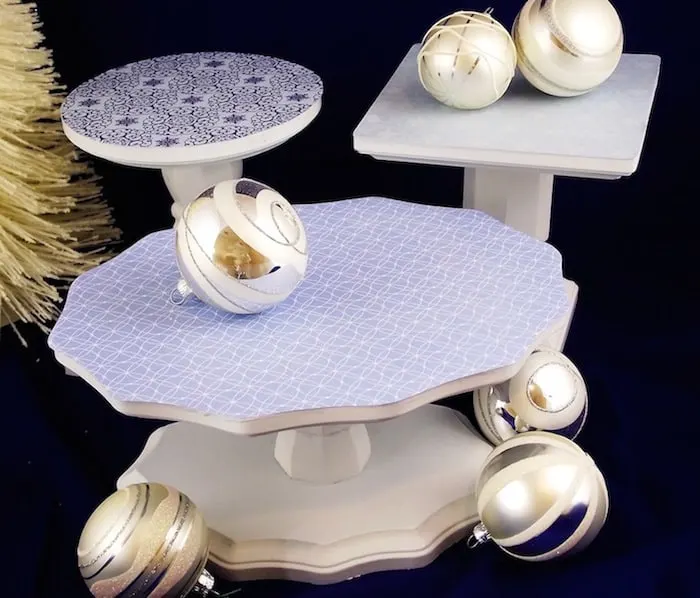
Man Podger David recently made these DIY cake stands for a holiday party, and I love them! There’s no reason why you can’t use these for any upcoming party – or even every day.
David also made a design that can be taken apart for storage, and even flipped over if you want a bit of a different look. Isn’t that cool? I will let David tell you how he made this wood Christmas craft.
Each year I throw a big holiday party. Well really it’s a dessert party, and I throw it so I can eat a lot of desserts. It’s quite festive! And each year I think, “some DIY cake stands would move this up a notch” – but in addition to the cost, I always think about storage.
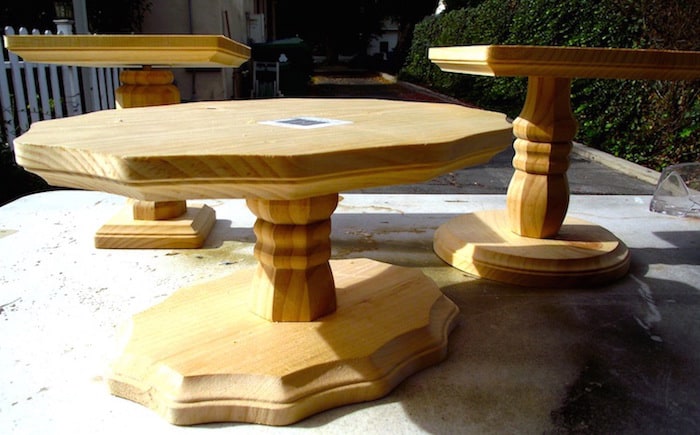
Cake stands are great when you’ve got a cake or two around to display, but a little awkward to put away. So I came up with a design that produces not one but three stands. It’s versatile, dirt cheap and, best of all; you can break it down to store it!

DIY Wood Cake Stands
Gather These Supplies
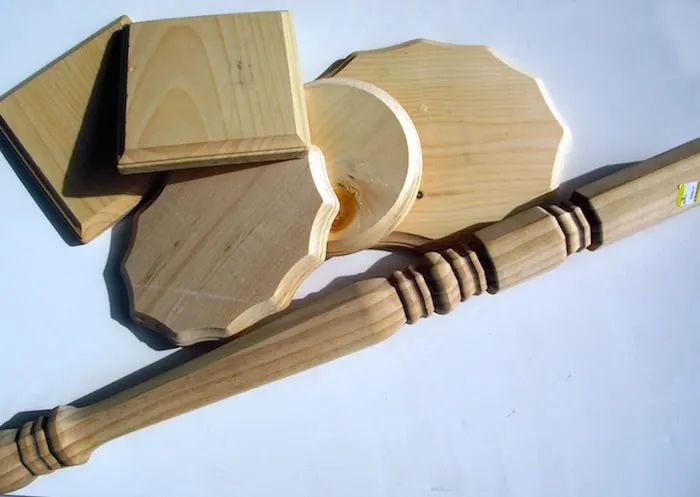
- One table leg (I got mine from True Value for $10)
- An assortment of wooden plaques from the craft store
- A dowel (not pictured)
- A drill or drill press
- A chop saw or handsaw
- Paint
- Scrapbook paper
- Mod Podge Matte
- Sealer
- Clamps
- Pencil
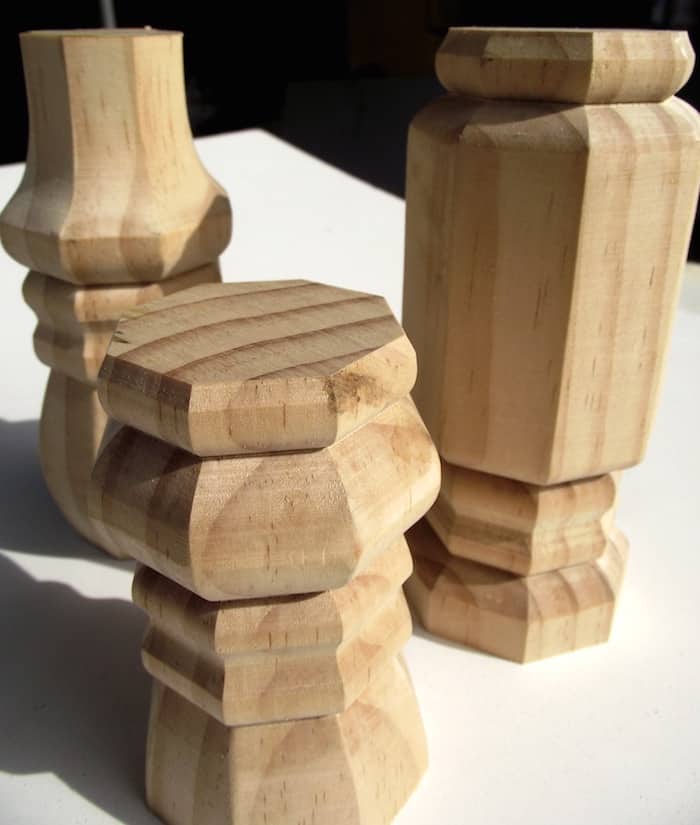
I chose my table leg based on all the curvy details, as I thought they would make interesting and varied stems for my DIY cake stands. It was easy to just cut the leg apart in three spots – I varied the length so my stands would be different heights.

Next I marked the center of each plaque and, using a drill bit that was the same size as my dowel, drilled a hole ½” deep.
Then I drilled corresponding holes in the center of the top and bottom of each of my stems – also ¾” deep. (I couldn’t take a picture and drill but you would need to clamp or hold the stem firmly on this step.)
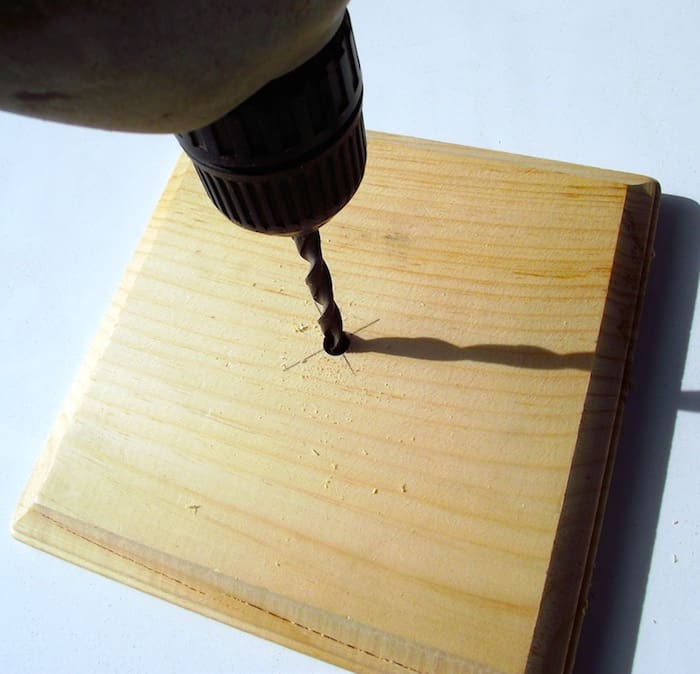

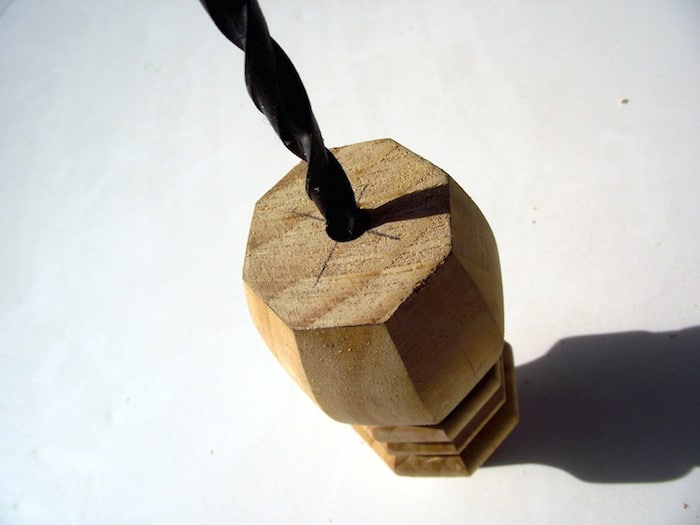

If you do this, you will want to make sure you drill your holes as straight as possible. If you’re using a drill, just put a piece of blue painter’s tape on the bit to mark the depth That way you know exactly how deep to go when making the hole.
Next I cut my dowel into 1 1/4” pieces. I popped the dowel pieces into the holes just to check to make sure everything was even and it looked pretty good (the one on the left needed a little more drilling).

After that I sanded thoroughly and primed with a latex spray primer (I think spray paint is easier to work with when you’re dealing with curvy details like the stems here). Then I top coated them in white and then sealed them with an acrylic satin sealer.
I let dry, then flipped them over and traced the top onto the back of my scrapbook paper cut it out and Mod Podged away. A couple of sealing coats of Mod Podge later and – there you go! Three DIY cake stands for about $20!
*Confession. I had purchased some cupcakes for this final shot. But the project got a little delayed and, well, I ate them. All of them. I’m not proud of it, but there you go.
And, since I didn’t glue the dowels in place I can take them apart to store them. If you aren’t as space-challenged as I am, you could just use screws where I used dowels.
Also, I realized as I was Mod Podging the tops that you could also Mod Podge the “bottoms” with some other paper and, therefore flip them over if you wanted a different color scheme. So it’s really six DIY cake stands. I’m in cake stand heaven!
If you enjoyed this tutorial, I’d love for you to check out these other posts:
Amanda
Saturday 22nd of December 2012
Way cool idea. I use cake stands for my craft fair booths, but it would be awesome to be able to take them apart and make them easier to transport.
Kat
Saturday 3rd of November 2012
Is it okay to set food on top of the mod podge? Or would you layer it with partchment paper first?
David
Saturday 3rd of November 2012
Hi Kat. Mod Podge is non-toxic however I think it would be best to use some parchment paper or something just to be on the safe side
Kat
Saturday 3rd of November 2012
Is it okay to set food on top of the mod podge? Or would you layer it with partchment paper first?
Cassie
Saturday 14th of January 2012
I love this idea! I am thinking of so many ideas I can't even handle it! Thank you!
Michele
Thursday 5th of January 2012
Absolutely love the idea of making them storable - utter genius!
But, I'm thinking if you tried to use both sides that you would run the risk of the bottom falling off if you picked up the plate.